Crochet Christmas Gift Bag – Free Drawstring Pattern
Make a reusable crochet Christmas gift bag with this free drawstring pattern featuring a sturdy base, festive stripes, cord closure, and optional holiday details.
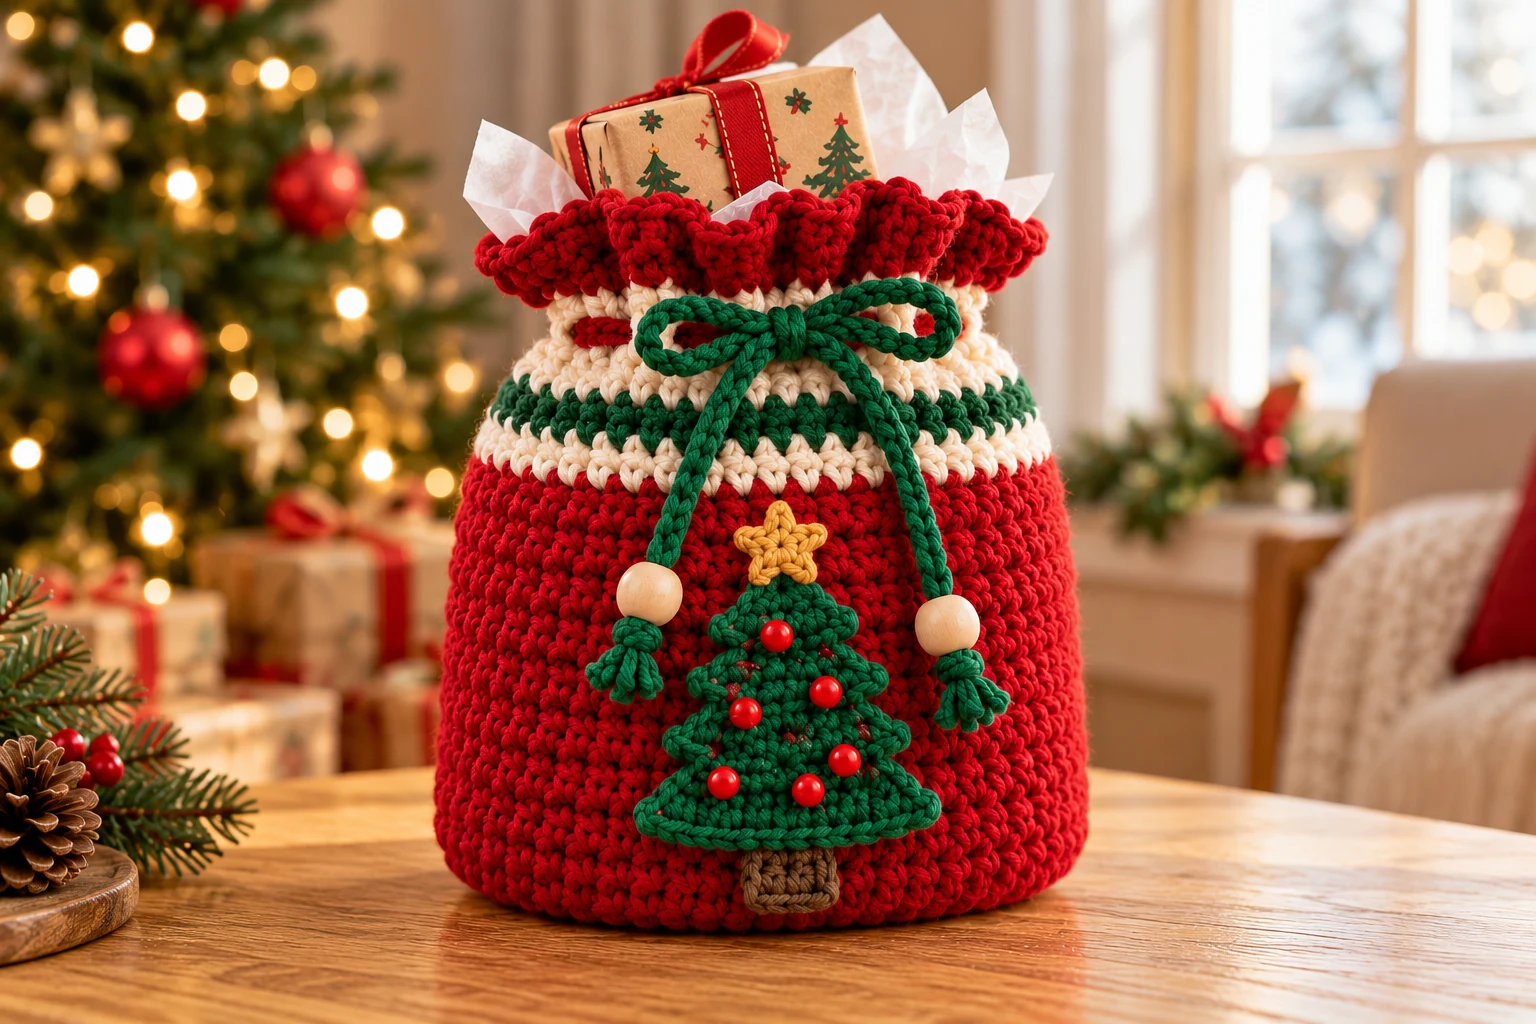
This crochet Christmas gift bag is worked from the bottom up, beginning with a flat round base and continuing into simple straight sides. A row of evenly spaced eyelets near the top creates the drawstring channel, while a crocheted cord closes the bag without requiring buttons, zippers, or extra hardware.
The standard version uses deep red as the main color with cream and forest-green stripes near the upper section. The same construction also works in solid colors, candy-cane stripes, winter neutrals, or traditional green and red.
The finished bag is useful for small books, candles, handmade accessories, skincare gifts, chocolates, ornaments, or several smaller items grouped together.
For more seasonal projects, browse our Christmas crochet patterns.
Because the bag is reusable, the recipient can also keep it for storage after the holiday season.
Pattern Details
Sizing note: The dimensions below are targets, not tested measurements. A reference gauge of about 15 sc and 15 rounds per 10 cm gives a 60-stitch circumference of about 40 cm and a flat width of 20 cm. Measure your base and body as you work; adjust the hook or round count to fit your gift.
Photo note: These generated images illustrate the construction stages and color placement. Use the written counts rather than counting stitches in the pictures. The photographed version uses cream eyelets, a red shell edge and the tiered tree variation below. The pattern has not been physically tested.
Skill level: Beginner to confident beginner Crochet terms: US terminology Construction: Bottom-up in continuous rounds Main stitches: Single crochet, half double crochet, chain Recommended yarn: Worsted weight / medium #4 Recommended hook: 4.5 mm Closure: Crochet drawstring Main color: Deep Christmas red Accent colors: Cream and forest green
This pattern is designed to create a fairly dense fabric.
If your stitches are very loose and the bag feels floppy, use a slightly smaller hook.
If the fabric feels stiff and difficult to work, move up half a hook size.
Finished Size
Using worsted-weight yarn and a 4.5 mm hook, the standard gift bag should measure approximately:
Height: 24–26 cm Width when laid flat: 18–20 cm Base diameter: approximately 12–14 cm
Exact measurements depend on yarn thickness and personal tension.
The standard size works best for small to medium gifts. Pair it with a crochet bow bag charm for an extra handmade detail.
If you already know what you want to place inside the bag, measure the gift before beginning and use the resizing section below.
Materials
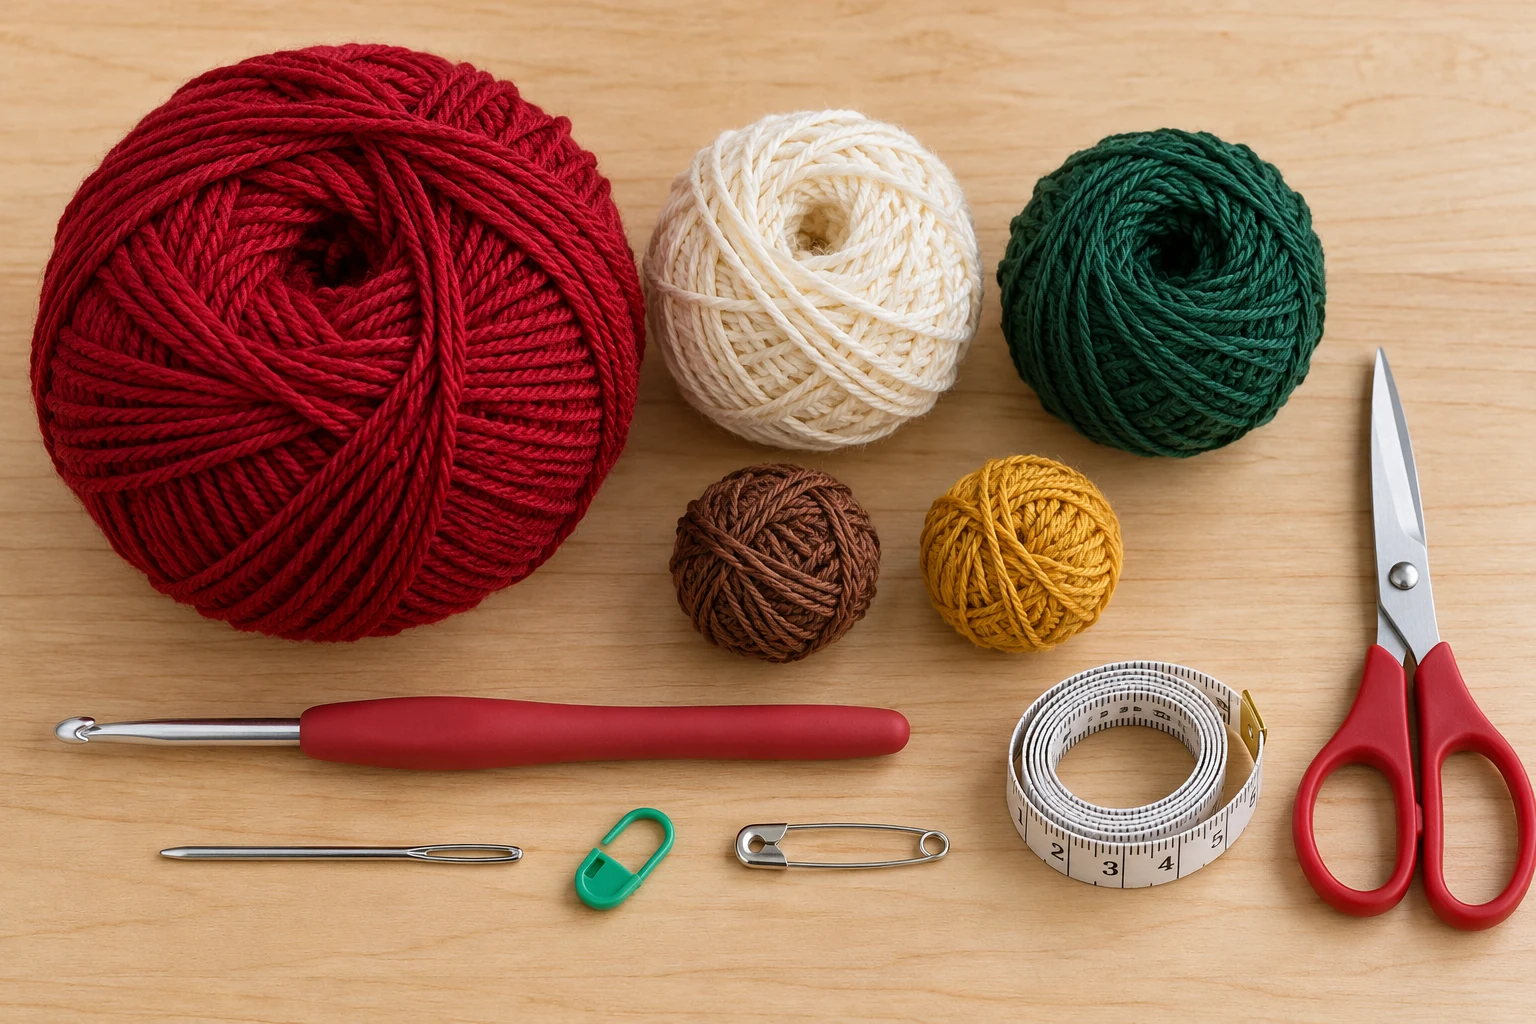
You will need:
- 90–120 g red worsted-weight yarn
- 20–30 g cream worsted-weight yarn
- 20–30 g forest-green worsted-weight yarn
- 4.5 mm crochet hook
- yarn needle
- scissors
- stitch marker
- measuring tape
- optional wooden bead for drawstring ends
- optional small amount of yellow or gold yarn for decoration
- optional brown yarn for the tree trunk
- safety pin for threading the cord
Cotton, cotton blends, and firm acrylic all work well.
A firm yarn creates a bag that stands more neatly.
Very soft yarn creates a looser pouch-style shape.
Christmas Color Palette
The basic construction can be used with many Christmas palettes.
| Style | Main Color | Accent 1 | Accent 2 |
|---|---|---|---|
| Classic Christmas | Red | Cream | Green |
| Candy Cane | Cream | Red | Red |
| Evergreen | Dark Green | Cream | Red |
| Rustic Holiday | Beige | Burgundy | Forest Green |
| Winter Neutral | Oatmeal | Cream | Taupe |
| Snowy Christmas | Cream | Sage | Red |
| Vintage Christmas | Brick Red | Mustard | Olive |
For a cleaner appearance, keep the lower two-thirds of the bag in one color and place the stripes only near the top.
Abbreviations
| Abbreviation | Meaning |
|---|---|
| MR | Magic ring |
| ch | Chain |
| sc | Single crochet |
| hdc | Half double crochet |
| dc | Double crochet |
| inc | Increase |
| sl st | Slip stitch |
| st / sts | Stitch / stitches |
| BLO | Back loop only |
| FO | Fasten off |
| rnd | Round |
Pattern Notes
Work the base and body in continuous rounds unless a section says otherwise.
Place a stitch marker in the first stitch of every round.
Move the marker upward as you work.
The base should remain flat. For another bag construction, see our granny square tote bag pattern.
Once the base reaches the required size, one BLO round creates a clear fold between the bottom and sides.
The bag body is worked without increases.
The eyelet round uses chains and skipped stitches to create openings for the drawstring.
Count the stitches every few rounds.
An accidental increase can slowly widen the bag, while a missed stitch can make the sides taper inward.
Crochet the Base
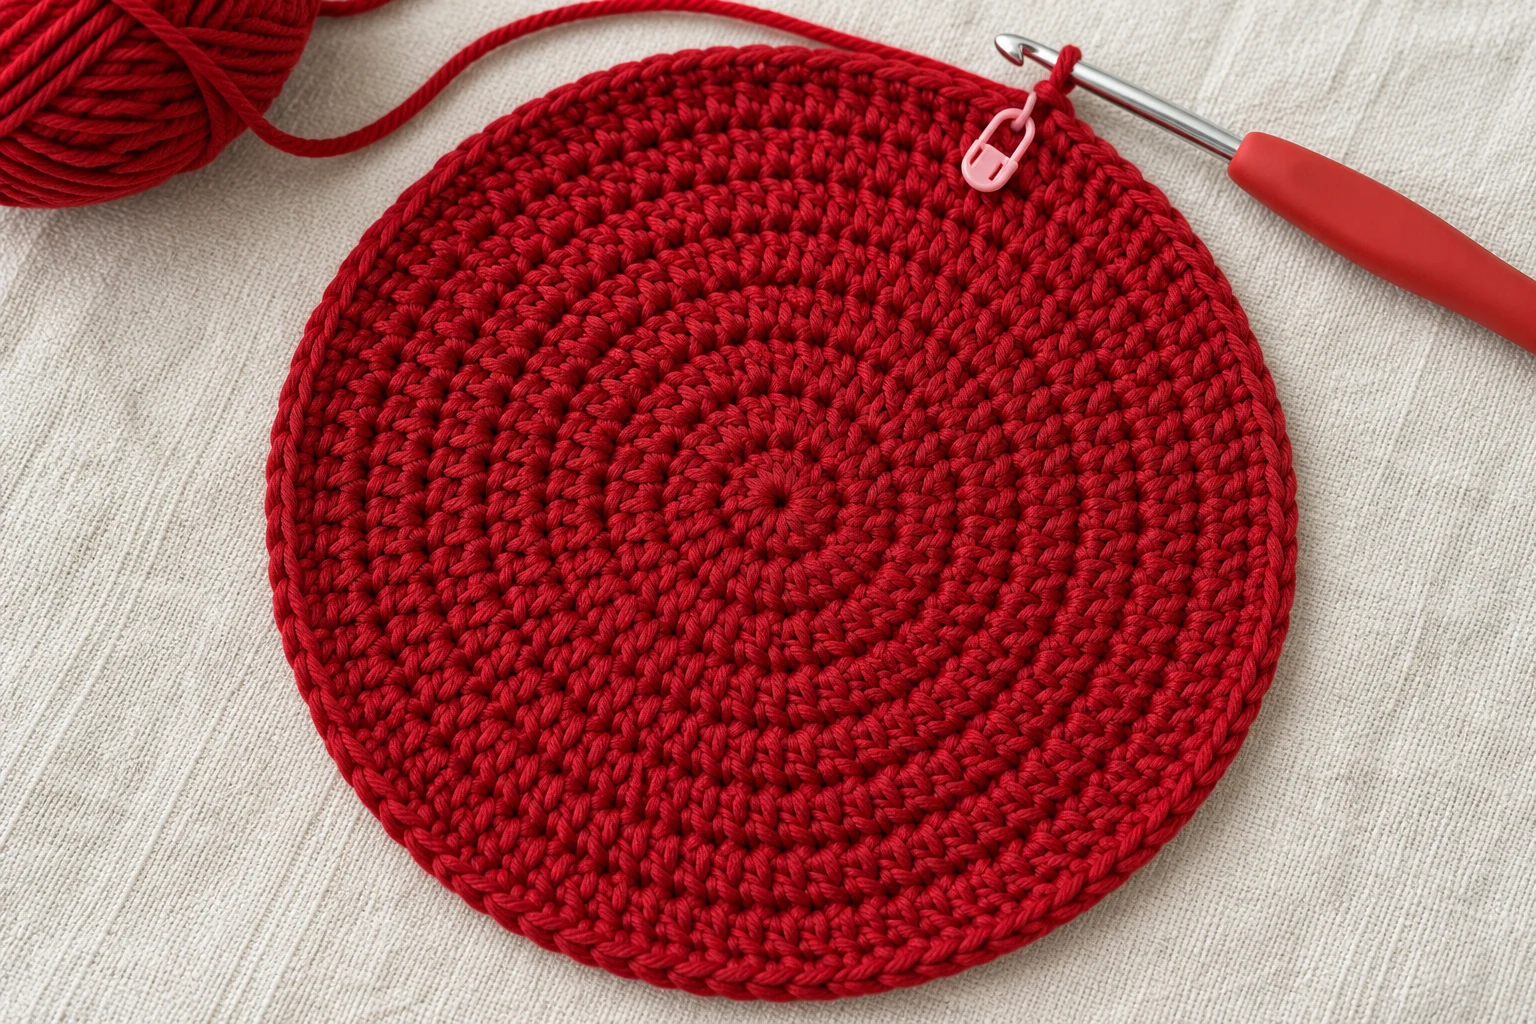
Use red yarn.
Round 1
6 sc in MR. (6)
Round 2
Inc in every stitch. (12)
Round 3
(1 sc, inc) repeat 6 times. (18)
Round 4
(2 sc, inc) repeat 6 times. (24)
Round 5
(3 sc, inc) repeat 6 times. (30)
Round 6
(4 sc, inc) repeat 6 times. (36)
Round 7
(5 sc, inc) repeat 6 times. (42)
Round 8
(6 sc, inc) repeat 6 times. (48)
Round 9
(7 sc, inc) repeat 6 times. (54)
Round 10
(8 sc, inc) repeat 6 times. (60)
Lay the circle flat.
It should form a smooth disk without strong ripples.
If your yarn produces a base that is already large enough after Round 9, you can stop there and work the body with 54 stitches.
Build the Bag Body
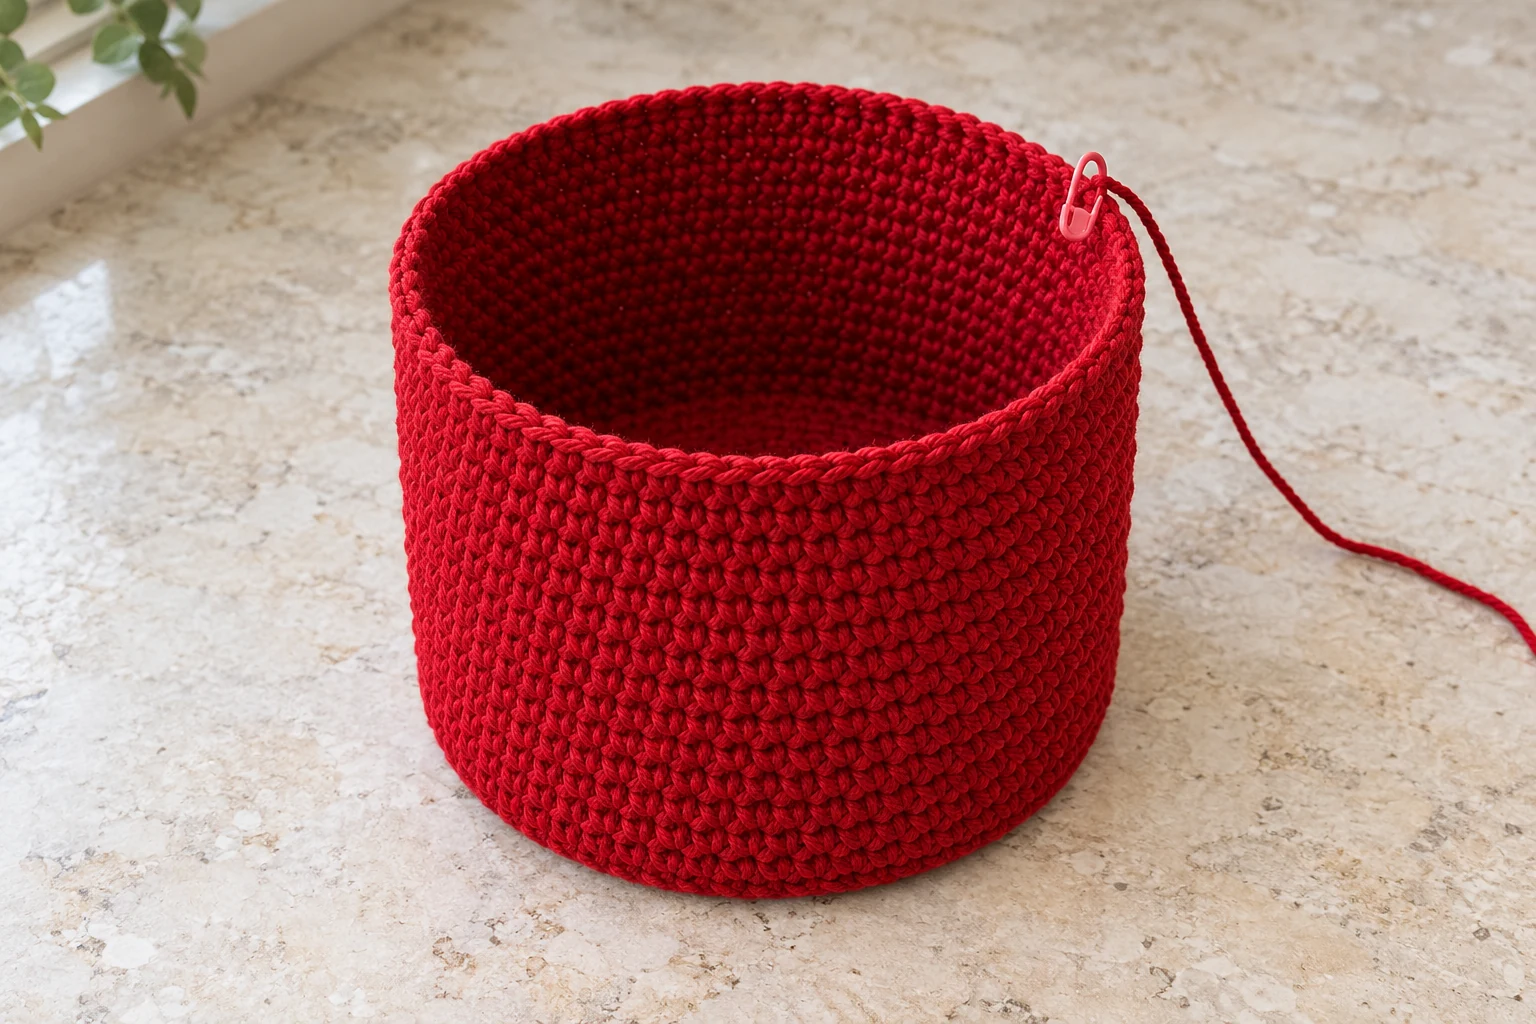
Round 11
BLO sc around. (60)
This round creates a subtle edge between the base and the side wall.
Rounds 12–25
Sc around. (60)
The bag should now resemble a simple open cylinder.
Check the height.
For a shorter gift bag, stop several rounds earlier.
For a taller bag, continue working additional plain rounds before adding the stripe section.
Add the Christmas Stripes
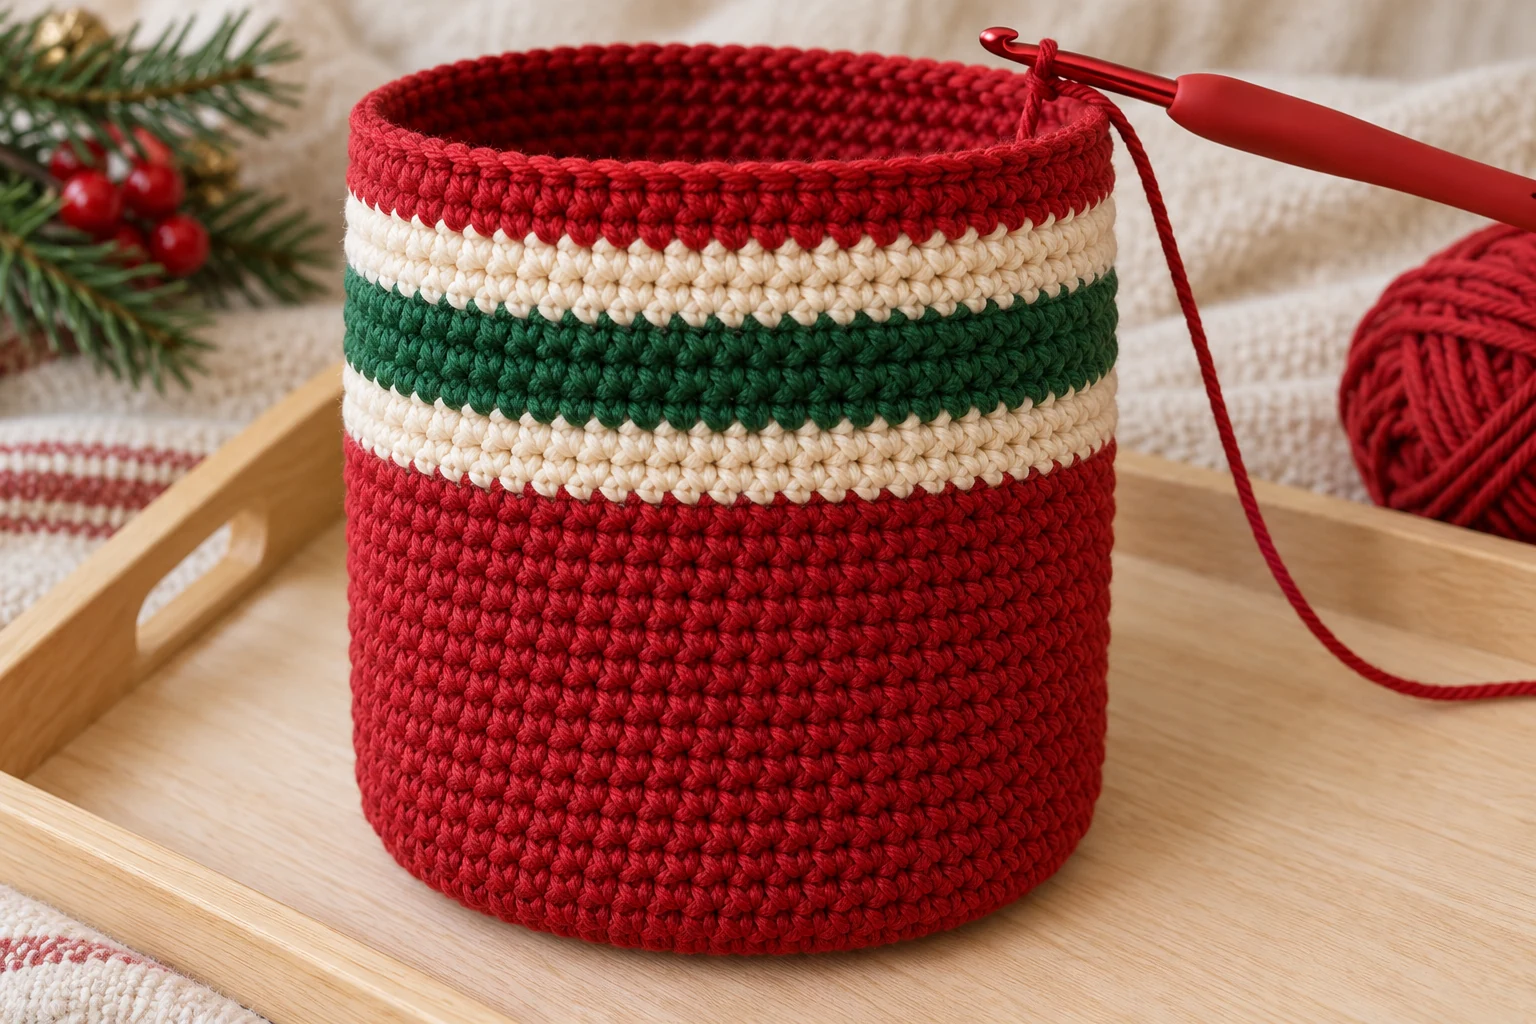
Change to cream yarn.
Rounds 26–27
Sc around. (60)
Change to green yarn.
Rounds 28–30
Sc around. (60)
Change back to cream.
Rounds 31–32
Sc around. (60)
Continue with cream for Rounds 33–36 so that the drawstring eyelets sit in the upper cream band.
Rounds 33–34
Sc around. (60)
This creates a simple festive stripe band without making the whole bag visually busy.
How to Change Colors Neatly
Work the final stitch of the old color until two loops remain on the hook.
Drop the old color.
Pull the new color through the final two loops.
Continue with the new yarn.
This places the new color directly at the top of the previous stitch and gives the transition a cleaner appearance.
Keep all color joins toward the back of the bag.
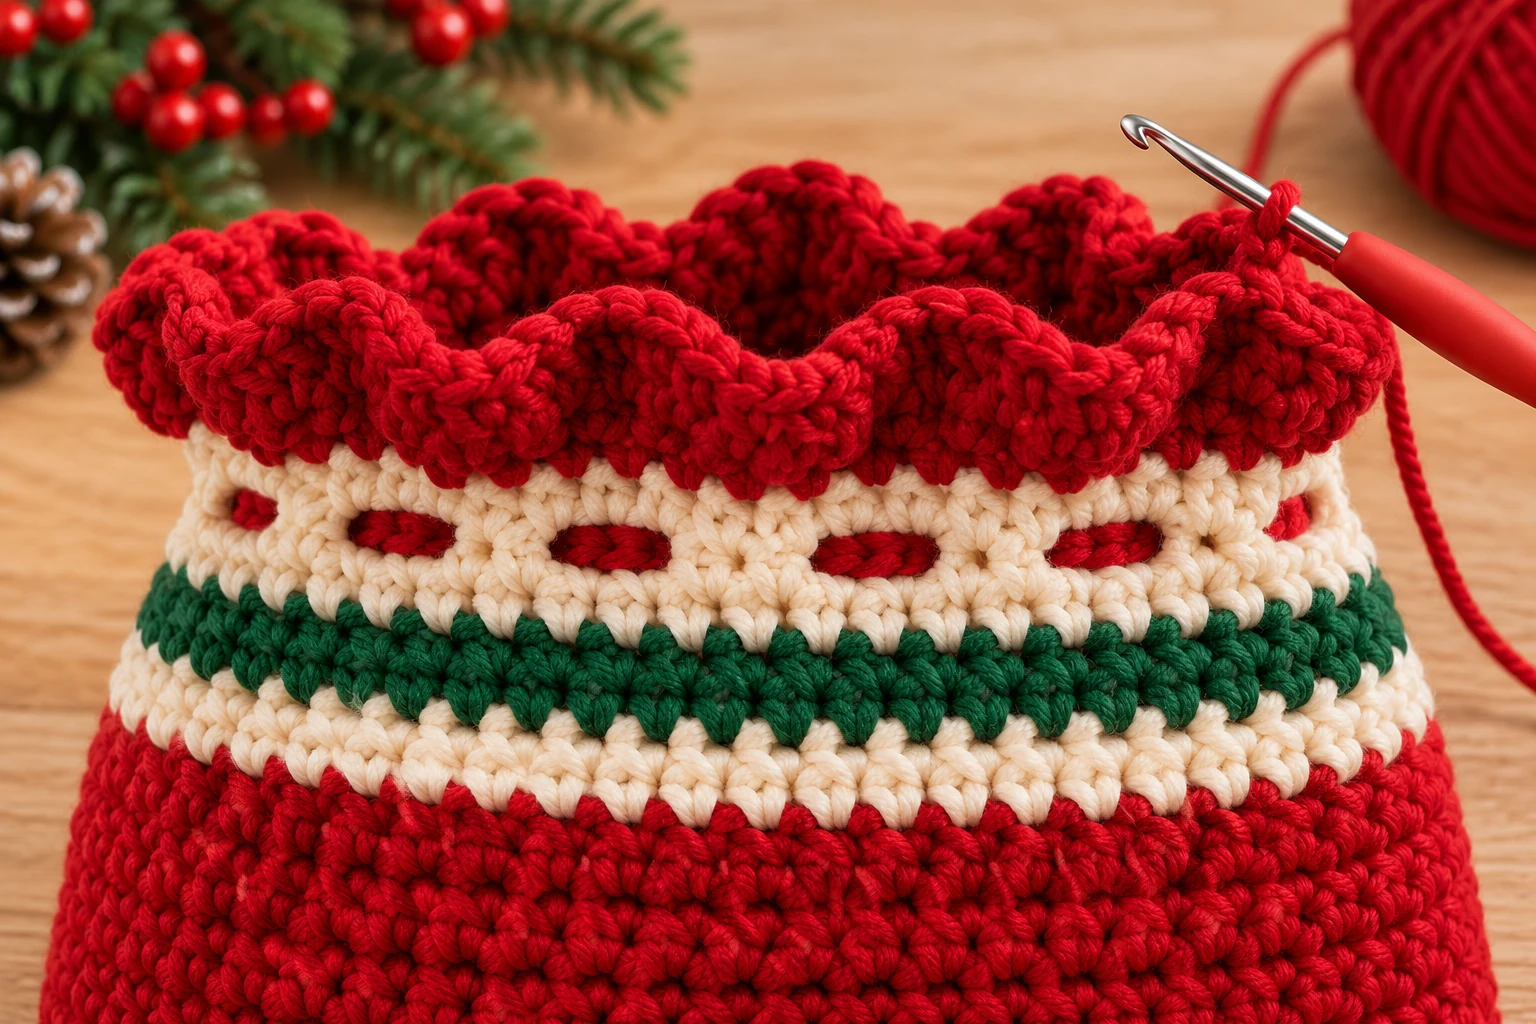
Optional Scalloped Edge
For a scalloped red edge, complete Round 36 in cream, then change to red. Work (sl st in next st, skip 1 st, 5 dc in next st, skip 1 st, sl st in next st, sc in next st) around. Each repeat uses 6 base stitches: 10 repeats at 60 stitches. Join to the first slip stitch and fasten off. This creates a shell edge; the degree of ruffling depends on yarn and tension.
Make the Drawstring Eyelets
Continue with cream yarn.
Round 35
Sc in next 3 sts, ch 1, skip 1 st.
Repeat 15 times: 45 sc and 15 ch-1 spaces (60 positions total).
For a 42- or 54-stitch bag, repeat (sc in next 2 sts, ch 1, skip 1 st) around: 14 or 18 eyelets respectively. For 72 stitches, the standard 4-stitch repeat makes 18 eyelets. With 66 stitches, use the 3-stitch repeat for 22 eyelets.
You should create a series of evenly spaced holes around the opening.
Do not make the chains too tight.
The holes need to be large enough for the finished drawstring to pass through comfortably.
Round 36
Sc in every sc and work 1 sc into each chain space.
(60)
Finish the Top Edge
Round 37
For a plain edge, change to red and hdc around. (60) For the photographed scalloped edge, use the alternative below instead of Rounds 37–38.
Round 38
Sl st loosely around.
Fasten off.
Weave in the yarn tail.
Do not work the final slip stitches tightly.
A tight edge can reduce the opening and make it difficult to place larger gifts inside.
Make the Drawstring
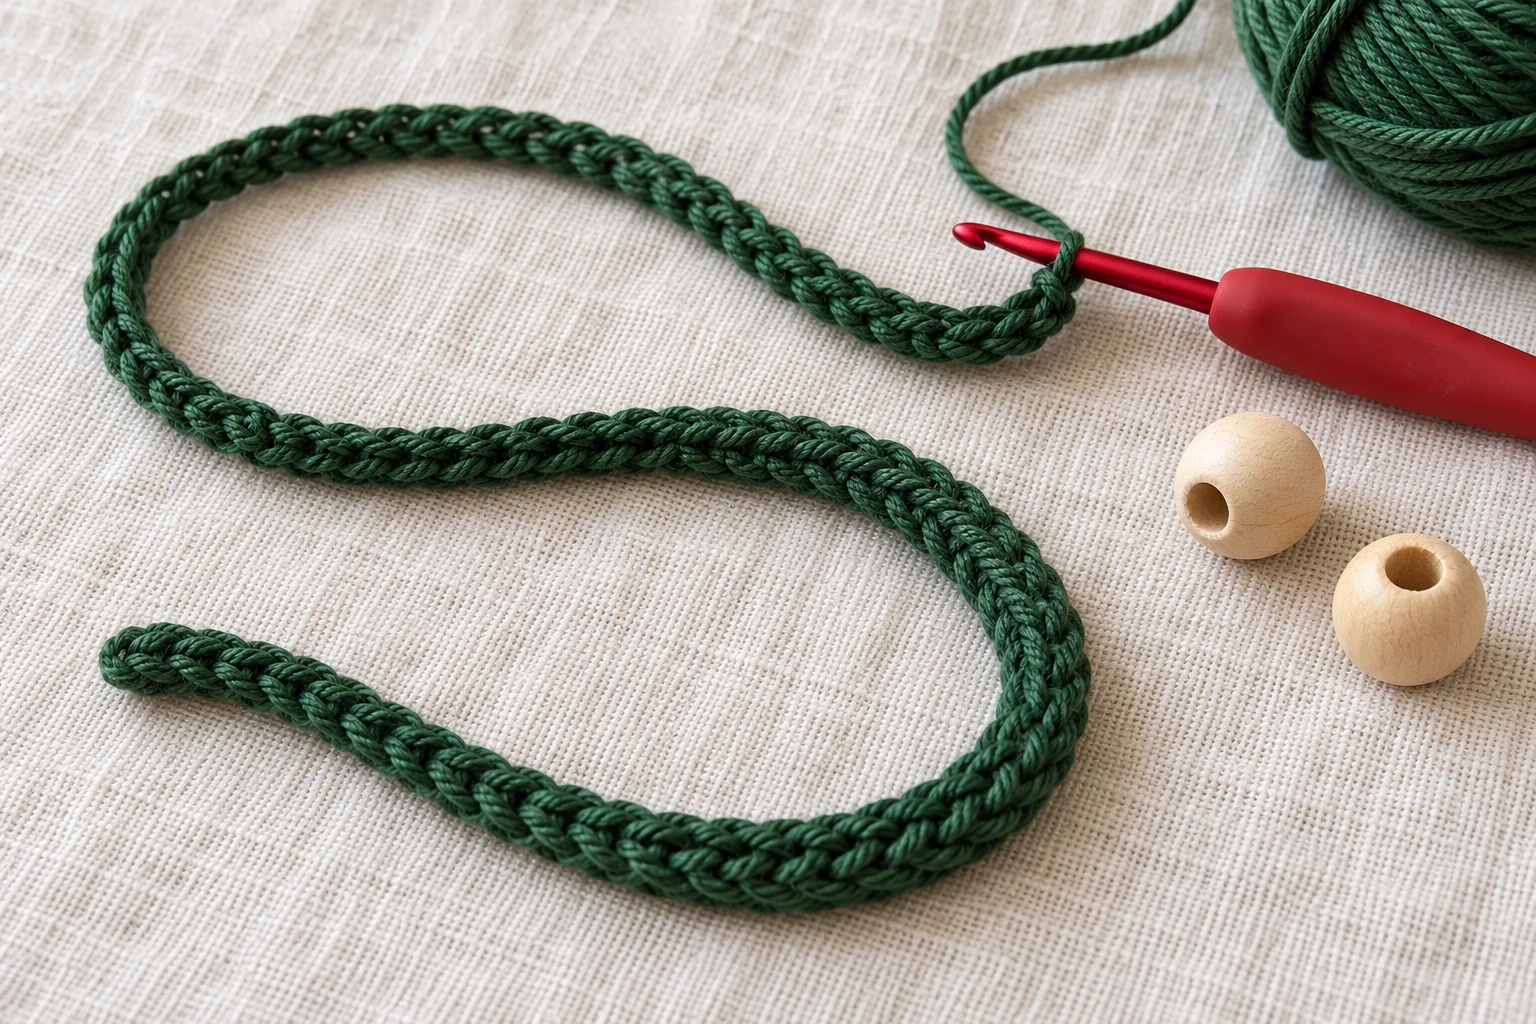
Use green yarn.
You can make a simple crochet chain or a thicker cord.
The thicker version is more durable.
Drawstring Cord
Chain a cord measuring the bag circumference plus 30–40 cm for tying; ch 90 is only a starting estimate. Measure the completed cord and extend it if necessary.
Starting in the second chain from the hook, sl st in each chain across.
Fasten off.
The finished cord should be long enough to pass through every eyelet with extra length remaining at both ends.
If your bag is larger, add more chains.
If your bag is smaller, reduce the starting chain.
Thread the Drawstring
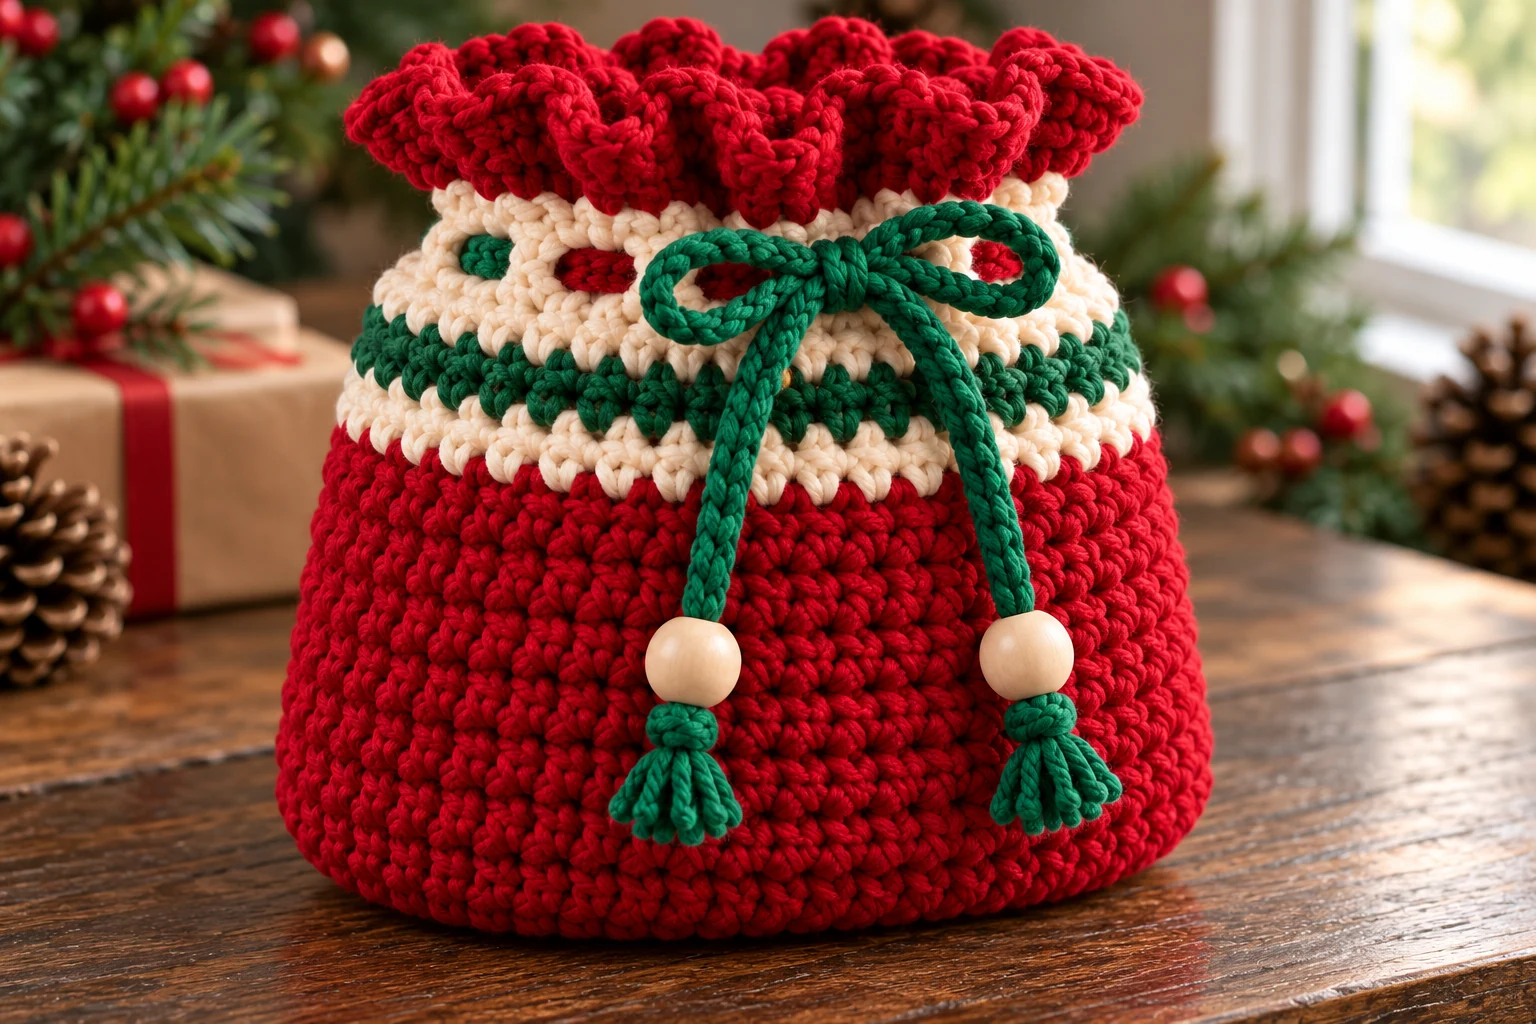
Attach a safety pin or yarn needle to one end of the cord.
Insert it through the first eyelet.
Pass over the next section of fabric and through the next opening.
Continue around the entire bag.
Bring both ends out through neighboring front eyelets.
Pull gently.
The top should gather evenly.
Tie the ends together in a bow or loose knot.
Optional Wooden Beads
If you want to add beads, choose holes wide enough for the crochet cord.
Thread one bead onto each end.
Tie a secure knot below each bead.
Keep in mind that small beads should not be used if the finished bag will be handled by very young children.
Optional Christmas Tree Appliqué
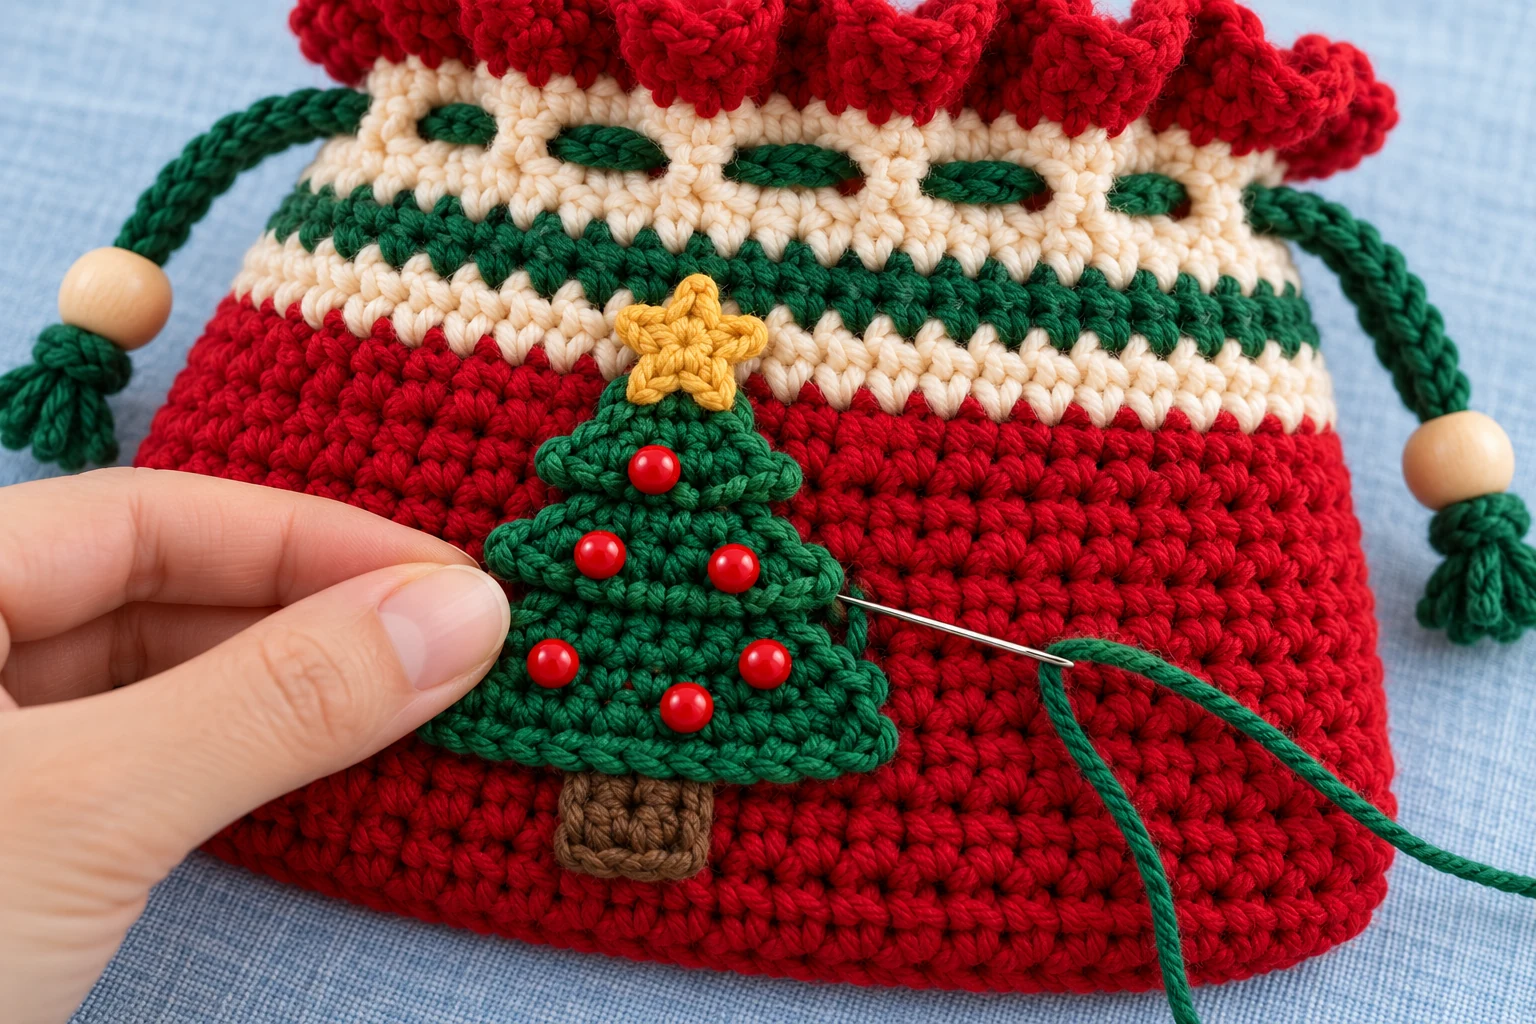
Use forest-green yarn.
Row 1
Ch 2.
Work 2 sc in second chain from hook.
Ch 1, turn.
Row 2
Inc in each stitch. (4)
Ch 1, turn.
Row 3
Sc across. (4)
Ch 1, turn.
Row 4
Inc, sc 2, inc. (6)
Ch 1, turn.
Row 5
Sc across. (6)
Ch 1, turn.
Row 6
Inc, sc 4, inc. (8)
Ch 1, turn.
Row 7
Sc across. (8)
Fasten off with a long sewing tail.
Tiered Tree Variation
For a stepped outline, make three separate triangles using the row instructions above: stop the smallest after Row 3 (4 sts), the middle after Row 5 (6 sts), and the largest after Row 7 (8 sts). Leave sewing tails. Place the largest at the bottom, overlap the middle over its upper portion, and overlap the smallest at the top. Keep the lower corners of all three triangles visible to form three branch tiers. Pin, then sew each piece to the bag with relaxed matching stitches. Attach the trunk beneath the lowest tier.
For the star, either embroider five radiating stitches or make a small crochet star: in a magic ring repeat (ch 2, sc in second ch from hook, sl st into ring) five times. Close the ring and sew securely above the tree. Add small red embroidered knots or securely sewn red beads. Use embroidery instead of beads when young children may handle the bag.
Tree Trunk
Use brown yarn.
Ch 4.
Starting in the second chain from the hook:
3 sc.
Fasten off.
Sew the trunk behind the lower center of the tree.
Place the appliqué on the front of the bag.
Keep it below the drawstring section.
Pin it.
Sew around the outer edge using green yarn. Our guide to sewing crochet pieces neatly explains secure attachment.
Optional Star
Use mustard or gold-colored yarn.
Make 5 small stitches radiating from one central point.
This creates a simple embroidered star without adding a bulky separate piece.
Place it directly above the tree. For a separate standing decoration, see the mini crochet Christmas tree pattern.
Optional Snowflake Version
If you prefer a winter-style gift bag, skip the tree.
Use cream yarn and embroider one large snowflake on the front.
Create three long crossing stitches.
Then add small diagonal stitches near each end.
A dark green or red bag makes the cream snowflake easy to see. Add a coordinating crochet snowman ornament as a gift.
Optional Gift Tag Loop
A small loop can be added beside the drawstring.
Use cream yarn.
Ch 8.
Sl st into the first chain.
Fasten off with a long tail.
Sew the loop securely near the upper side of the bag.
Use it to hold a lightweight paper gift tag.
Avoid hanging anything heavy from this loop.
Make a Candy Cane Stripe Version
Start with cream yarn.
Work the base and lower body in cream.
Then alternate:
2 rounds red 2 rounds cream
Continue until you reach the drawstring section.
Finish the top in red.
Use a red drawstring.
This version has a stronger holiday look without requiring an appliqué. For another seasonal bag, try our Halloween trick-or-treat bag.
Make a Minimal Christmas Version
Use forest green for the entire bag.
Add:
- cream top border
- cream drawstring
- one small red embroidered star
This version works well if you prefer a simple design.
The bag can also be reused after Christmas if the decoration remains subtle.
Make a Rustic Gift Bag
Use beige or oatmeal yarn.
Work the entire body in one color.
Use dark green for the drawstring.
Add a small burgundy stripe close to the top.
A simple wooden button or removable paper tag can add more detail without changing the bag itself.
Resize the Gift Bag
The easiest way to resize the pattern is to change the number of base increase rounds.
Small Gift Bag
Stop after:
Round 7 = 42 stitches
Work one BLO round.
Then work approximately 14–18 straight rounds.
Add an eyelet round and top border.
This size works well for:
- jewelry boxes
- small ornaments
- gift cards inside a small box
- soaps
- mini candles
Medium Gift Bag
Use the standard:
60 stitches
This size works for many small holiday gifts.
Large Gift Bag
Continue increasing.
Round 11
(9 sc, inc) ×6. (66)
Round 12
(10 sc, inc) ×6. (72)
Then work one BLO round at 72 stitches.
Continue straight until the desired height.
A larger bag uses more yarn and may benefit from a wider drawstring.
Make the Bag Taller
Continue the straight body rounds before beginning the Christmas stripe section.
For example, add 6 extra red rounds.
This is useful for bottles, taller books, or long gift boxes.
Check that the base is wide enough for the item before adding height.
A tall but narrow bag may not fit a wider gift.
Make the Bag Wider
Add more increase rounds to the base.
Do not simply add increases randomly once you start the side walls.
Increasing evenly at the base creates a smoother shape.
Once you reach the desired circumference, work the body without further increases.
Using the Bag for a Book
A paperback can fit inside the medium or large version depending on dimensions.
Measure the book first.
The bag circumference needs to accommodate:
- book width
- book thickness
Add enough height so the drawstring can close above the top edge.
For a book gift, a fabric lining is optional but can create a smoother interior.
Optional Fabric Lining
Measure the finished bag interior.
Cut fabric slightly larger than the required dimensions to allow for seams.
Sew a simple fabric pouch.
Place it inside the crochet bag.
Fold the upper raw edge inward.
Hand sew the fabric below the eyelet round.
Do not cover the drawstring openings.
A lining helps reduce stretching when the gift is heavy.
Reinforcing the Base
For heavier gifts, cut a circle of plastic canvas slightly smaller than the base.
Round the edges.
Place it inside the bag.
If you are adding fabric lining, put the insert between the crochet and the fabric.
The base insert helps the bag remain flat.
It is not necessary for lightweight gifts.
What to Put Inside
The medium bag can work for many small Christmas gifts, depending on size and weight.
Examples include:
- small paperback
- candle
- folded scarf
- crochet accessories
- chocolates
- ornament set
- skincare items
- mug with protective wrapping
- small craft kit
Avoid overloading the bag with very heavy items.
The drawstring opening and crochet base are designed for normal small gifts rather than heavy carrying.
How to Keep the Drawstring from Twisting
Lay the cord flat before threading.
Thread it slowly through each eyelet.
If the cord twists, pull it back slightly and straighten it before continuing.
A slip-stitch cord is less likely to twist than a simple loose chain.
How to Make a Two-Cord Closure
Instead of one drawstring, make two cords.
Thread the first cord from the left side all the way around and back out on the left.
Thread the second from the right side and back out on the right.
Pull both sides.
This creates a pouch-style double drawstring closure.
It also gathers the opening more evenly. Explore more crochet bag patterns.
Common Problems
The Base Is Wavy
The base may contain too many stitches for your tension.
Check the stitch counts.
If the counts are correct but the circle still ripples strongly, try a smaller hook.
The Base Is Cupping
Your tension may be too tight.
Use a slightly larger hook or relax the stitches.
The Bag Gets Wider as I Crochet
You may be accidentally adding stitches at the beginning or end of rounds.
Count the body regularly.
Once the straight section begins, the stitch count should remain unchanged.
The Bag Narrows Toward the Top
You may be skipping stitches.
Make sure every round before the eyelets maintains the full stitch count.
The Stripes Look Uneven
Keep the color joins at the back.
Make each stripe the planned number of rounds.
The Eyelets Are Too Small
Your chain stitches may be tight.
Work the chains more loosely.
If your cord is thick, replace each ch-1 space with ch 2 and skip 1 stitch. In the following round, work only 1 sc into each ch-2 space to preserve the original circumference.
The Drawstring Is Difficult to Pull
The cord may be too thick for the holes.
Make a thinner cord or enlarge the eyelets.
The Top Edge Is Tight
The final slip-stitch round may have been worked too tightly.
Remove it and redo it with relaxed tension.
The Bag Does Not Stand Up
Very soft yarn can create a pouch rather than a structured bag.
Use firmer yarn, a smaller hook, or add lining and a base insert.
The Appliqué Pulls the Bag Fabric
The sewing stitches may be too tight.
Sew the tree down using small relaxed stitches.
Frequently Asked Questions
Is this crochet Christmas gift bag beginner-friendly?
Yes. The pattern mainly uses single crochet, basic increases, chains, and simple color changes.
What yarn is best for a crochet gift bag?
Worsted-weight cotton, cotton blend, or firm acrylic works well because it creates a sturdy fabric.
Can I make the bag in one color?
Yes. A solid red, green, cream, or neutral version works well.
The drawstring can provide the contrasting color.
Does the bag need a lining?
No. A lining is optional.
It is most useful when the gift is heavy, contains small items, or needs a smoother interior.
Can I use chunky yarn?
Yes. The finished bag will be larger and thicker.
Use a hook appropriate for the yarn.
Can I make the bag without the appliqué?
Yes. The striped version already has a clear Christmas look.
Can I replace the drawstring with ribbon?
Yes. Choose a ribbon that passes easily through the eyelets.
Avoid very stiff ribbon that may pull on the crochet stitches.
Can I make a double drawstring?
Yes. Two cords threaded from opposite sides create a traditional pouch closure.
Can I use this pattern for birthdays?
Yes. Remove the Christmas stripes or choose non-seasonal colors.
The basic bag construction works year-round.
Can I add handles?
Yes, but it changes the project from a simple gift pouch into a small drawstring tote. Short crochet handles can be attached below the eyelet section.
How do I make the gift bag smaller?
Stop the base increases earlier and work fewer body rounds.
How do I make it larger?
Continue the base increase sequence before beginning the straight side rounds.
Your Finished Christmas Gift Bag