Mini Crochet Turkey Pattern – Free Thanksgiving Amigurumi
Crochet a small Thanksgiving turkey with a one-piece head and body, five colorful tail feathers, and simple sewn details.
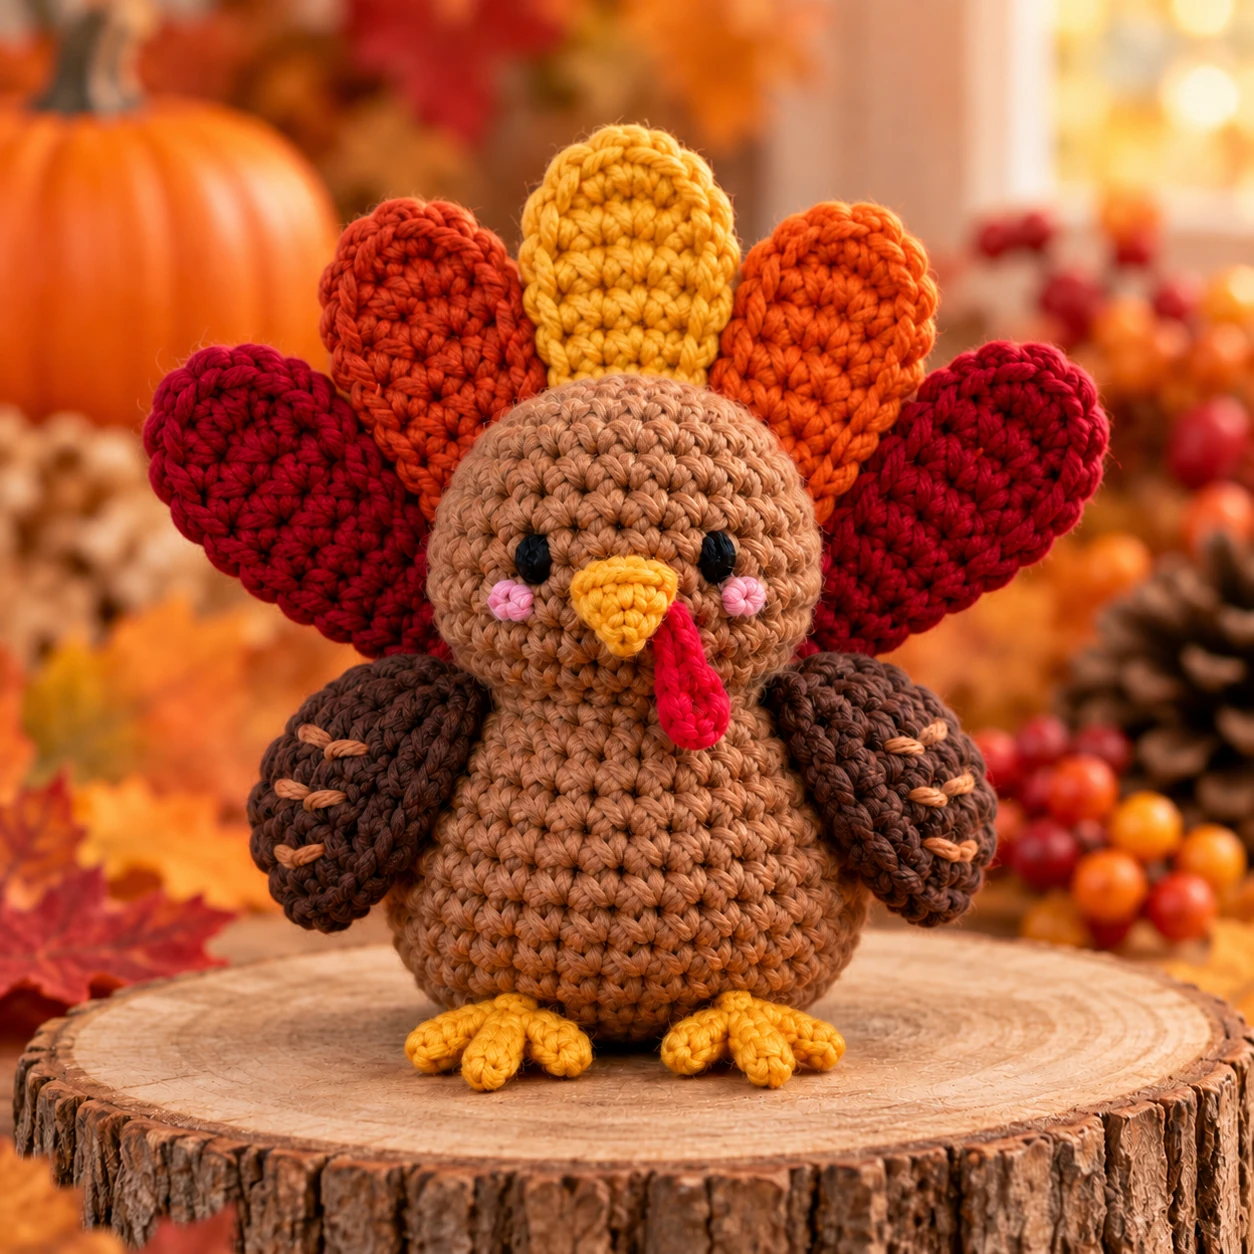
This mini crochet turkey pattern makes a small, rounded Thanksgiving turkey with a warm brown body, simple wings, an orange beak, red wattle, little feet, and a fan of autumn-colored tail feathers.
The head and body are worked as one continuous piece, which keeps the main shape simple and reduces sewing. The colorful feathers are made separately and attached across the back in a fan.
The finished turkey works well as a small Thanksgiving table decoration, shelf piece, seasonal gift, or part of an autumn amigurumi collection.
Pattern Details
Skill level: Confident beginner
Terms: US crochet terminology
Construction: Continuous rounds with separate decorative pieces
Recommended yarn: DK or light worsted cotton or cotton blend
Recommended hook: 2.75–3.25 mm
Main stitch: Single crochet
Stuffing: Polyester fiberfill
For another small bird project, see the free crochet chicken pattern.
The project uses basic increases and decreases. The tail requires several repeated pieces, but each feather is small and uses the same construction.
Finished Size and Yarn Choice
The stitch counts define the shape, but they do not guarantee a particular finished size. Measure your own sample after stuffing and attaching the tail. The dimensions and yarn consumption have not been confirmed with a physical sample.
Use the same yarn weight throughout the body, wings, and feathers. A 3 mm hook is a starting point for DK cotton: adjust it if the stitches leave gaps or the fabric becomes difficult to work. Thicker yarn makes a larger turkey with the same stitch counts.
Materials
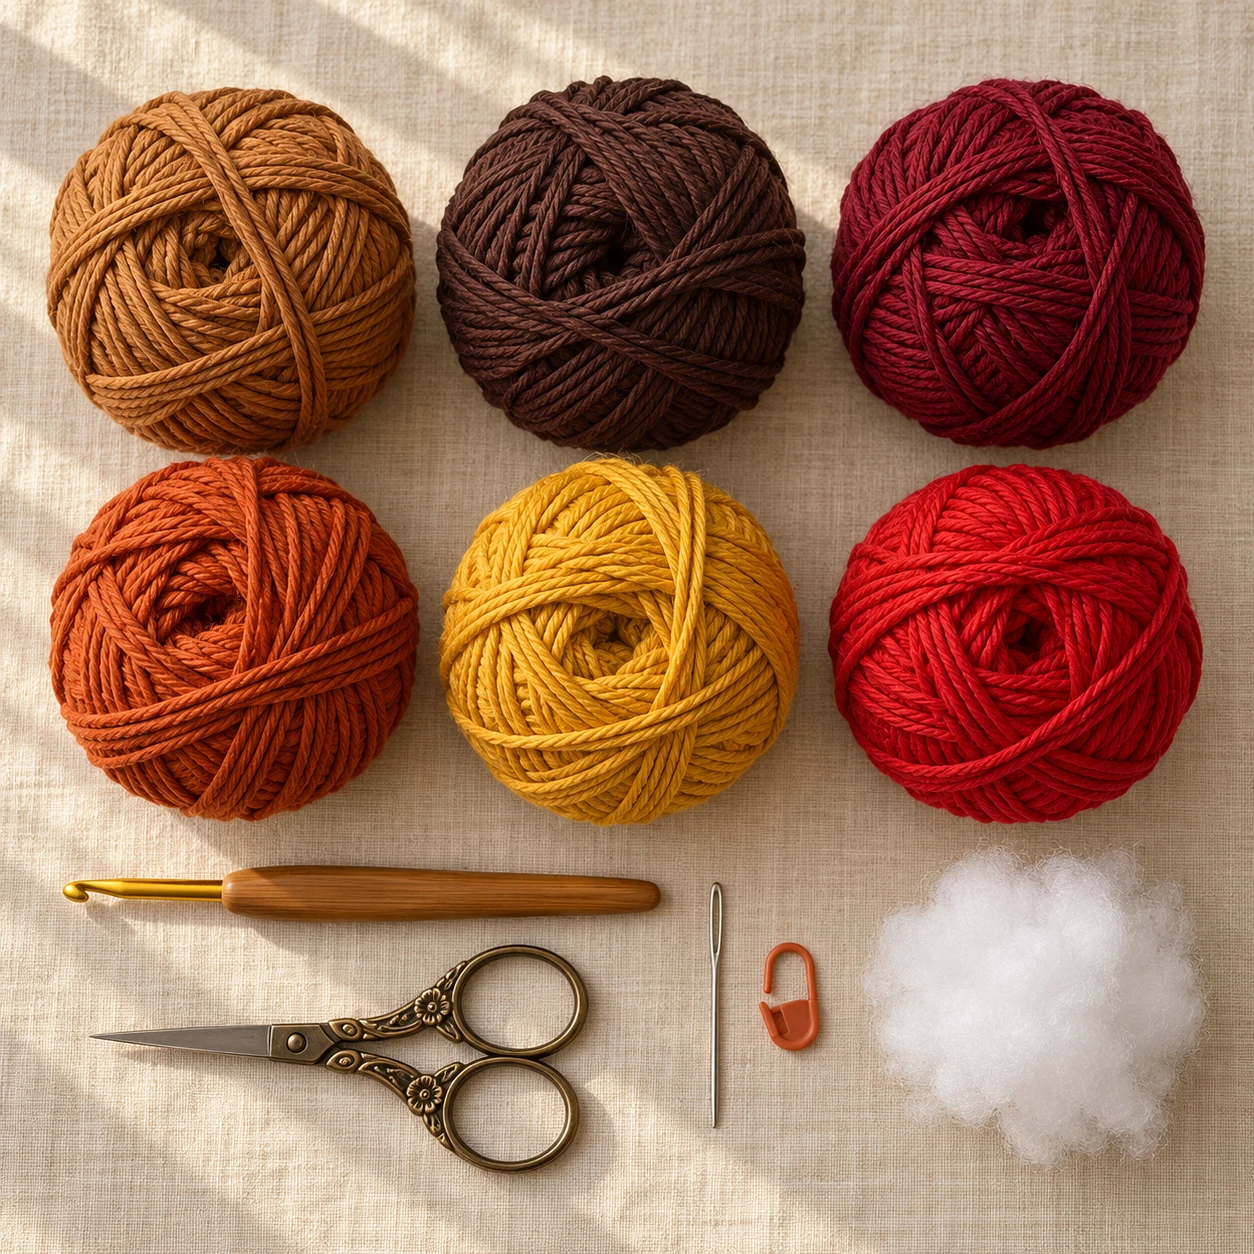
You will need:
- medium brown yarn for body and head
- darker brown yarn for wings
- rust yarn for tail feathers
- mustard yarn for tail feathers and feet
- burnt orange yarn for tail feathers and beak
- dark red or burgundy yarn for tail feathers
- red yarn for the wattle
- cream yarn, optional for belly detail
- 2.75–3.25 mm crochet hook
- polyester fiberfill
- yarn needle
- scissors
- stitch marker
- pins
- black embroidery thread or safety eyes
The version shown is a seasonal decoration. Embroidered eyes let you avoid detachable plastic eyes; any version intended as a child’s toy needs a separate safety assessment.
Color Palette
A traditional autumn palette works especially well for this pattern.
| Piece | Suggested Color |
|---|---|
| Body | Warm brown |
| Wings | Dark brown |
| Beak | Mustard or orange |
| Wattle | Red |
| Feet | Mustard |
| Feather 1 | Burgundy |
| Feather 2 | Rust |
| Feather 3 | Mustard |
| Feather 4 | Burnt orange |
| Feather 5 | Dark red |
You do not need five different yarn colors.
Three colors repeated across the feather fan can still create a strong Thanksgiving look.
Abbreviations
| Abbreviation | Meaning |
|---|---|
| MR | Magic ring |
| ch | Chain |
| sc | Single crochet |
| inc | Increase |
| dec | Invisible decrease |
| hdc | Half double crochet |
| dc | Double crochet |
| sl st | Slip stitch |
| st / sts | Stitch / stitches |
| FO | Fasten off |
| rnd | Round |
Pattern Notes
Most pieces are worked in continuous rounds.
Use a stitch marker to mark the first stitch.
Move the marker after each round.
Stuff the main body gradually.
Use small tufts of filling, spreading them evenly. Keep the base and head rounded without stretching the stitches. Ordinary filling alone does not guarantee that the turkey will balance; check its base and fan placement during assembly.
Do not overstuff the narrow neck area.
The tail feathers are attached after the body is finished.
Pin the entire feather fan before sewing so you can check the spacing from the front.
Step 1: Crochet the Turkey Body
Use medium brown yarn.
The body and head are worked in one piece from the bottom upward.
Round 1
6 sc in MR.
(6)
Round 2
Inc around.
(12)
Round 3
(1 sc, inc) ×6.
(18)
Round 4
(2 sc, inc) ×6.
(24)
Round 5
(3 sc, inc) ×6.
(30)
Round 6
(4 sc, inc) ×6.
(36)
Rounds 7–11
Sc around.
(36)
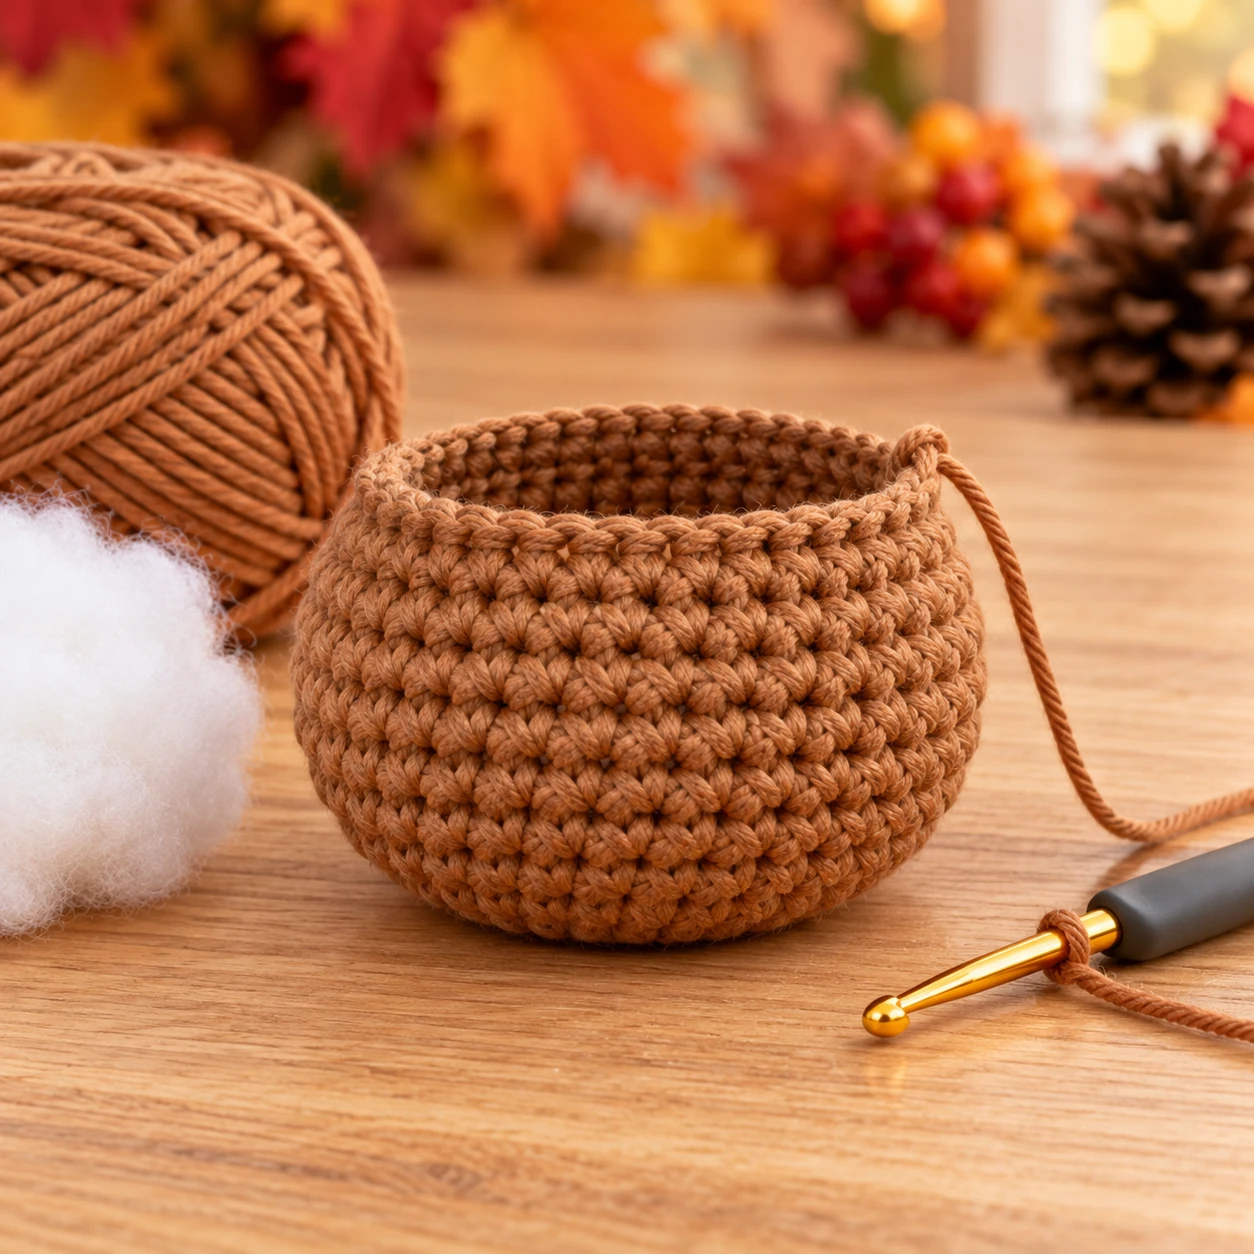
The lower half should now form a rounded bowl.
Round 12
(4 sc, dec) ×6.
(30)
Rounds 13–14
Sc around.
(30)
Round 15
(3 sc, dec) ×6.
(24)
Begin stuffing.
Push most of the stuffing into the lower body.
Rounds 16–17
Sc around.
(24)
Round 18
(2 sc, dec) ×6.
(18)
This begins narrowing the body toward the neck.
Rounds 19–20
Sc around.
(18)
Round 21
(2 sc, inc) ×6.
(24)
The shape now begins widening again for the head.
Round 22
(3 sc, inc) ×6.
(30)
Rounds 23–27
Sc around.
(30)
If using safety eyes, place them between approximately Rounds 24 and 25.
Leave around 6–7 stitches between the eyes.
Check the placement with the beak area in mind.
Round 28
(3 sc, dec) ×6.
(24)
Round 29
(2 sc, dec) ×6.
(18)
Stuff the head.
Keep the cheeks rounded but do not stretch the stitches.
Round 30
(1 sc, dec) ×6.
(12)
Add the final stuffing.
Round 31
Dec around.
(6)
Fasten off.
Close the opening with the yarn needle.
Shape the Lower Body
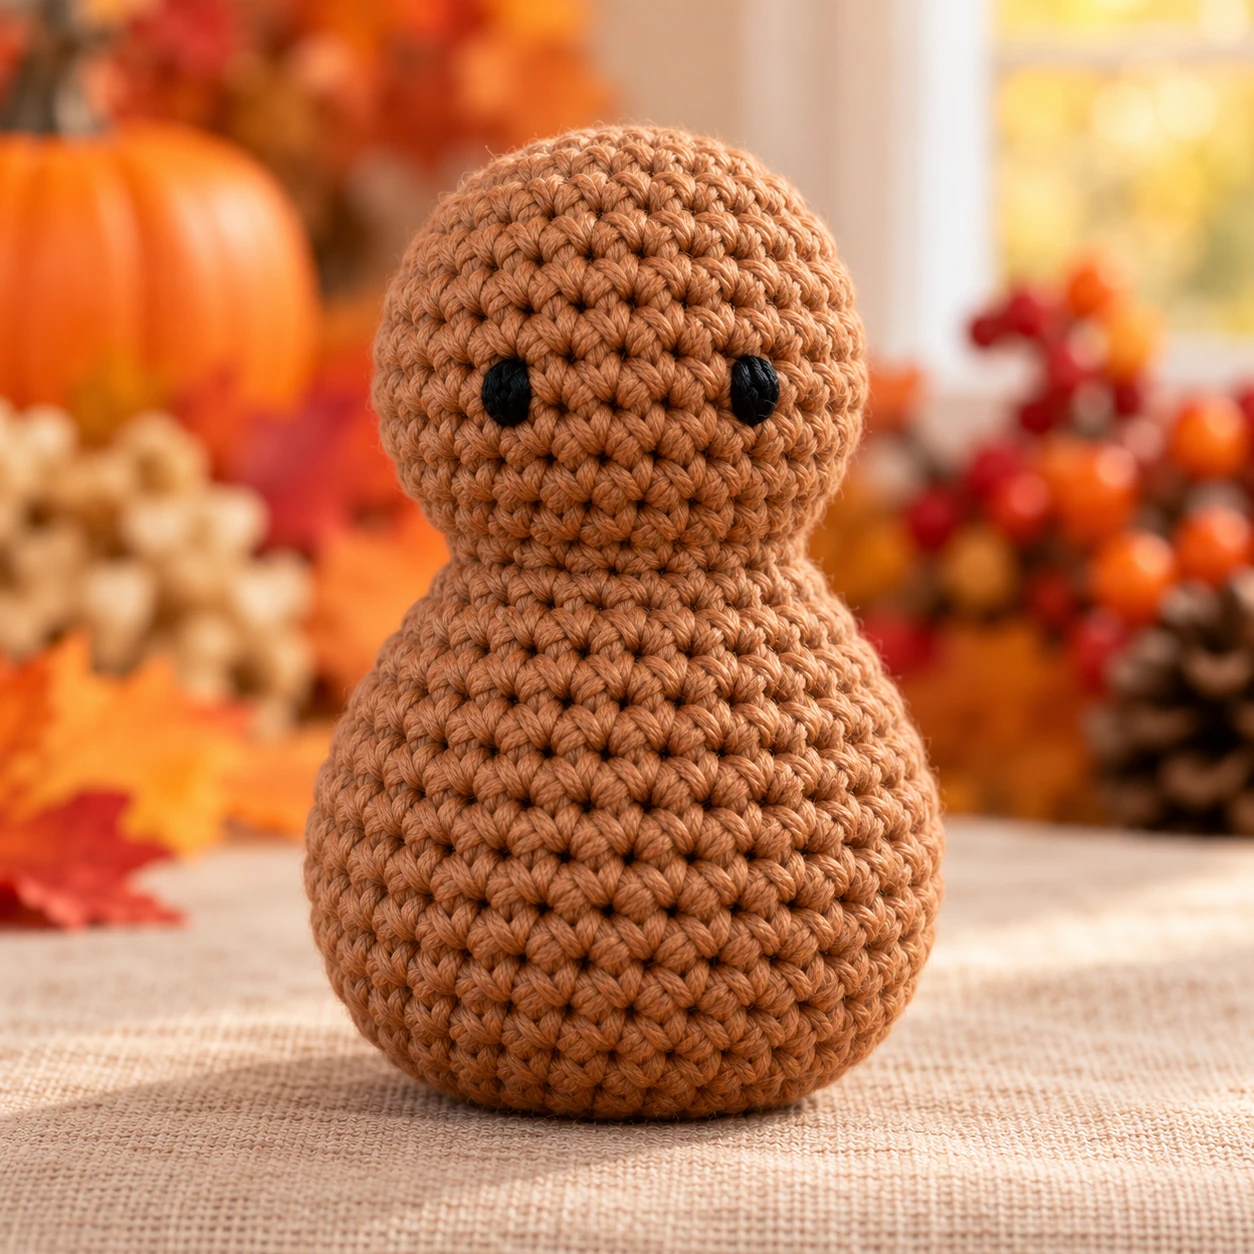
Place the turkey on a flat surface.
Press the bottom lightly with your fingers.
The lower body should flatten just enough to sit without rolling.
Check the balance before closing the head in Round 31. Redistribute the stuffing through the open head and neck if needed. After closing, gently massage the base to adjust its shape; reopen the closure if you need to add or remove filling. Do not add weights to this version.
Step 2: Make the Wings
Make 2 using dark brown yarn.
Round 1
6 sc in MR.
(6)
Round 2
Inc around.
(12)
Round 3
(1 sc, inc) ×6.
(18)
Rounds 4–5
Sc around.
(18)
Round 6
(1 sc, dec) ×6.
(12)
Round 7
Sc around.
(12)
Add a very small amount of stuffing.
Round 8
Dec around.
(6)
Fasten off with a long sewing tail. Thread the tail through the front loops of the six remaining stitches, draw the opening closed, and secure the yarn. Keep the remaining tail for attaching the wing.
Flatten the finished piece slightly.
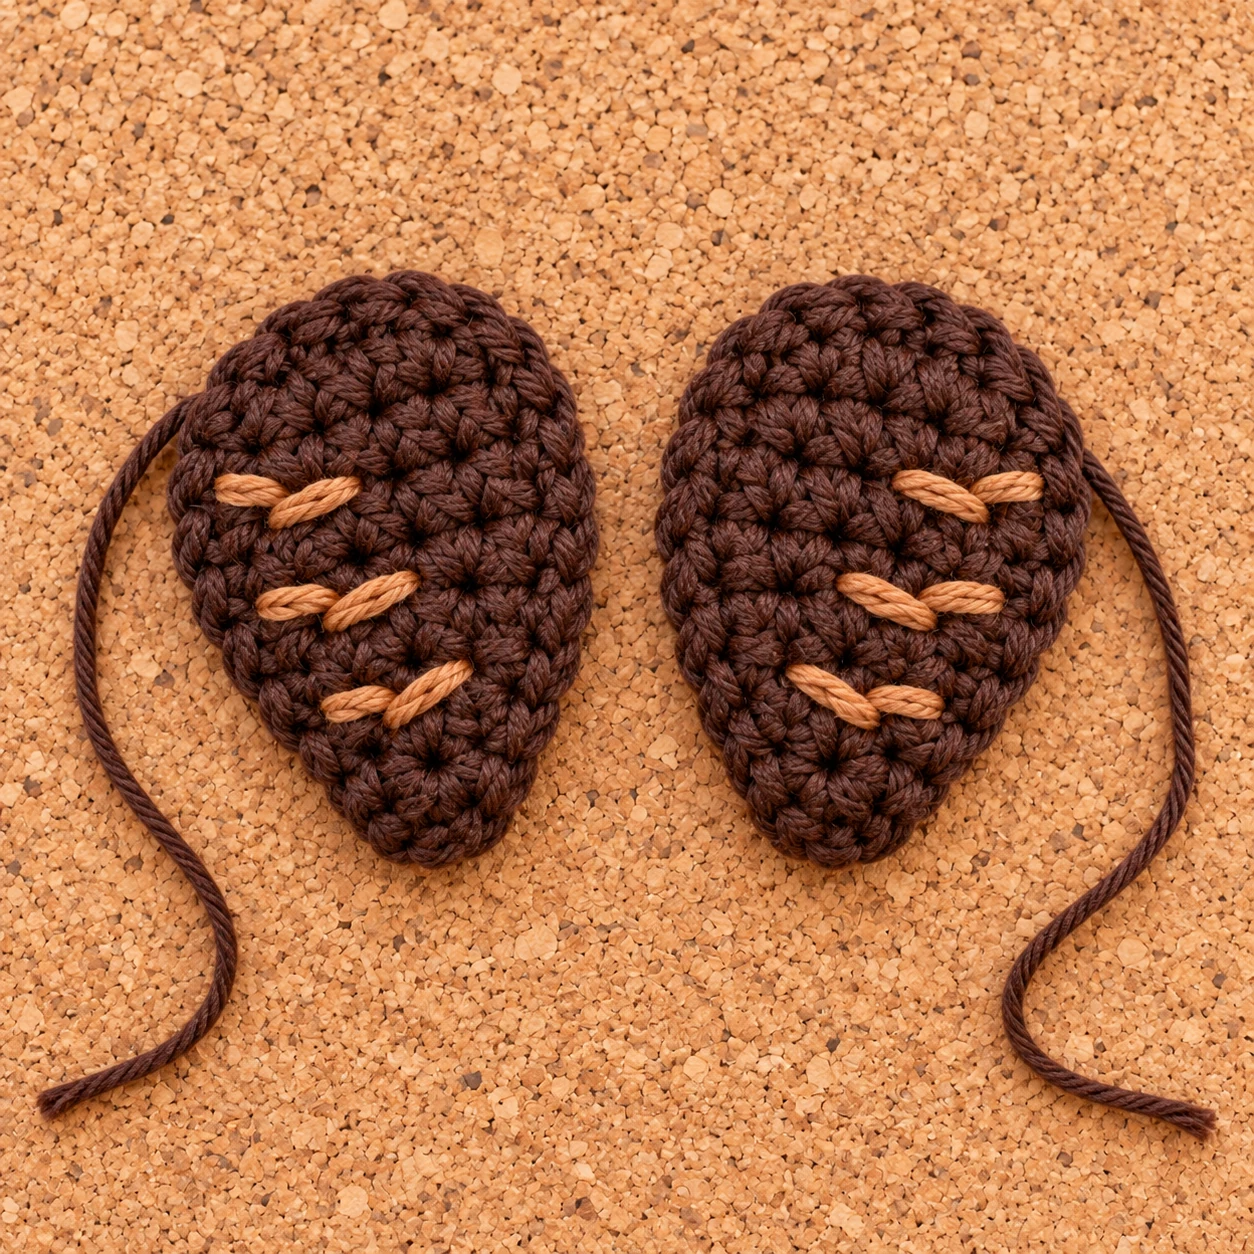
Each wing should look like a small rounded teardrop.
Optional Wing Texture
For a more feathered appearance, use the yarn needle and a slightly lighter brown yarn.
Make three short diagonal embroidery stitches across each wing.
Keep the stitches loose enough that they do not distort the crochet fabric.
Step 3: Crochet the Tail Feathers
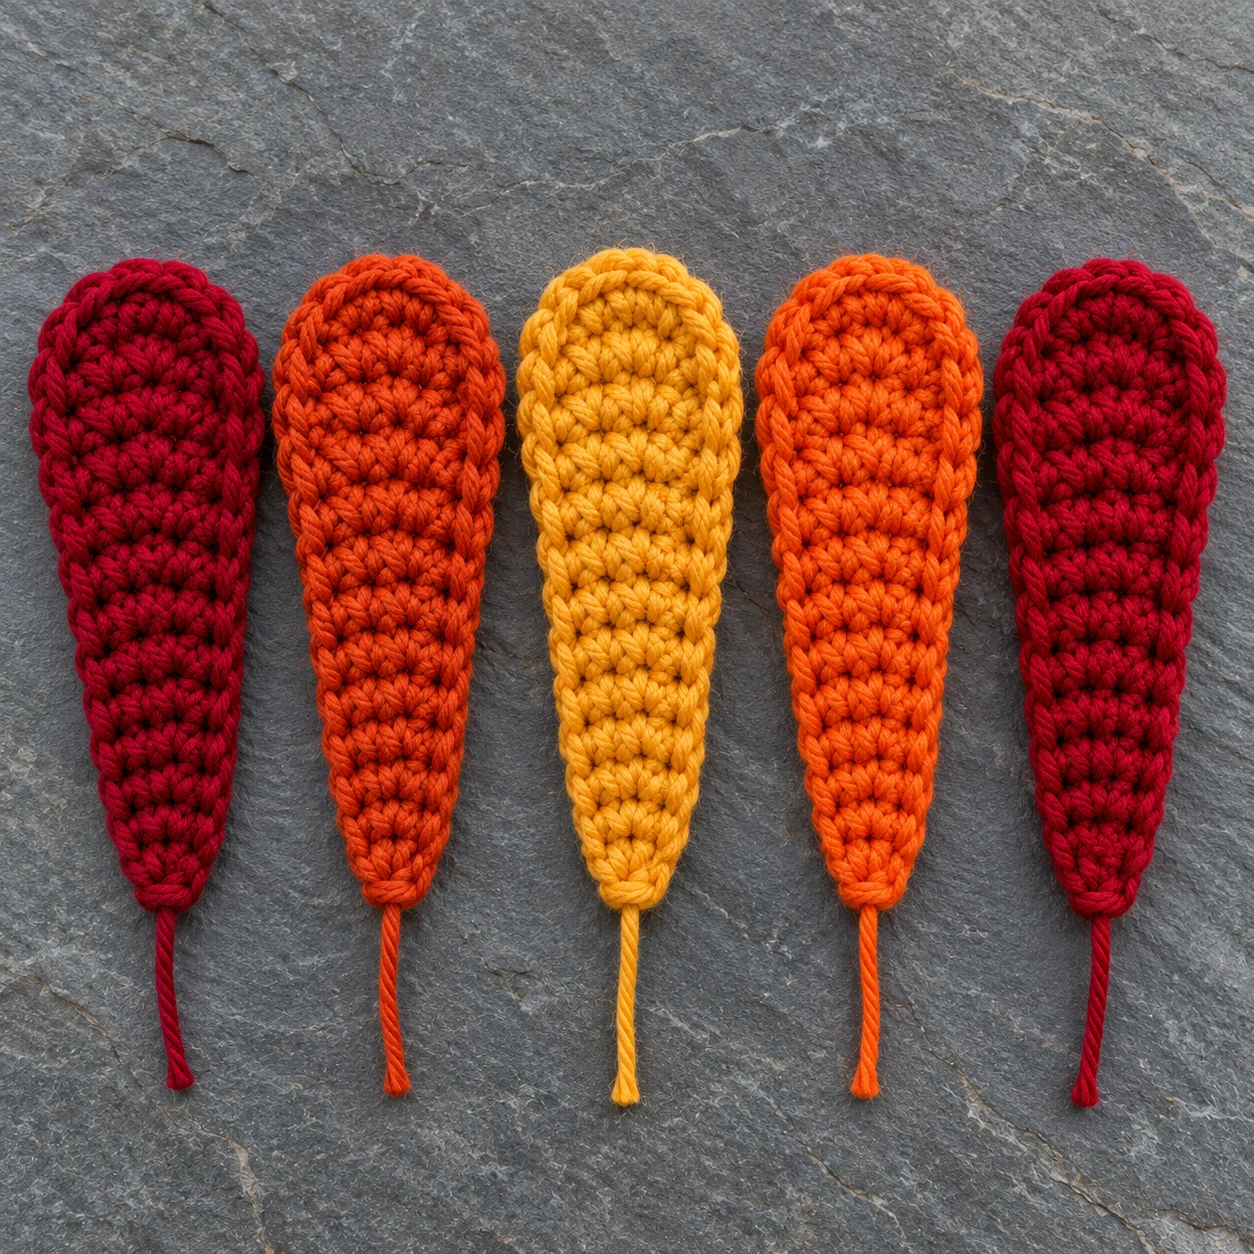
Make 5 feathers.
Use a different autumn color for each one, or repeat three colors.
The feather shape is slightly elongated so the fan remains visible behind the turkey.
Round 1
6 sc in MR.
(6)
Round 2
Inc around.
(12)
Round 3
(1 sc, inc) ×6.
(18)
Rounds 4–6
Sc around.
(18)
Round 7
(1 sc, dec) ×6.
(12)
Rounds 8–10
Sc around.
(12)
Round 11
(1 sc, dec) ×4.
(8)
Rounds 12–13
Sc around.
(8)
Fasten off with a long sewing tail.
Leave the feathers unstuffed for a lightweight fan. Flatten the eight-stitch opening so four stitches on the front align with four stitches on the back. Sew through each aligned pair to close the narrow base, leaving a long tail for assembly. The rounded magic-ring end is the feather top; the narrow closed end attaches to the body.
Arrange the Feather Fan
Lay all five feathers on the table.
Place the central feather upright.
Angle two feathers slightly outward on each side.
The final arrangement should look roughly like this:
burgundy → rust → mustard → burnt orange → dark red
or any combination you prefer.
Overlap the lower edges slightly.
Pin the feathers together before attaching them to the body.
Step 4: Make the Beak and Wattle
Use mustard or orange yarn.
Round 1
4 sc in MR.
(4)
Round 2
(1 sc, inc) ×2.
(6)
Round 3
Sc around.
(6)
Fasten off with a long tail.
Do not stuff.
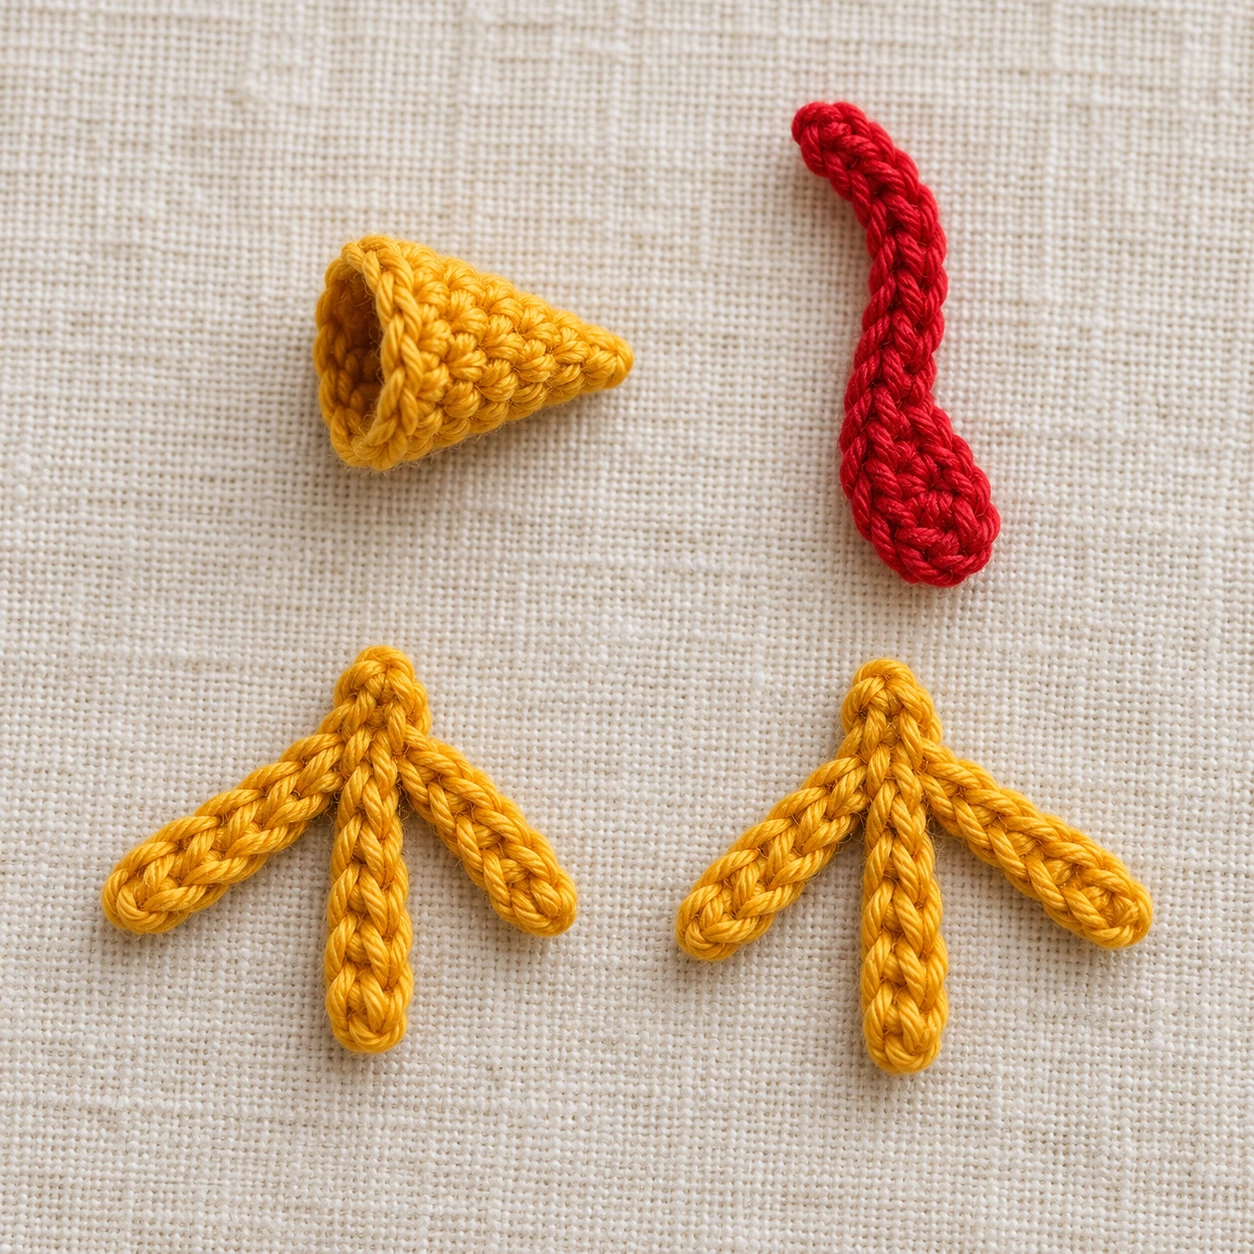
Keep the magic-ring end as the tip and the six-stitch opening as the base. Do not close that base. Set the small cone aside and sew around its open base during assembly, with the tip facing outward.
Wattle
Use red yarn.
Ch 6.
Starting in the second chain from the hook:
sl st, sc, hdc, sc, sl st.
Fasten off with a sewing tail.
This creates a small curved strip.
Attach it just below and slightly to one side of the beak.
Do not center the whole wattle directly under the beak.
A slight side placement gives it a more natural turkey look.
Step 5: Make the Feet
Make two flat, three-toed feet with mustard yarn. Each foot uses one shared chain as the toe attachment point.
Base: Ch 2. The first chain made is the base chain. Mark it if it is hard to find.
Toe 1: Ch 4. Starting in the second chain from the hook, sc in the next three chains. Sl st into the marked base chain.
Toe 2: Ch 4. Starting in the second chain from the hook, sc in the next three chains. Sl st into the same marked base chain.
Toe 3: Repeat Toe 2. Fasten off, leaving a long sewing tail.
Arrange the three short strips into a fan, keeping them flat. During assembly, sew the shared base and the inner end of each toe to the underside of the body. Leave the outer toe ends free. This version has no separate ankle tube; do not expect it to look like a sculpted foot with a tall ankle.
Optional Cream Belly Patch
Use cream yarn.
Round 1
6 sc in MR.
(6)
Round 2
Inc around.
(12)
Round 3
(1 sc, inc) ×6.
(18)
Fasten off with a long tail.
Keep the patch circular and unstuffed. An oval patch would need a different stitch arrangement; do not stretch the stitches to force that shape.
Sew it to the lower front of the body.
The belly patch is optional, but it adds contrast and makes the warm brown body easier to read in photos.
Step 6: Assemble the Turkey
For help making tidy joins, use the guide to sewing amigurumi pieces together.
Do not sew each piece immediately after making it.
Place everything first.
A few millimeters of difference can noticeably change a small amigurumi.
Attach the Wings
Place one wing on each side of the body.
The top of each wing should sit around the widest part of the lower body.
Angle the narrow end slightly downward.
Pin both wings.
Look at the turkey from the front.
Make sure the wings sit at the same height.
Sew around the upper and side edges.
Leave the lower edge slightly free if you want a softer dimensional look.
Attach the Tail Feathers
Turn the turkey around.
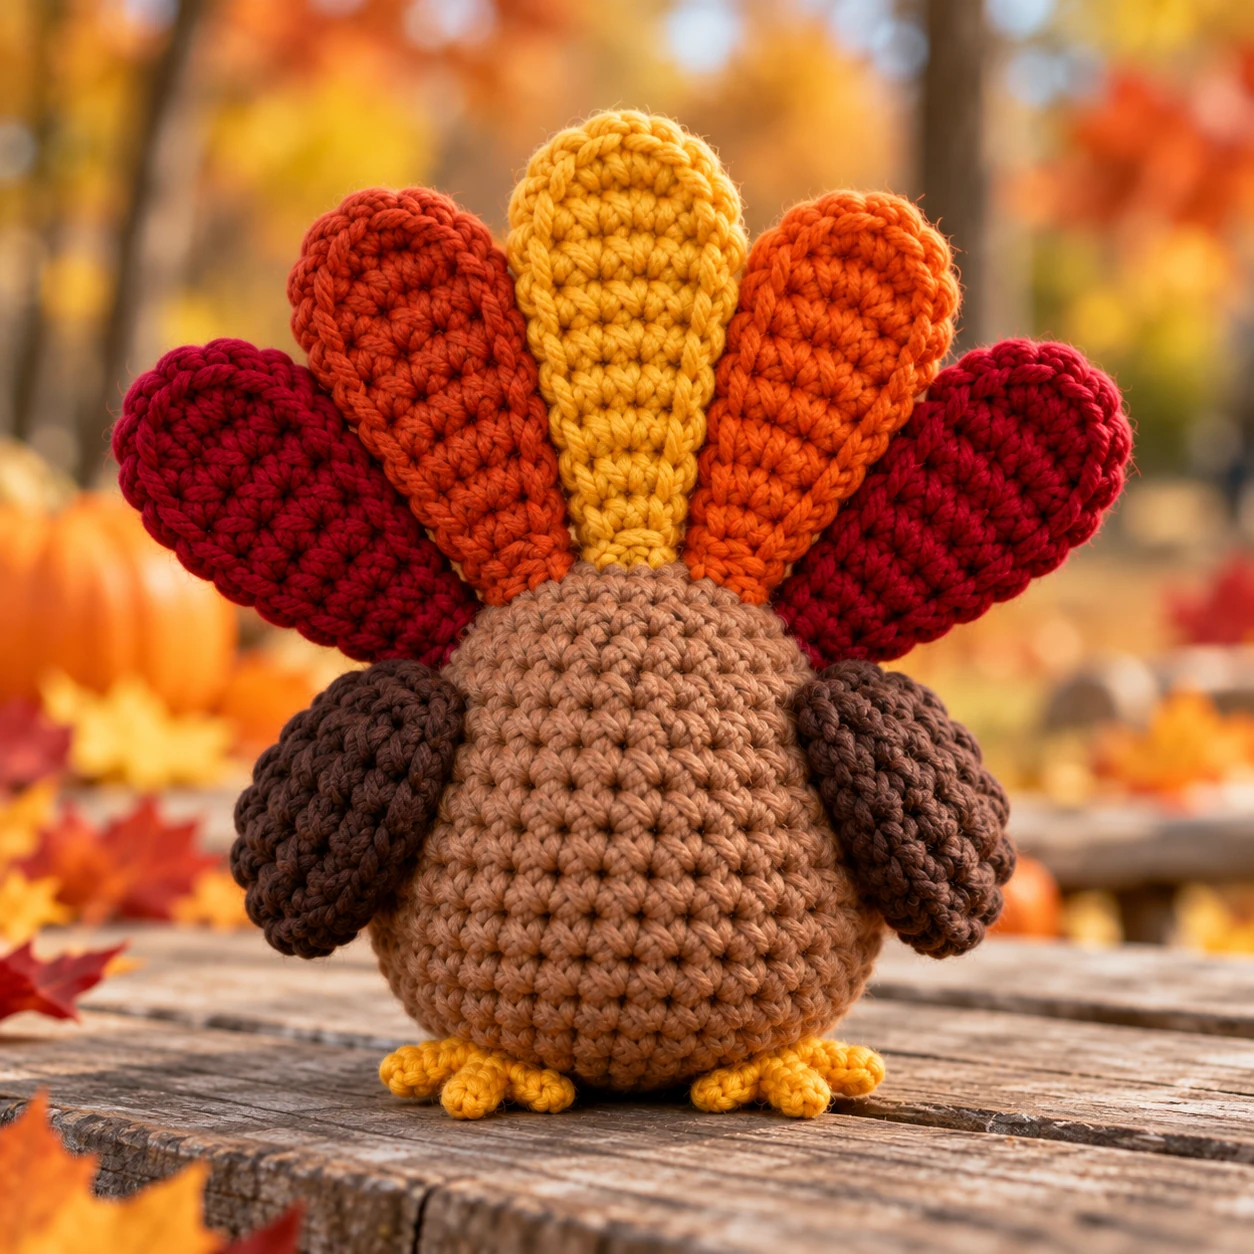
Place the central feather vertically along the middle of the back.
Position the fan high enough that its rounded tops are visible around the head when viewed from the front. Test this placement before sewing: visibility depends on your tension and the finished proportions, not on a fixed attachment round.
Add the next two feathers at an angle.
Add the outer feathers last.
The fan should remain symmetrical.
Pin all five pieces.
Turn the turkey to the front again.
You should see the colorful feather tops around the head and shoulders without them completely overpowering the body.
Sew each feather firmly at the lower section.
Add a few hidden stitches between neighboring feather edges where they overlap to support the fan. Keep the rounded tops free. Check that every pin has been removed after sewing.
Attach the Beak
Place the beak between the eyes.
The base should sit slightly below the eye line.
Pin it.
Sew around the base.
Avoid flattening the point.
Attach the Wattle
Place the red wattle below the beak.
Angle it slightly to one side.
Use several small stitches to secure the upper part.
Allow the lower end to remain loose.
Attach the Feet
Position the feet at the lower front.
Check that both point forward.
Sew the bases securely.
The toes should remain free.
Face Placement
A small face benefits from simple proportions.
Keep the eyes relatively close to the beak.
If the eyes are too high, the turkey can look surprised rather than soft and rounded.
If they are too far apart, the face can feel very wide.
For embroidered eyes, make two short vertical or slightly curved stitches.
Add optional pink cheeks with one or two small horizontal stitches below the eyes.
Keep the cheeks subtle.
The red wattle already adds a strong accent color to the face.
Step 7: Shape and Finish the Turkey
Once all the pieces are attached, hold the turkey between both hands.
Gently press the sides inward.
Then press the bottom against a flat table.
Adjust the tail so it fans evenly.
Pull the outer feathers slightly outward.
Press the center feather backward if it leans too far over the head.
The turkey should sit with the feet visible and the wing tips angled slightly down.
Thanksgiving Color Variations
The basic pattern can be changed with color alone.
Traditional Thanksgiving Turkey
Body: medium brown
Wings: dark brown
Feathers: red, orange, mustard, burgundy, rust
Neutral Farmhouse Turkey
Body: taupe
Wings: chocolate brown
Feathers: cream, camel, beige, rust, brown
Bright Kids’ Turkey
Body: light brown
Feathers: red, yellow, orange, green, blue
Rustic Autumn Turkey
Body: dark caramel
Feathers: burnt orange, mustard, burgundy, olive, rust
Cream and Gold Turkey
Body: cream
Wings: tan
Feathers: mustard, caramel, rust, beige, brown
For a Thanksgiving table, several turkeys in slightly different palettes can be grouped together without changing the pattern.
Using the Turkey as a Place Setting
The mini size makes the finished project suitable for decorative table settings.
You can place one turkey beside each plate.
If you want to add a guest name, use a removable paper tag tied loosely around the body rather than gluing anything to the crochet.
The same turkey can then be reused after Thanksgiving.
Common Problems
My Turkey Falls Backward
The feather fan may be too heavy.
Leave the feathers unstuffed.
Move their attachment slightly lower.
If filling needs changing, reopen the head closure, adjust the filling through the neck, and close it again securely.
The Feathers Look Uneven
Pin all five before sewing any of them.
Start with the center feather.
Then match the angle of the two inner feathers.
Add the outer pair last.
The Head Looks Too Small
Check the stitch counts around Rounds 21–27.
The head should widen from 18 stitches back to 30.
The Neck Is Too Thin
The narrowing between the body and head should be visible but not extreme.
Do not pull the stuffing away from the neck completely.
Add a small amount to support the head.
The Wings Stick Out
The wings may be overstuffed.
Use only a tiny amount of filling.
You can also add one hidden stitch near the lower wing edge to hold it against the body.
The Beak Looks Too Large
Remove one round or use thinner orange yarn.
The beak should remain small enough that the eyes and wattle are still clearly visible.
The Tail Covers the Head
Attach the feathers slightly lower on the back.
Angle the center feather backward.
Check the silhouette from the front and side before sewing. Move the attachment higher if the rounded tops disappear behind the body, while keeping the narrow bases firmly anchored.
The Body Does Not Sit Flat
Redistribute the stuffing and press the base firmly against a flat surface.
If necessary, use a few hidden shaping stitches across the bottom.
Frequently Asked Questions
Is this mini crochet turkey pattern suitable for beginners?
It is best for a confident beginner who already knows how to make a magic ring, single crochet, increases, decreases, and simple sewn assembly.
What yarn should I use?
DK or light worsted cotton or cotton blend works well because it provides clear stitch definition and keeps the small tail feathers structured.
Can I use acrylic yarn?
Yes. Choose an acrylic that is not extremely soft if you want the feathers to hold their shape.
Can I use plush yarn?
You can, but the turkey will become much larger and the small wattle, beak, and feet may need to be simplified.
Do the tail feathers need stuffing?
No. This version leaves all five feathers unstuffed, with their narrow bases flattened and sewn closed.
Can I make only three feathers?
Yes. Use one central feather and one on each side.
The finished turkey will have a simpler silhouette.
Can I make seven feathers?
Yes. Make two additional feathers and angle them farther outward.
Seven feathers create a fuller tail but add more weight to the back.
Can I embroider the eyes?
Yes. Embroidered eyes work very well on a small turkey.
Can I hang the turkey as an ornament?
Yes, after adding a securely sewn hanging loop through several stitches at the upper back of the head. Check the balance and attachment before hanging. The main instructions describe a sitting decoration.
Can I turn the turkey into a keychain?
Yes, although the hardware should be attached through several reinforced stitches rather than one single crochet stitch.
Can I make the turkey smaller?
Use thinner yarn and a smaller hook while following the same stitch counts.
How do I make the turkey larger?
Use thicker yarn and an appropriate hook. Keep in mind that the larger feathers may require more secure attachment.