Free Crochet Chicken Pattern – Easy Amigurumi Hen
Make an adorable chicken with this free crochet chicken pattern. Follow easy steps for the body, wings, comb, beak, feet, tail, face, and assembly.
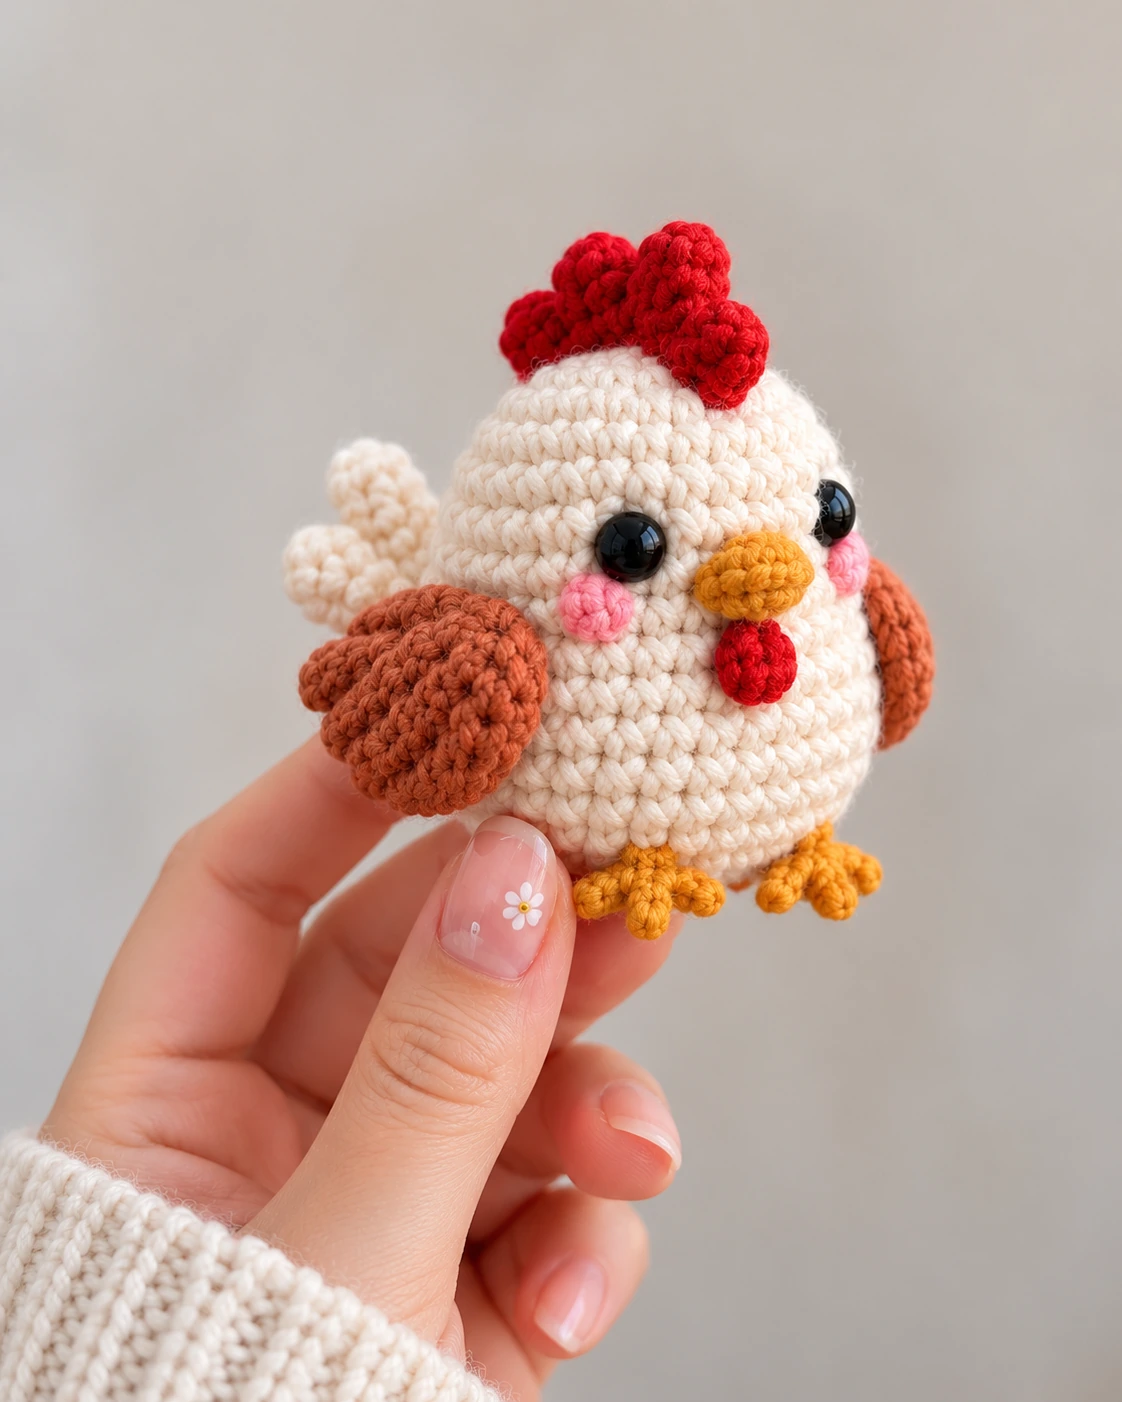
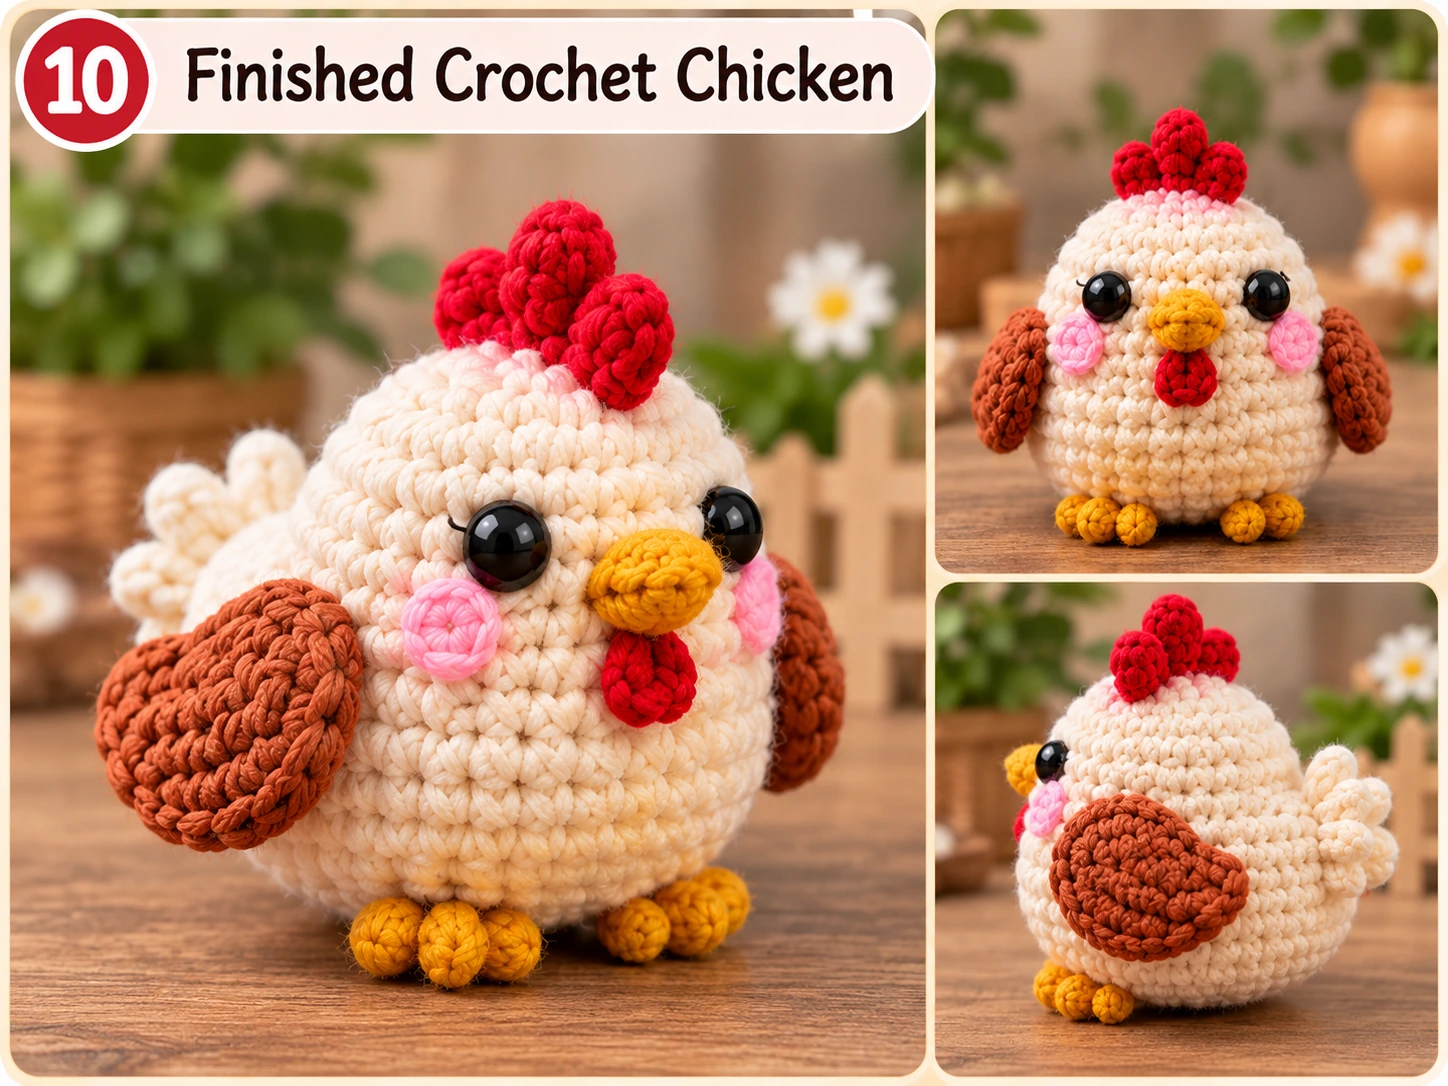
This free crochet chicken pattern makes a small, round amigurumi hen with a creamy body, rusty brown wings, a bright red comb and wattle, a mustard-yellow beak and feet, glossy eyes, and tiny pink cheeks.
The finished chicken has a deliberately plump shape that makes it especially cute when photographed in the palm of your hand. It works well as a small shelf decoration, farm-animal amigurumi, handmade gift, or addition to a collection of crochet animals.
This version takes a slightly different visual direction. Instead of eliminating every sewn detail, the design uses a few separate pieces so the finished hen has more character: dimensional wings, a three-bump comb, little feet, a wattle, and a small tail.
The basic stitches are simple. If you already know how to make a magic ring, single crochet, increase, and invisible decrease, you should be comfortable with most of the project.
Pattern at a Glance
Skill level: Confident beginner
Crochet terms: US
Construction: Body worked in continuous rounds with separately attached details
Main stitch: Single crochet
Recommended yarn: DK or light worsted yarn
Recommended hook: 3 mm
Approximate finished height: 9–11 cm / 3.5–4.3 inches, depending on yarn, hook, tension, and stuffing
Main colors:
- Cream — chicken body and tail
- Rust or terracotta brown — wings
- Red — comb and wattle
- Mustard or golden yellow — beak and feet
- Pink — optional cheeks
Gauge is not critical for this amigurumi. What matters most is creating stitches tight enough that the fiberfill does not show through.
If you crochet loosely, try a hook slightly smaller than the yarn label normally recommends.
Materials and Tools
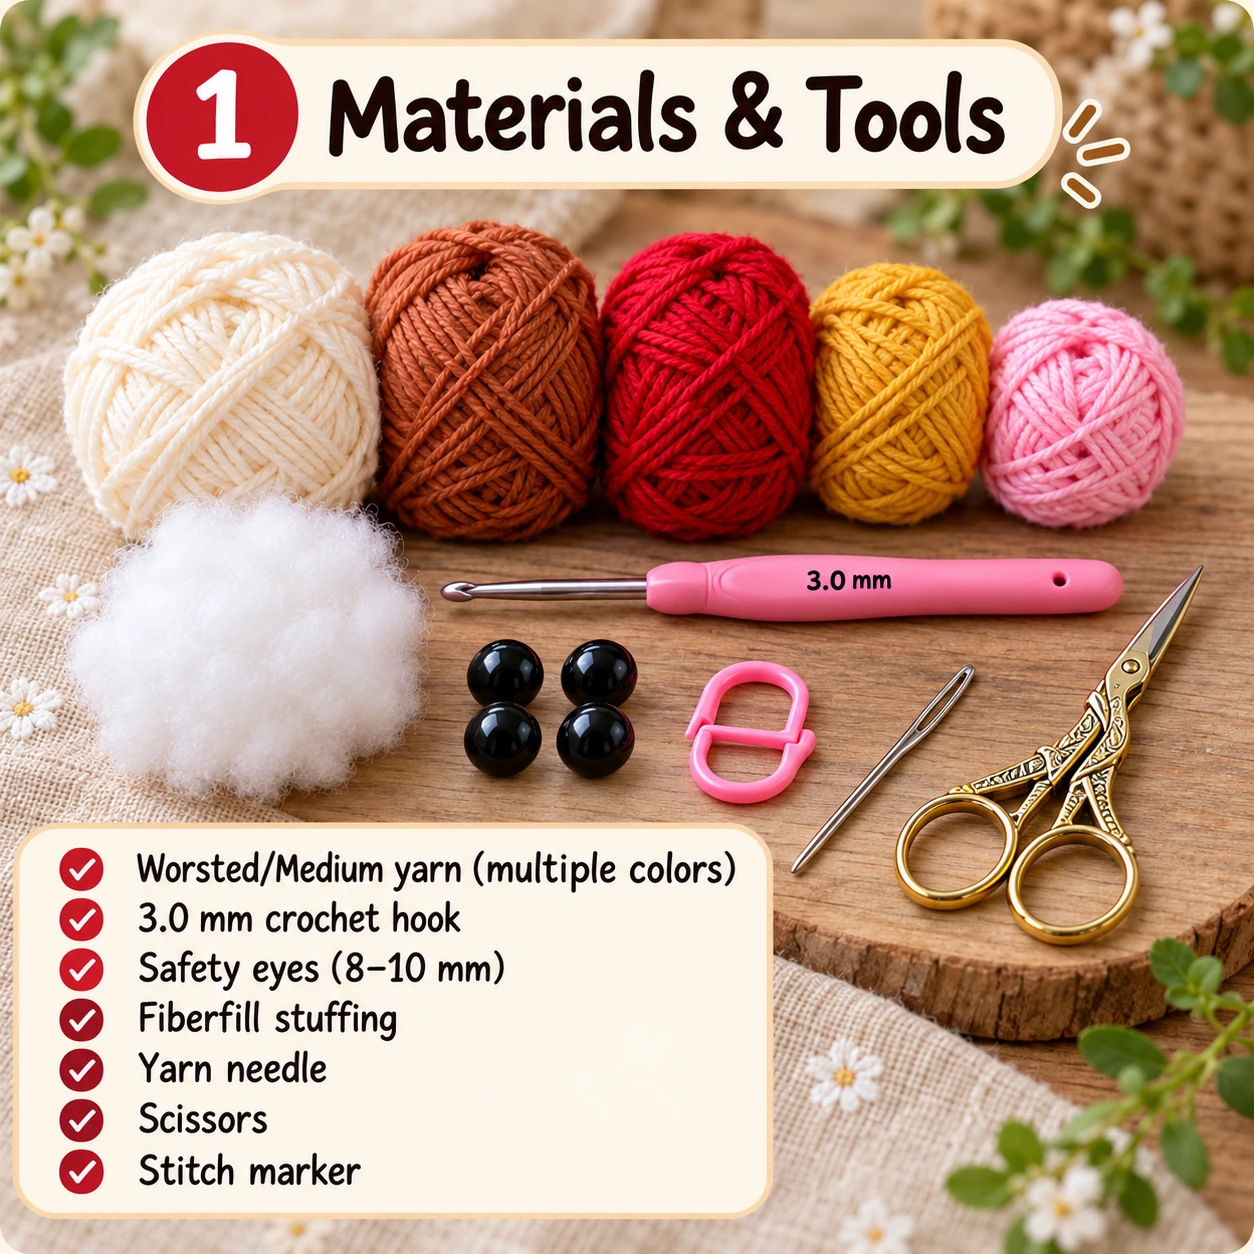
You will need:
- Approximately 35–45 g cream DK or light worsted yarn
- Approximately 10–15 g rust-brown yarn
- Small amount of red yarn
- Small amount of mustard-yellow yarn
- Small amount of pink yarn or embroidery thread
- 3 mm crochet hook
- Two 8 mm safety eyes
- Polyester fiberfill
- Locking stitch marker
- Yarn needle
- Pins
- Scissors
You can substitute embroidered eyes if the chicken is intended for a baby or very young child.
Small plastic safety eyes are detachable components and are not appropriate for every age or use.
Crochet Abbreviations
This pattern uses US crochet terminology.
| Abbreviation | Meaning |
|---|---|
| MR | Magic ring |
| ch | Chain |
| sc | Single crochet |
| inc | Increase — 2 sc in one stitch |
| dec | Invisible decrease |
| sl st | Slip stitch |
| st | Stitch |
| sts | Stitches |
| Rnd | Round |
| FO | Fasten off |
The number in parentheses at the end of each round shows how many stitches you should have when that round is complete.
Important Pattern Notes
Work the main body in a continuous spiral. Do not join rounds unless the instructions specifically tell you to do so.
Place a stitch marker in the first stitch of every round and move it upward as you work.
Count your stitches regularly. A single missed increase can make the body lean or become asymmetrical.
Stuff gradually rather than pushing all the fiberfill into the chicken at the end.
The goal is a firm but still squeezable shape.
Overstuffing can stretch the spaces between stitches and make the chicken look angular instead of softly rounded.
Chicken Body
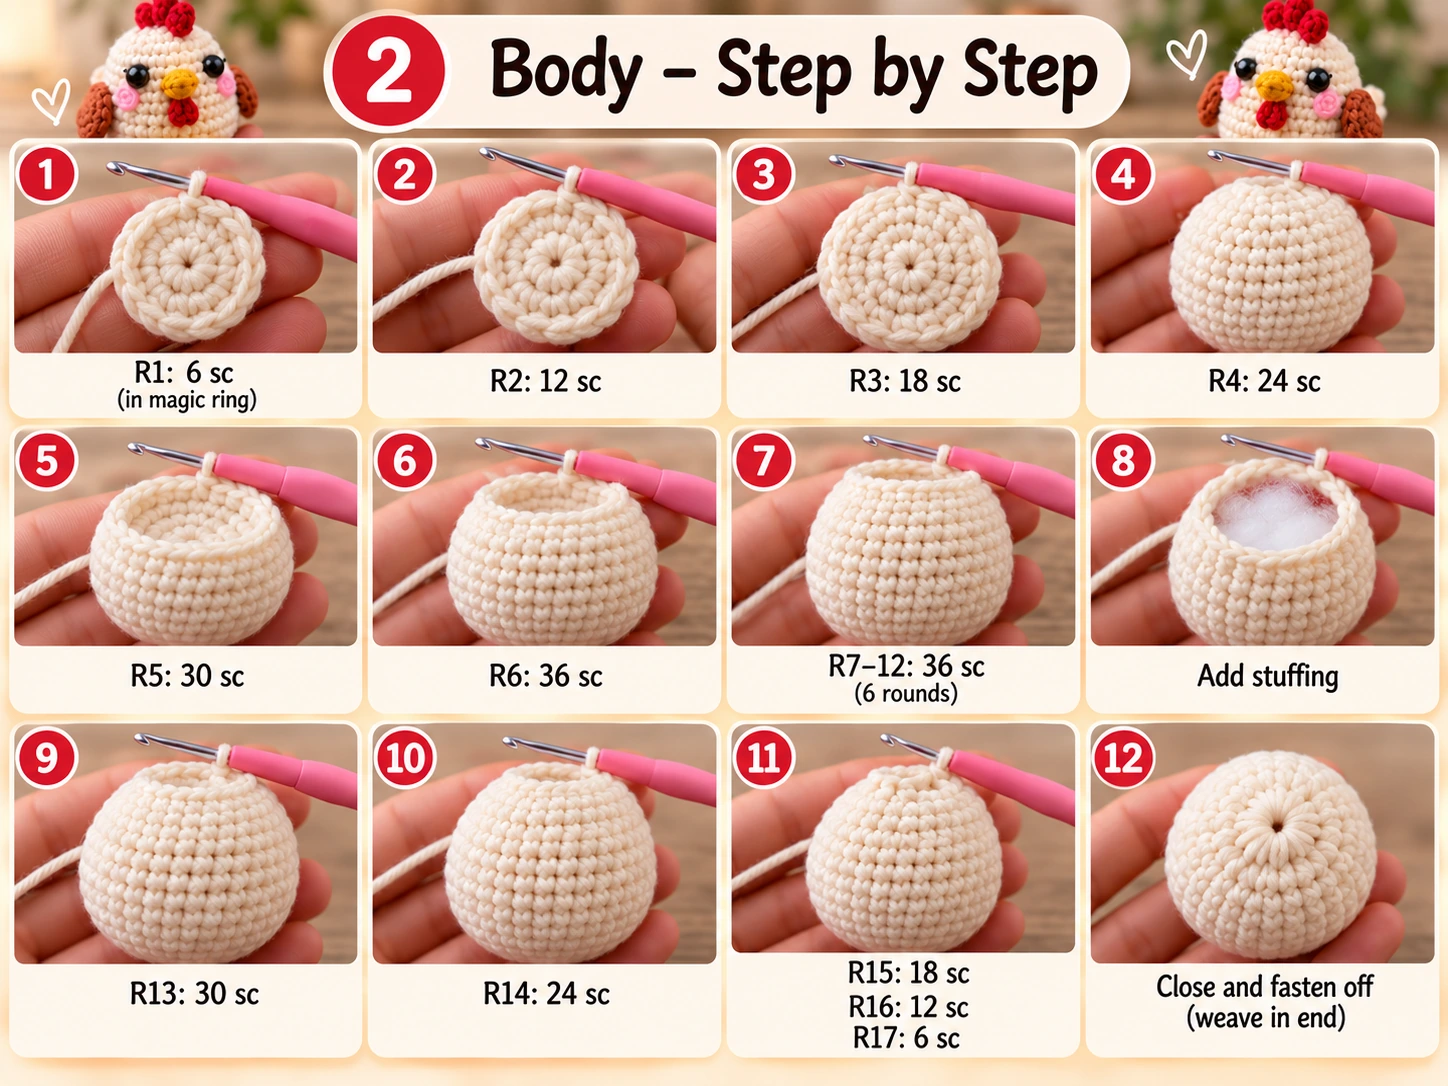
Use cream yarn.
Rnd 1
Make a MR and work 6 sc into the ring.\ (6)
Rnd 2
Inc in each stitch around.\ (12)
Rnd 3
(1 sc, inc) repeat 6 times.\ (18)
Rnd 4
(2 sc, inc) repeat 6 times.\ (24)
Rnd 5
(3 sc, inc) repeat 6 times.\ (30)
Rnd 6
(4 sc, inc) repeat 6 times.\ (36)
You now have the widest part of the lower chicken body.
Rnds 7–12
Sc in each stitch around.\ (36)
As these straight rounds grow, the flat circle will turn into a rounded bowl and then a plump body.
Add the Eyes
Place the safety eyes approximately between Rounds 9 and 10.
Start with about 7 stitches between the eyes and adjust slightly if necessary.
Before securing them permanently, look at the chicken from the front.
A wider eye placement creates a calmer expression. A slightly closer placement makes the amigurumi look younger and more cartoon-like.
Rnd 13
(4 sc, dec) repeat 6 times.\ (30)
Rnd 14
(3 sc, dec) repeat 6 times.\ (24)
Begin stuffing.
Add small pieces of fiberfill instead of one large clump.
Push stuffing toward the lower edges first so the bottom stays rounded.
Rnd 15
(2 sc, dec) repeat 6 times.\ (18)
Add more stuffing.
Check the body from the front and side.
Rnd 16
(1 sc, dec) repeat 6 times.\ (12)
Finish stuffing before the opening becomes too narrow.
Rnd 17
Dec 6 times.\ (6)
Fasten off, leaving a short tail.
Thread the tail through the front loops of the remaining six stitches, pull firmly, and secure.
Hide the yarn tail inside the body.
The finished body should look like a plump egg rather than a perfectly round ball.
Crochet the Wings
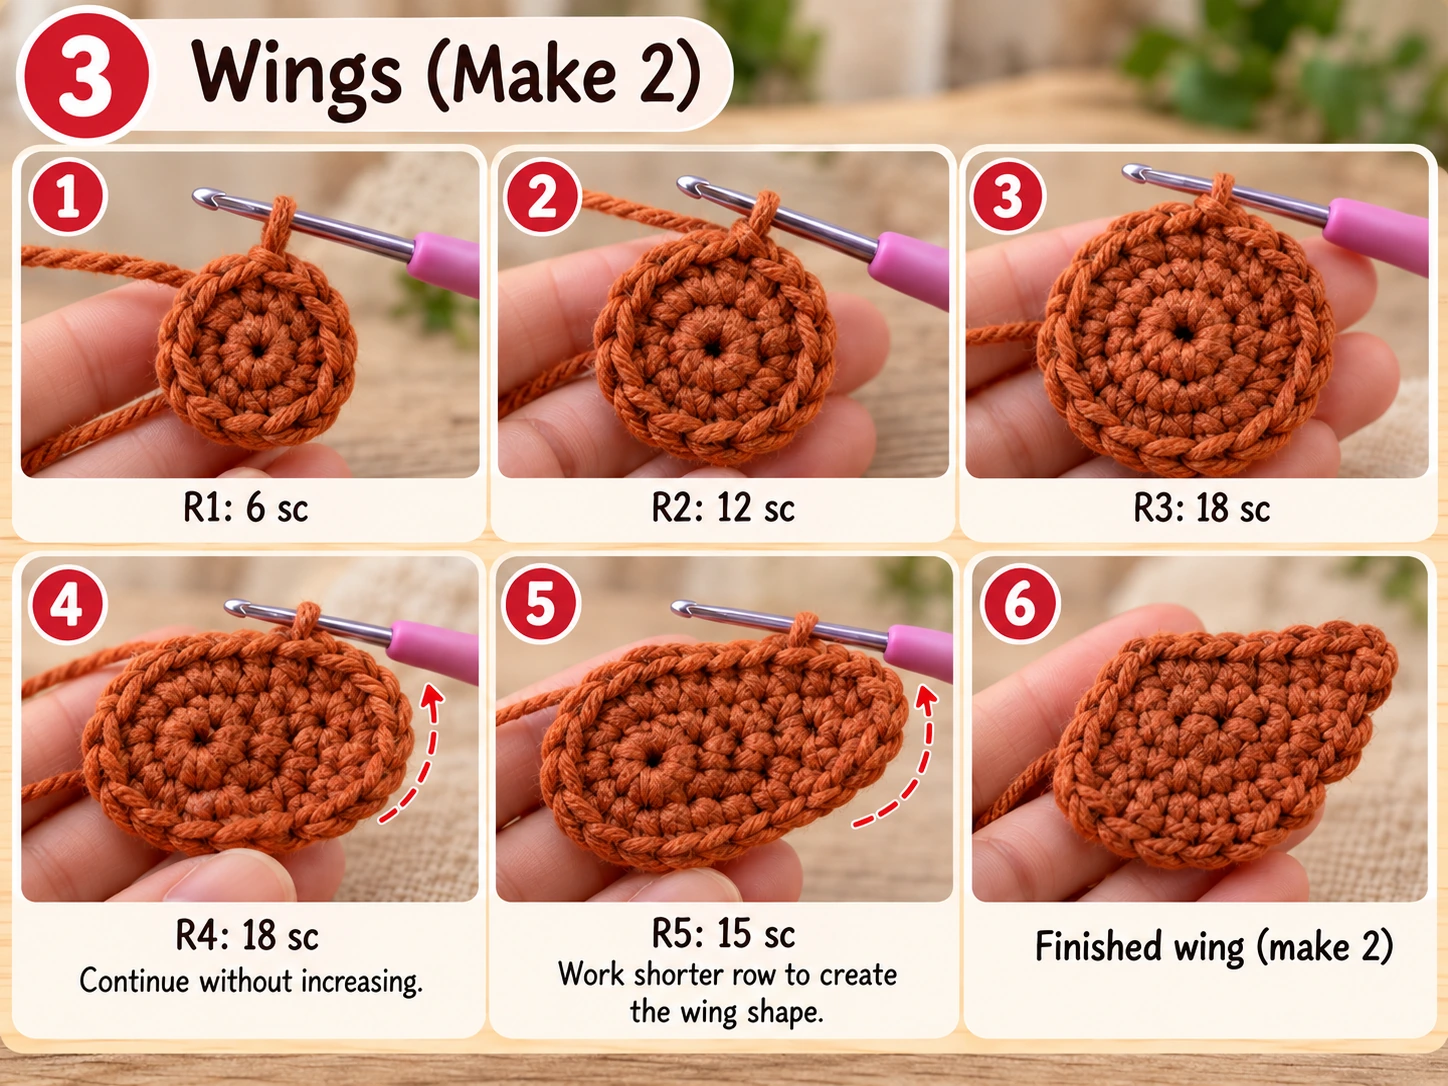
Make 2 using rust, terracotta, or medium brown yarn.
Rnd 1
6 sc in MR.\ (6)
Rnd 2
Inc around.\ (12)
Rnd 3
(1 sc, inc) repeat 6 times.\ (18)
Rnd 4
Sc around.\ (18)
Rnd 5
(4 sc, dec) repeat 3 times.\ (15)
Fasten off with a long tail for sewing.
Do not stuff the wings.
Gently flatten each piece with your fingers.
The slight cupping created by the rounds gives the wings more depth than completely flat circles.
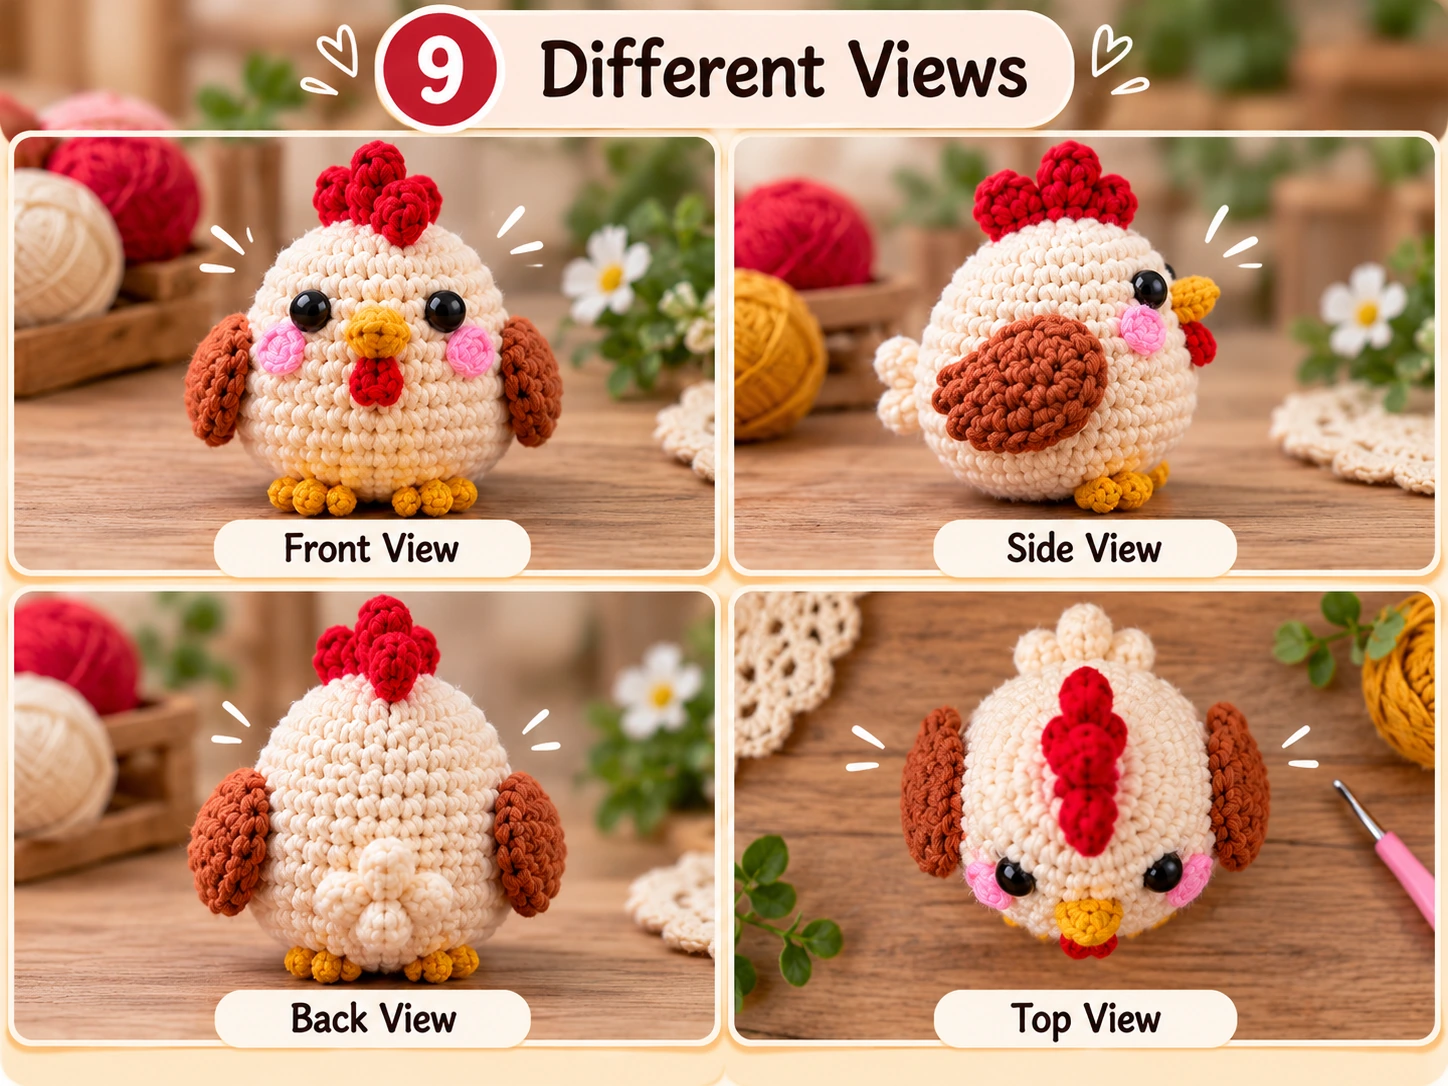
Position one wing on each side of the chicken around the middle of the body.
For the appearance shown in our finished design, angle the top of each wing slightly backward.
This keeps the face visually open and makes the chicken look rounder from the front.
Make the Chicken Comb
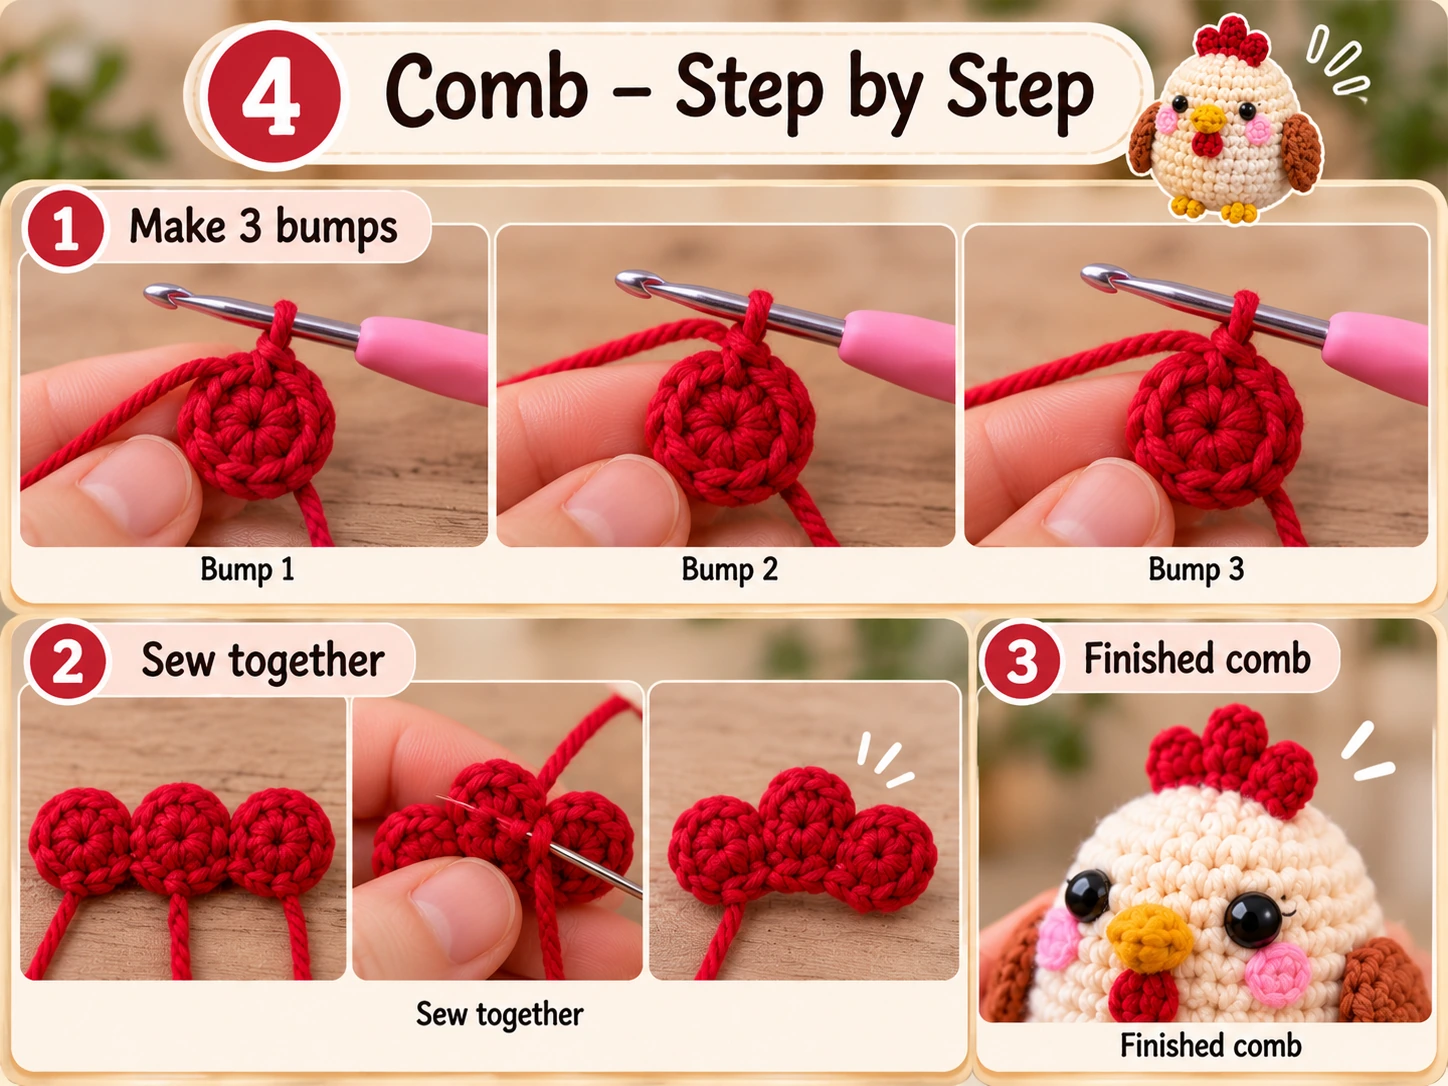
Use red yarn.
The comb is made from three small rounded bumps.
Side Bumps — Make 2
Rnd 1: 5 sc in MR. (5)\ Rnd 2: Sc around. (5)
Fasten off.
Center Bump — Make 1
Rnd 1: 6 sc in MR. (6)\ Rnd 2: Sc around. (6)
Fasten off with a longer sewing tail.
Arrange the three bumps side by side with the slightly larger bump in the center.
Use the center yarn tail to secure the three pieces together along their lower edges.
The finished comb should form a small three-lobed crown.
Do not stuff it.
Later, sew it across the upper center of the chicken.
Crochet the Beak
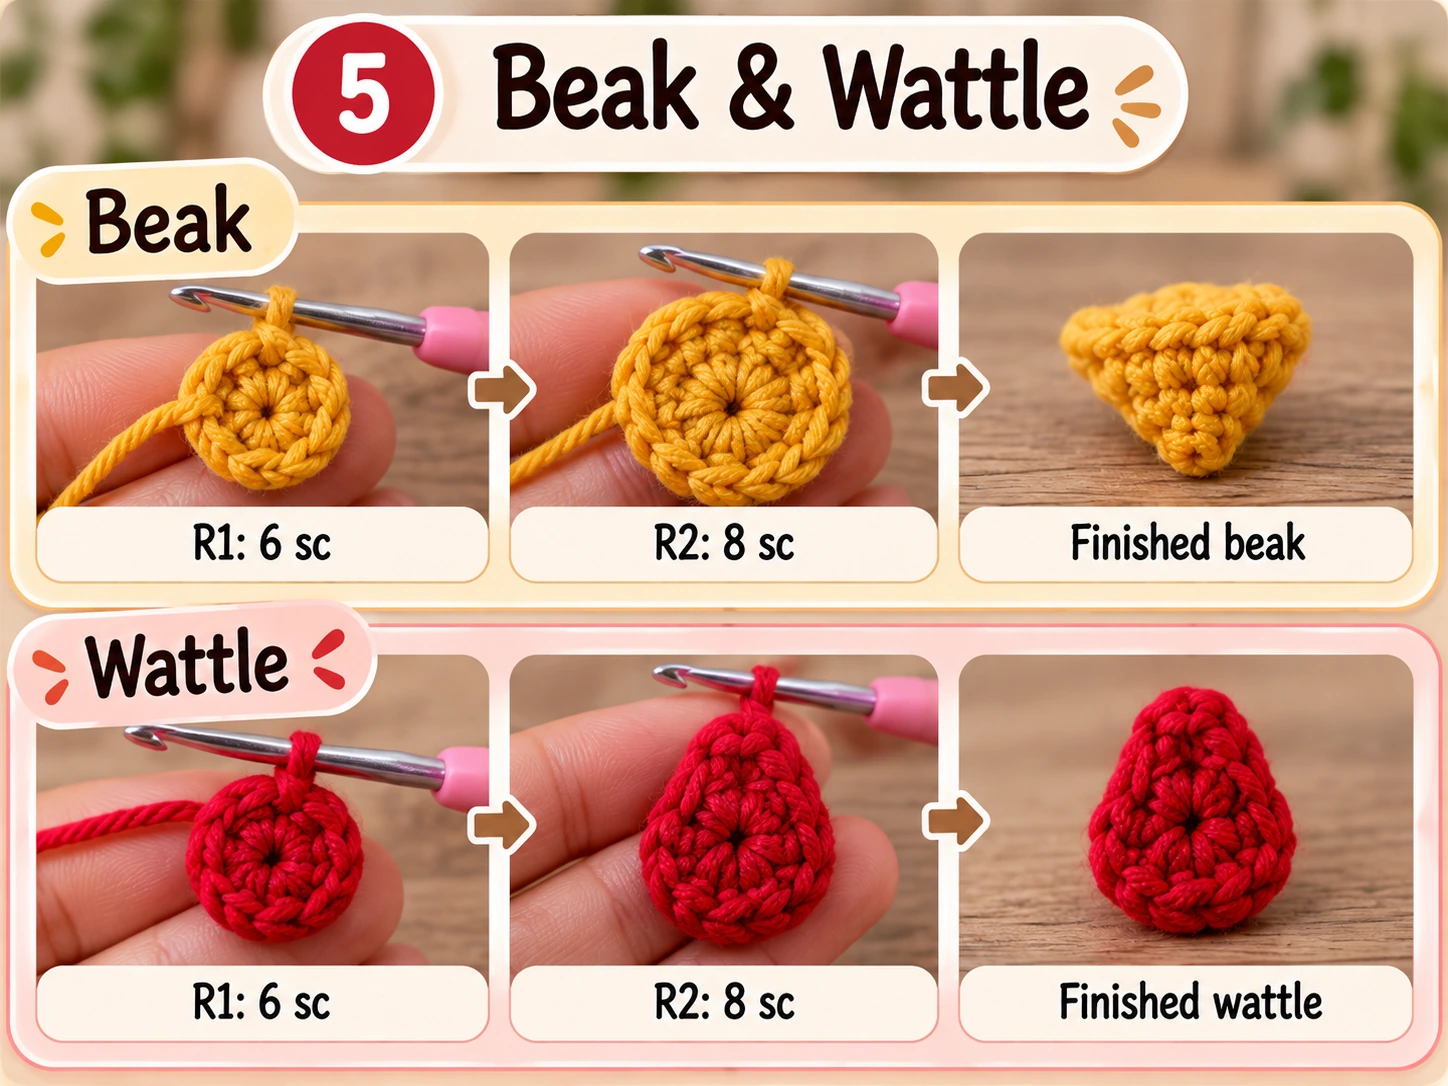
Use mustard or golden-yellow yarn.
Rnd 1: 4 sc in MR. (4)
Rnd 2: Inc in each stitch. (8)
Rnd 3: Sc around. (8)
Fasten off, leaving a long tail.
Do not stuff.
Flatten the piece gently so it forms a tiny rounded triangle or oval.
Position it centrally below the eyes.
The beak should remain fairly small. If the beak is too wide, it can dominate the face and make the hen look more like a duck.
Make the Wattle
Use red yarn.
Rnd 1: 6 sc in MR. (6)
Rnd 2: Sc around. (6)
Rnd 3: (1 sc, dec) repeat twice. (4)
Fasten off with a long sewing tail.
Do not stuff.
Pin the wattle immediately beneath the beak.
Allow the bottom of the piece to hang freely instead of sewing every edge flat against the body.
This creates the small dangling red detail visible on the finished chicken.
Crochet the Feet
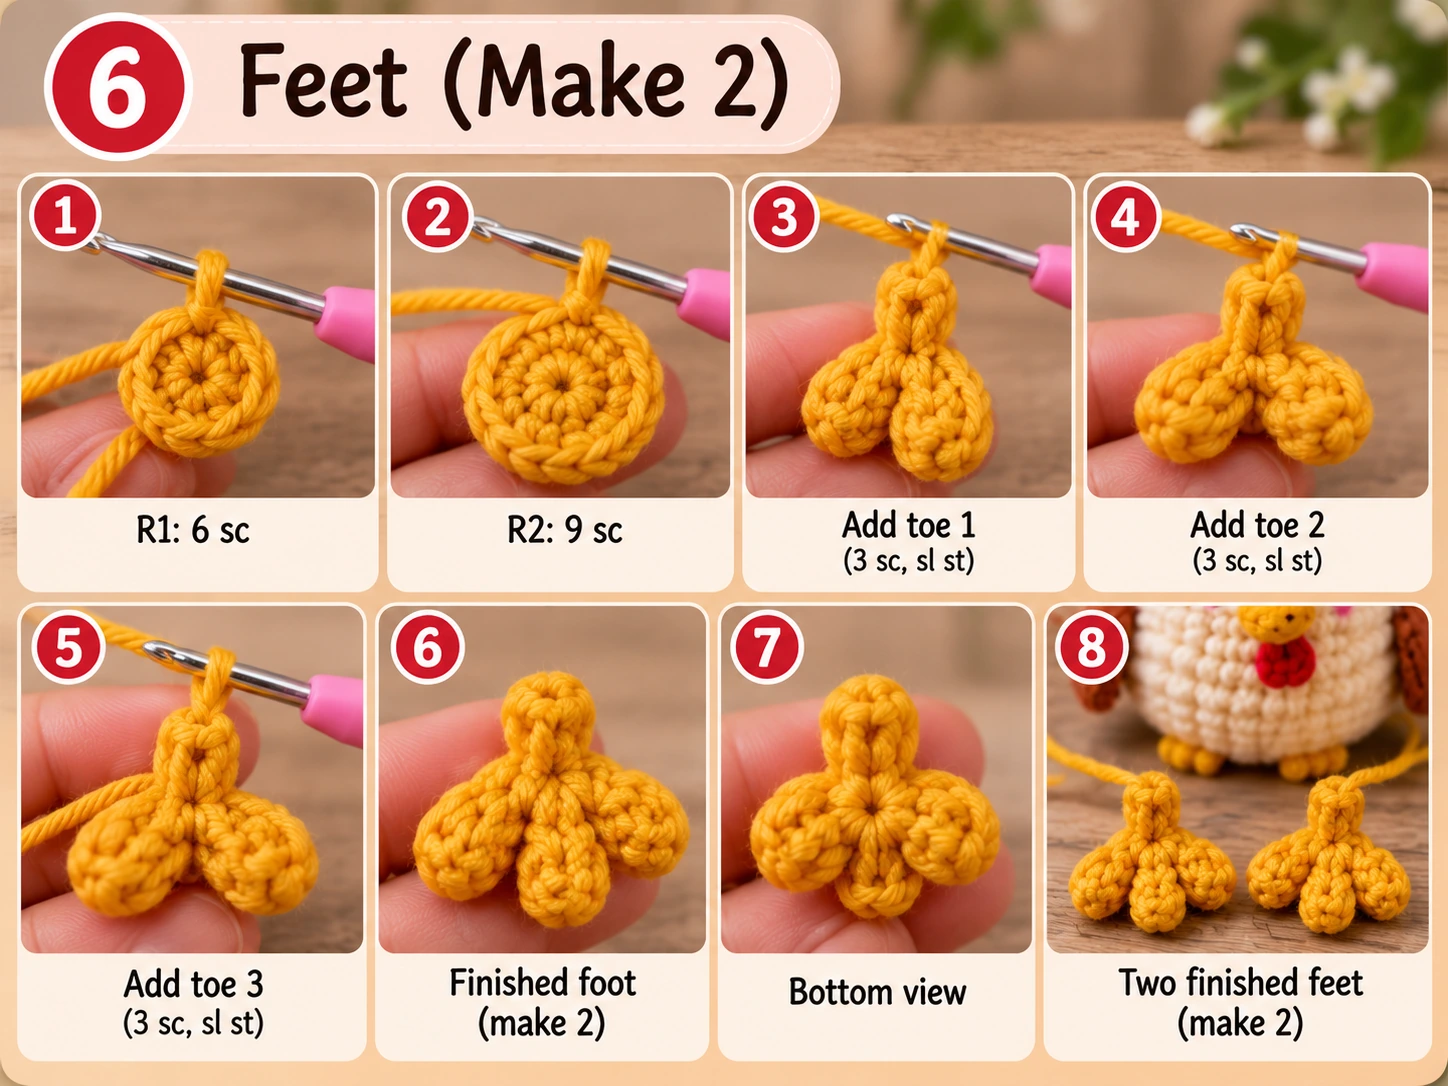
Make 2 using mustard-yellow yarn.
The feet are intentionally tiny because the body is the visual focus of this amigurumi.
Foot Base
Rnd 1: 6 sc in MR. (6)
Rnd 2: (1 sc, inc) repeat 3 times. (9)
Do not fasten off yet.
Make the Toes
You will make three tiny toes from the edge of the foot.
Ch 3, sl st in second ch from hook, sc in next ch, sl st into the next stitch of the foot.
Repeat this sequence three times, spacing the toes closely together.
Fasten off with a long tail.
Do not stuff the foot.
Fold or shape the small round base slightly so the three toes point forward.
Repeat for the second foot.
The feet should be noticeable from the front without becoming large enough to support the chicken like long legs.
Make the Tail
Use cream yarn.
The tail consists of three simple feather loops.
Ch 5.
Starting in the second chain from the hook, work:
sl st, sc, hdc, dc.
Sl st near the base.
Repeat the same feather sequence two more times from the same general base area:
ch 5, sl st, sc, hdc, dc.
You should now have three narrow feather shapes.
Fasten off with a long sewing tail.
Fold or fan them slightly apart.
Sew the tail to the center back of the chicken, approximately opposite the face and slightly above the lowest part of the body.
Add the Facial Details
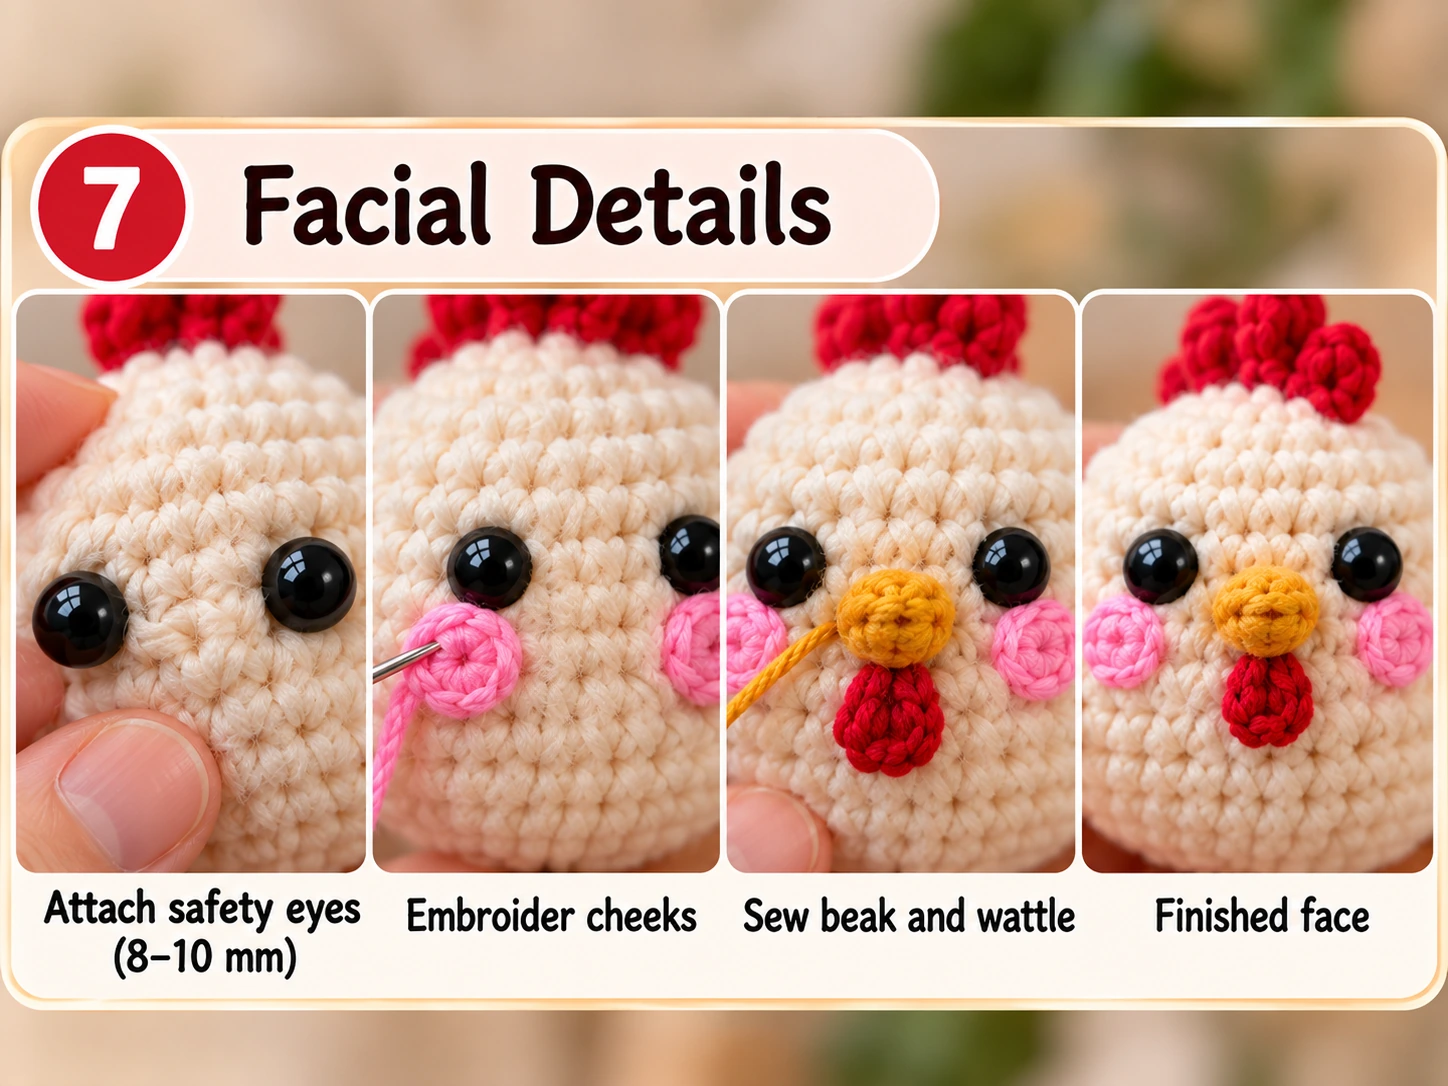
The safety eyes provide most of the expression, so keep the remaining details small.
Cheeks
Using pink yarn or embroidery thread, make a few short horizontal stitches beneath the outer edge of each eye.
Alternatively, crochet tiny pink circles if you prefer the raised cheeks shown in the visual design.
For a subtle version, embroidery is easier and less bulky.
Eye Highlights
Optional white embroidery can be added beside the safety eyes.
One tiny stitch is usually enough.
Facial Balance
Before fastening every feature permanently, place the chicken upright and check:
- Are both eyes level?
- Is the beak centered?
- Is the wattle below the beak?
- Is the comb centered above the eyes?
- Are the cheeks equally spaced?
A difference of only one stitch can be noticeable on a small amigurumi face.
Chicken Assembly
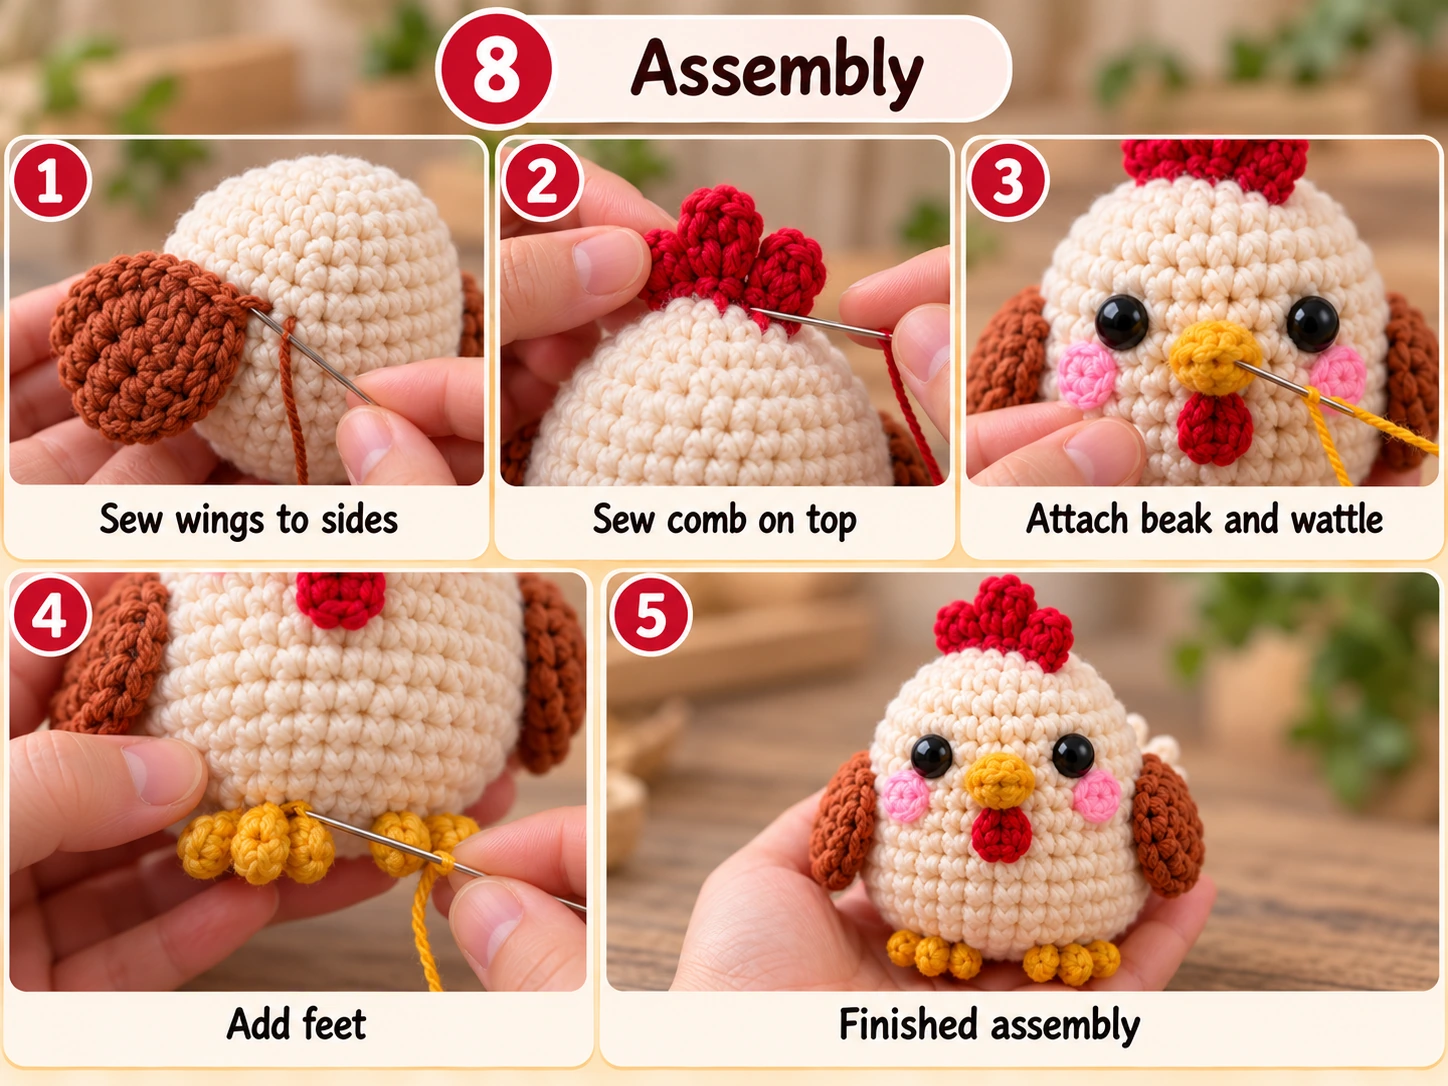
Assembly is where the separate pieces begin to look like the finished chicken.
Use pins before sewing whenever possible.
1. Attach the Wings
Pin the brown wings to each side.
The upper edges can begin around the middle of the body.
Angle the lower portion slightly backward.
Sew around most of the wing edge while allowing a little natural dimension in the center.
2. Attach the Comb
Center the red three-bump comb on top of the head.
View the chicken from the front.
It should run from front to back rather than side to side.
Sew securely along the bottom of the comb.
3. Add the Beak
Pin the mustard beak below and between the eyes.
Sew around the back edge.
Avoid pulling your stitches too tightly because this can create a dent in the cream body.
4. Attach the Wattle
Place the red wattle directly beneath the beak.
Secure only the upper portion.
Leave the lower end free.
5. Attach the Feet
Turn the chicken toward you.
Pin both feet near the bottom front of the body.
The toes should point forward and remain visible when the chicken is sitting upright.
Sew the round base of each foot firmly to the body.
6. Attach the Tail
Sew the cream feather cluster to the center back.
Fan the three feathers slightly.
Check the chicken from the side to make sure the tail sits high enough to be visible.
7. Final Shaping
Roll the chicken gently between your palms.
Massage the stuffing toward any areas that appear flat.
Adjust the wings, comb, tail, and feet with your fingers.
Your crochet chicken is now finished.
Color Ideas
The same crochet chicken pattern can look completely different depending on the yarn palette.
| Style | Body | Wings | Comb/Wattle | Beak/Feet |
|---|---|---|---|---|
| Farmhouse | Cream | Rust brown | Red | Mustard |
| Classic Hen | White | Medium brown | Bright red | Orange |
| Pastel | Ivory | Blush pink | Dusty rose | Pale yellow |
| Woodland | Beige | Dark brown | Burgundy | Ochre |
| Spring | Soft yellow | Cream | Coral | Orange |
| Neutral | Oatmeal | Taupe | Brick red | Caramel |
| Fantasy | Lavender | Purple | Raspberry | Gold |
For Pinterest photography, the farmhouse palette works especially well because the cream body contrasts clearly against brown wood, green plants, and warm neutral interiors.
How to Make the Chicken Look Extra Cute
The shape matters as much as the colors.
Use a smaller hook than you would normally use for flat crochet fabric so the stitches remain compact.
Avoid stuffing the chicken until it becomes hard.
A gently rounded surface photographs better and feels more handmade.
Keep the feet small.
Large feet can change the character completely.
Position the eyes before attaching the beak. The eyes are your best reference point for centering all the other facial features.
The wings should sit slightly forward of the exact side center when viewed from the front. This allows some brown color to remain visible in frontal photos.
Common Crochet Chicken Problems
Why is my chicken leaning?
The most common reason is uneven stuffing.
Massage the fiberfill away from the heavier side.
If the feet are sewn at different heights, reposition one before securing the yarn.
Why does the body look cylindrical?
You may have added too many straight rounds.
The pattern uses Rounds 7–12 at 36 stitches to provide height without making the body excessively long.
Why are there holes between my stitches?
Your hook may be too large for your yarn, or the body may be overstuffed.
Try a smaller hook or remove a little filling.
Why does the comb fall sideways?
Add another small sewing stitch at the base of the center bump.
Do not sew through the upper portion because the lobes should remain dimensional.
Why do my wings look different?
Make sure both wings have the same stitch count before fastening off.
Pin both wings before sewing either one permanently.
Why is the face crooked?
Spiral crochet naturally causes stitches to shift slightly.
Use the finished body shape—not only the stitch marker—as your visual reference when positioning the face.