Crochet Poison Apple Pattern: Easy 10-Step Halloween Guide
Make this crochet poison apple pattern with a red amigurumi apple, toxic green drips, stem, leaf, and a cute spooky face for Halloween.
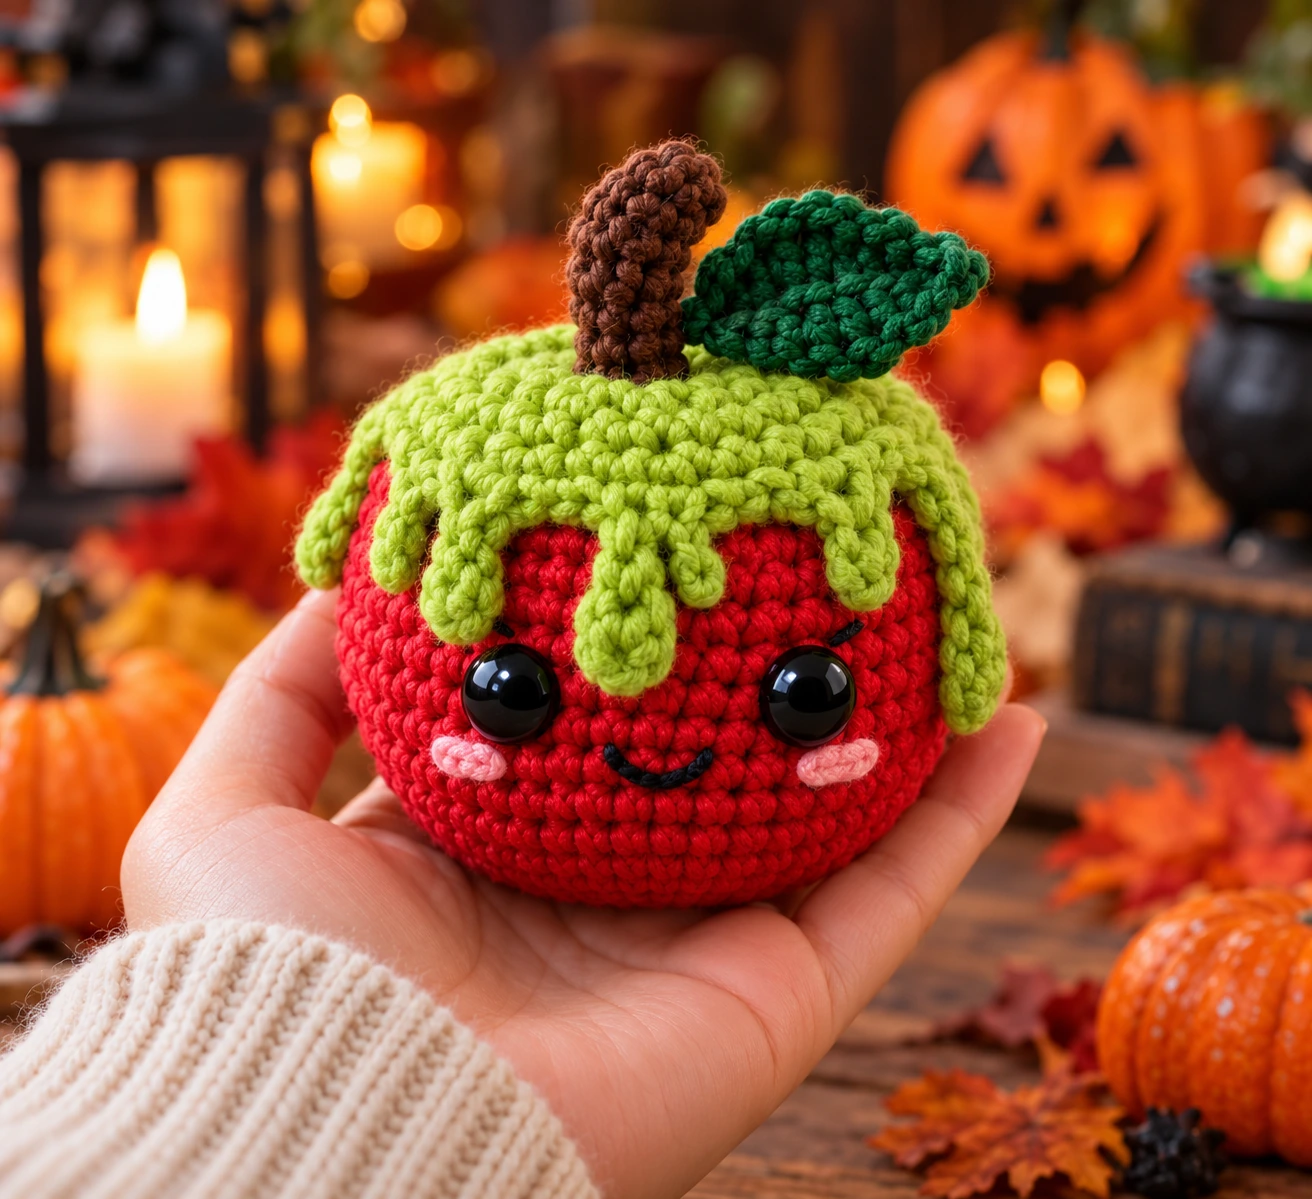
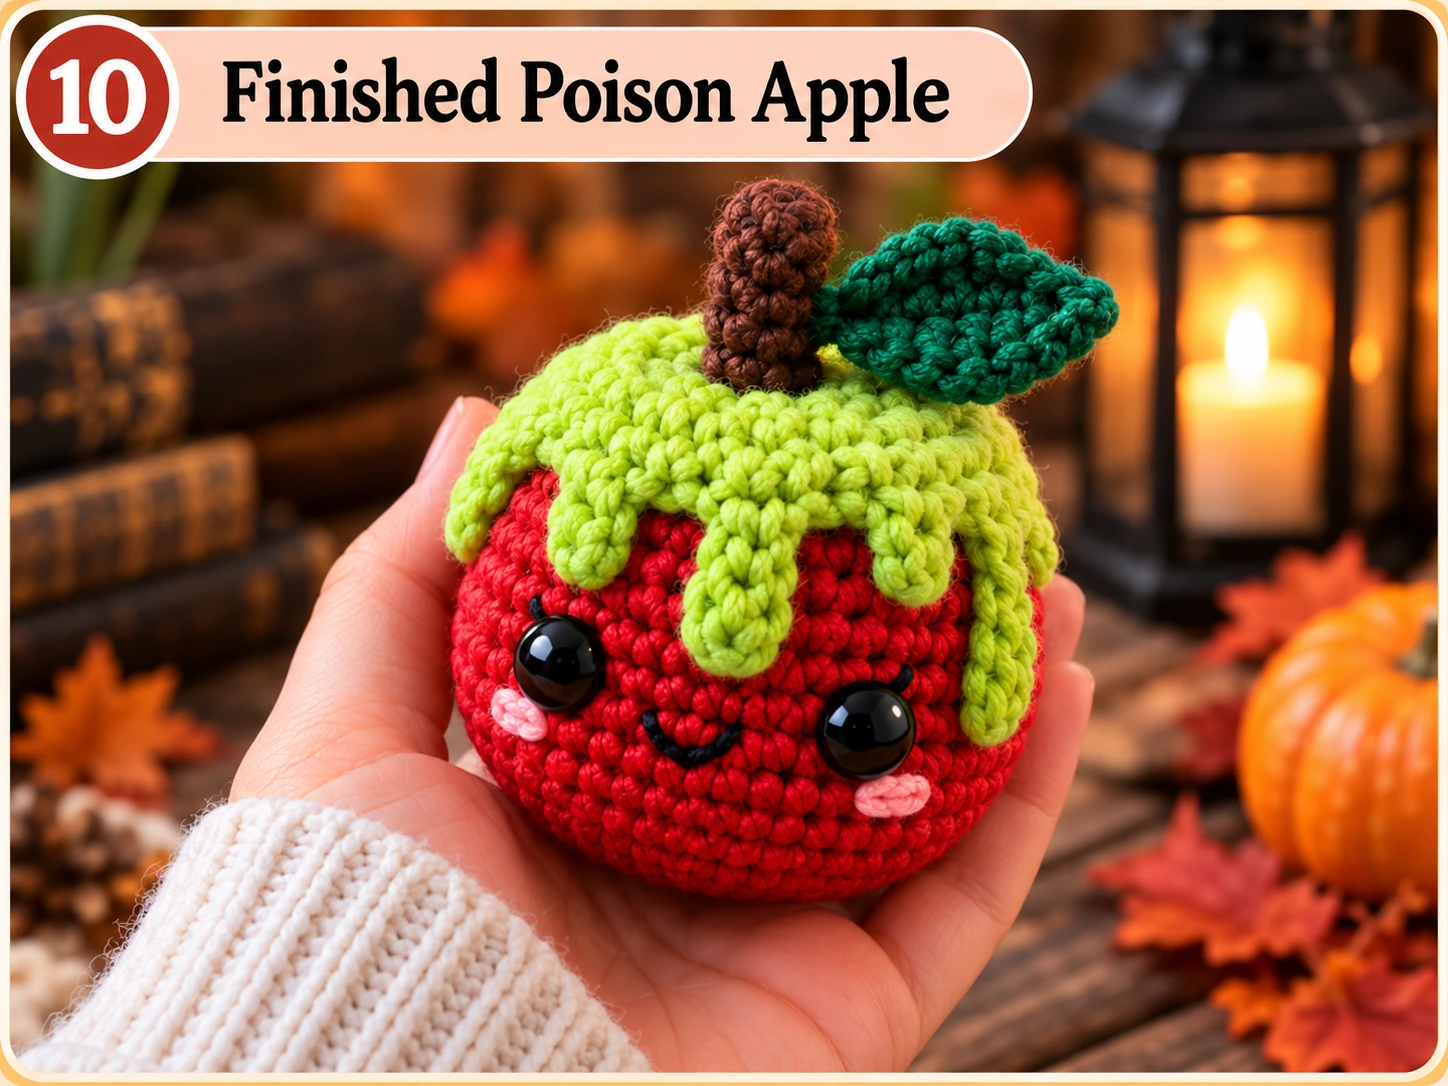
This crochet poison apple pattern turns a bright red apple with dripping green poison into a spooky-cute Halloween amigurumi that is surprisingly easy to recognize and fun to make.
This crochet poison apple pattern creates a small three-dimensional Halloween amigurumi with a rounded red apple, a separate toxic-green poison cap, four uneven drips, a curved brown stem, a green leaf, and a simple kawaii face.
The project is small enough to fit comfortably in one hand, making it a fun choice for Halloween shelf décor, seasonal displays, desk decorations, gift baskets, or handmade gifts.
The apple body uses familiar amigurumi increases and decreases, while a simple shaping technique creates the indentation that gives the finished piece its recognizable apple silhouette. The poison section is crocheted separately, so you can create the entire red body without complicated color changes.
The four poison drips are intentionally different lengths. That slight asymmetry helps the green section look like liquid flowing naturally down the apple rather than a perfectly even decorative border.
For more seasonal projects, browse our Halloween and occasion crochet ideas.
Crochet Poison Apple Pattern at a Glance
| Detail | Pattern Information |
|---|---|
| Skill Level | Confident Beginner |
| Crochet Terms | US |
| Project Type | Amigurumi |
| Construction | Separate apple, poison cap, stem and leaf |
| Recommended Yarn | DK / light worsted |
| Hook | 3.0 mm |
| Finished Size | Approx. 9–11 cm / 3.5–4.3 in tall |
| Main Color | Apple red |
| Poison | Toxic green |
| Stem | Dark brown |
| Leaf | Dark or medium green |
| Gauge | Not critical |
| Body Method | Continuous spiral |
| Sewing | Light assembly required |
Finished measurements may vary depending on yarn, hook size, tension, stuffing, and shaping. This pattern uses US crochet terminology.
Crochet Poison Apple Pattern Materials and Tools
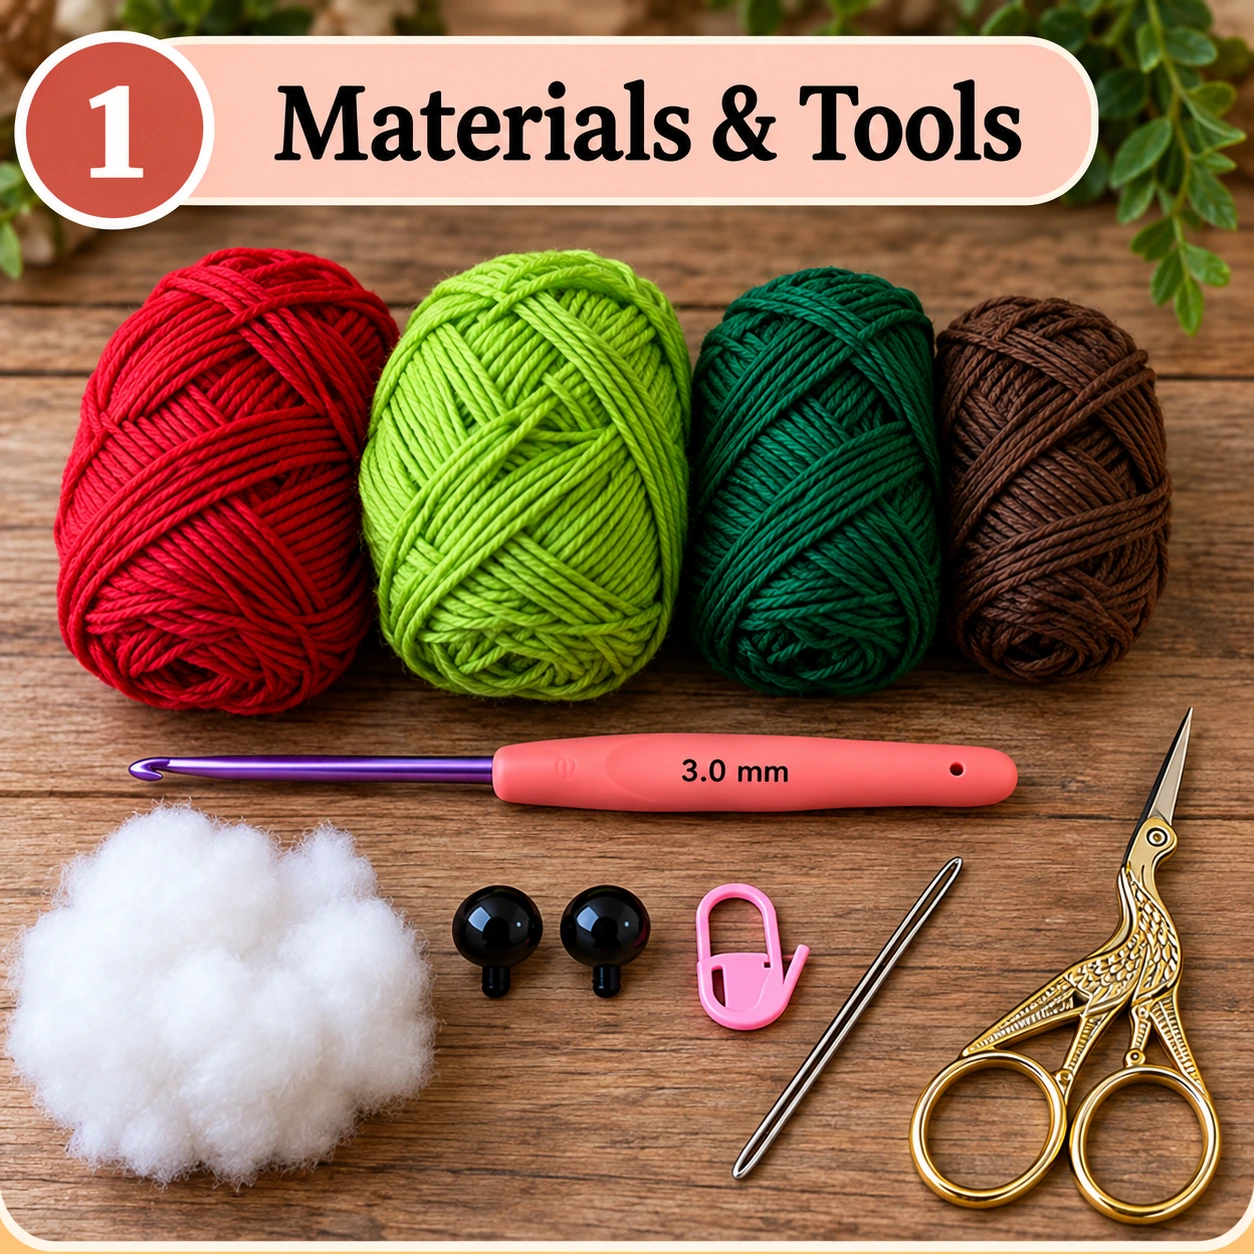
You only need a small amount of yarn for this project, so it can be a useful way to use leftover yarn from larger amigurumi projects.
Yarn
- 30–40 g red DK/light worsted yarn for the apple
- 10–15 g bright green yarn for the poison
- Small amount of dark brown yarn for the stem
- Small amount of darker or medium green yarn for the leaf
- Small amount of black embroidery yarn for the mouth
Tools
- 3.0 mm crochet hook
- Fiberfill stuffing
- Two 8 mm safety eyes
- Stitch marker
- Yarn needle
- Pins
- Scissors
Safety eyes are optional. If the finished apple is intended for a baby or very young child, embroidered facial features may be more appropriate than removable plastic components.
Yarn and Color Choices
Strong color contrast is important for this design. Use a rich red for the apple body and a vivid toxic or slime green for the poison.
If both colors are too dark, the drips can become difficult to see, especially in smaller photos. For the stem, use dark brown yarn. For the leaf, choose a green darker than the poison color so the leaf reads visually as a separate part of the apple.
Crochet Abbreviations
| Abbreviation | Meaning |
|---|---|
| MR | Magic Ring |
| ch | Chain |
| sc | Single Crochet |
| inc | Increase — 2 sc in one stitch |
| dec | Invisible decrease |
| hdc | Half Double Crochet |
| dc | Double Crochet |
| sl st | Slip Stitch |
| st | Stitch |
| sts | Stitches |
| Rnd | Round |
| FO | Fasten Off |
Numbers in parentheses show the total stitch count at the end of the round. For example, (3 sc, inc) × 6 (30) means repeat three single crochets followed by one increase six times. You should finish the round with 30 stitches.
These abbreviations use standard US crochet terminology. You can also compare them with the Craft Yarn Council crochet abbreviations.
Important Crochet Poison Apple Pattern Notes
Work in continuous rounds
The apple body, poison cap, and stem are worked in continuous spirals unless otherwise stated. Place a stitch marker in the first stitch of each round and move it upward as you work.
Count your stitches
The apple relies on symmetrical increases and decreases. A missed increase or decrease can change the final shape, so check your stitch count regularly.
Crochet firmly
Your fabric should be dense enough that the stuffing does not show through the stitches. If you see large gaps, try using a slightly smaller hook.
Stuff gradually
Do not add all the fiberfill at once. The apple should be firm enough to hold its shape but still flexible enough to shape after closing.
Test the poison cap before sewing
Yarn weight and tension can change the size of the green cap. Always place it on the finished apple before sewing it permanently.
If you are new to amigurumi shaping, our invisible decrease crochet technique guide can help with the decrease rounds.
How to Crochet the Apple Body for This Crochet Poison Apple Pattern
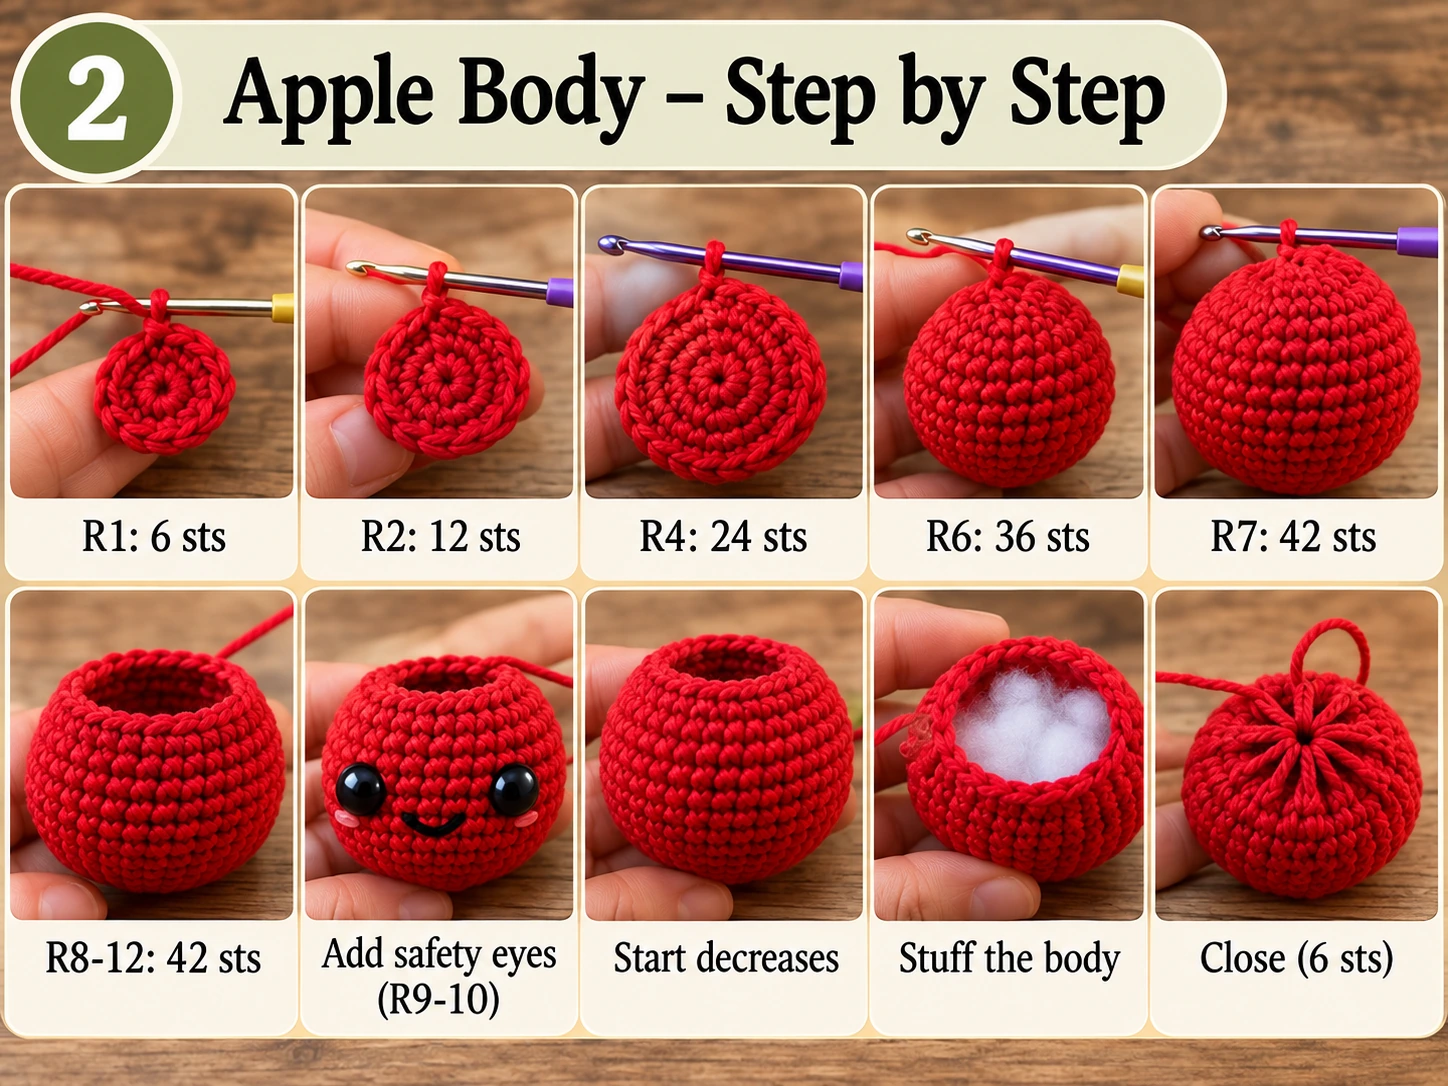
For the main body of this crochet poison apple pattern, use red yarn. The apple begins at the top and expands outward.
Round 1
6 sc in MR. (6)
Round 2
inc × 6. (12)
Round 3
(1 sc, inc) × 6. (18)
Round 4
(2 sc, inc) × 6. (24)
Round 5
(3 sc, inc) × 6. (30)
Round 6
(4 sc, inc) × 6. (36)
Round 7
(5 sc, inc) × 6. (42)
Your work should now resemble a flat circle.
Rounds 8–12
sc around. (42)
The circle will gradually curve into a rounded apple body.
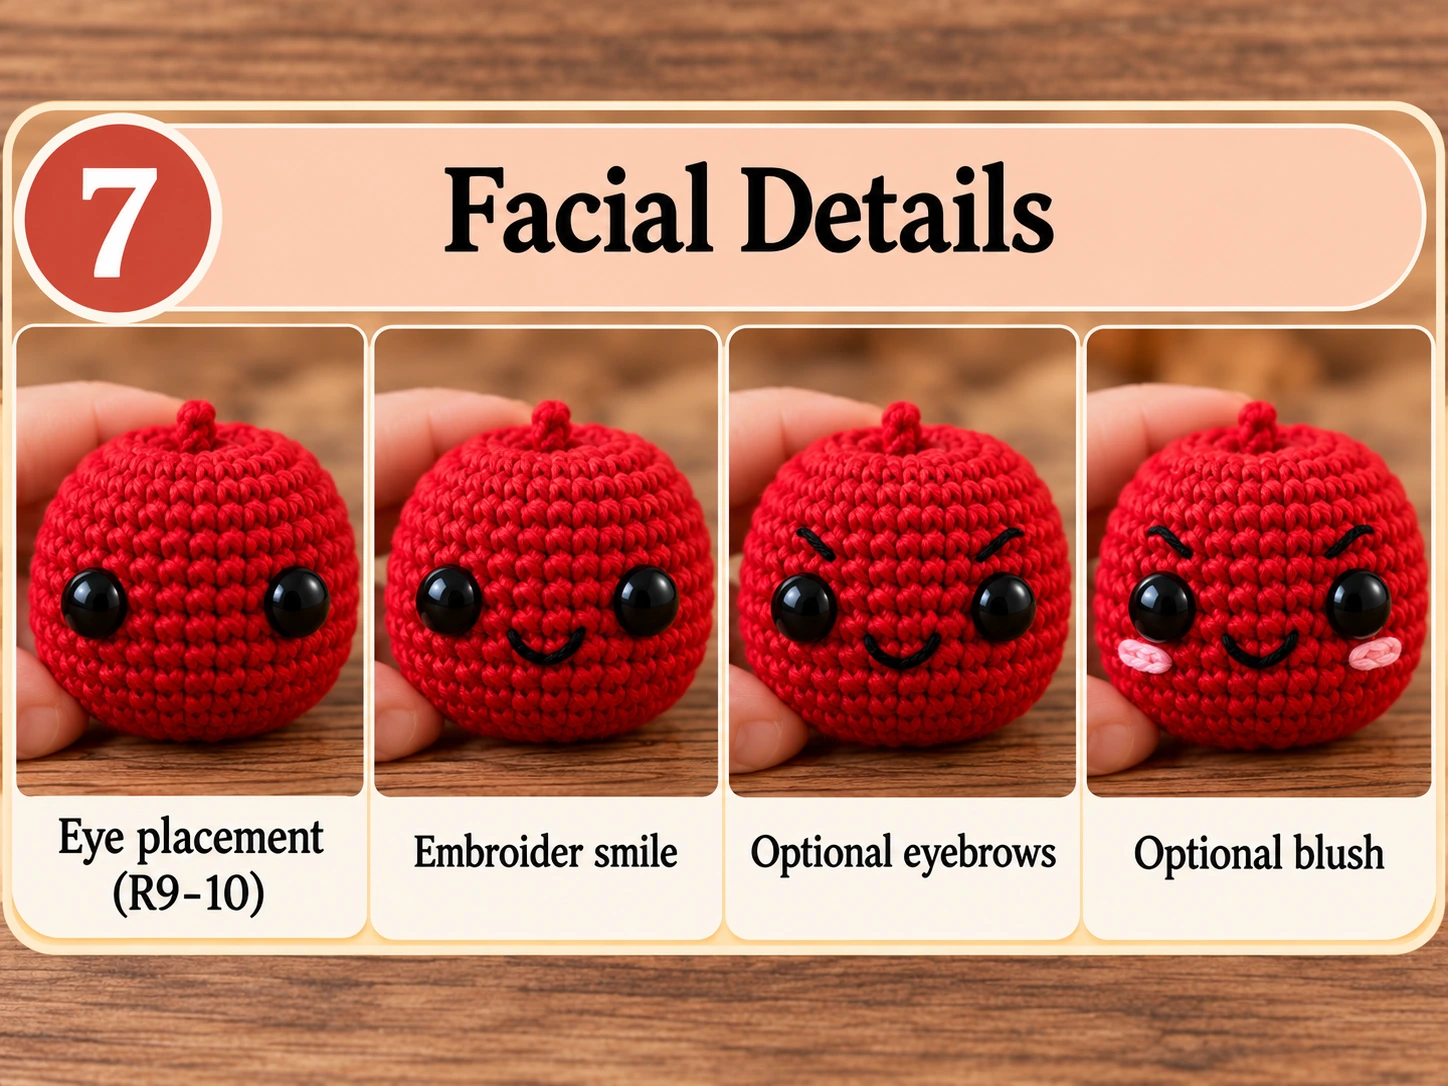
Add the Eyes
If you are using safety eyes, place them approximately between Rounds 9 and 10. Start with about 7 stitches between the eyes.
Do not attach the washers immediately. Look at the apple from the front and adjust the eye position if necessary. Remember that the poison cap will eventually cover part of the upper apple, so the eyes should remain clearly visible underneath it.
Once you are happy with their position, secure the eyes.
Round 13
(5 sc, dec) × 6. (36)
Round 14
(4 sc, dec) × 6. (30)
Begin stuffing. Add small amounts of fiberfill around the sides rather than pushing one large piece into the center.
Round 15
(3 sc, dec) × 6. (24)
Round 16
(2 sc, dec) × 6. (18)
Round 17
(1 sc, dec) × 6. (12)
Round 18
dec × 6. (6)
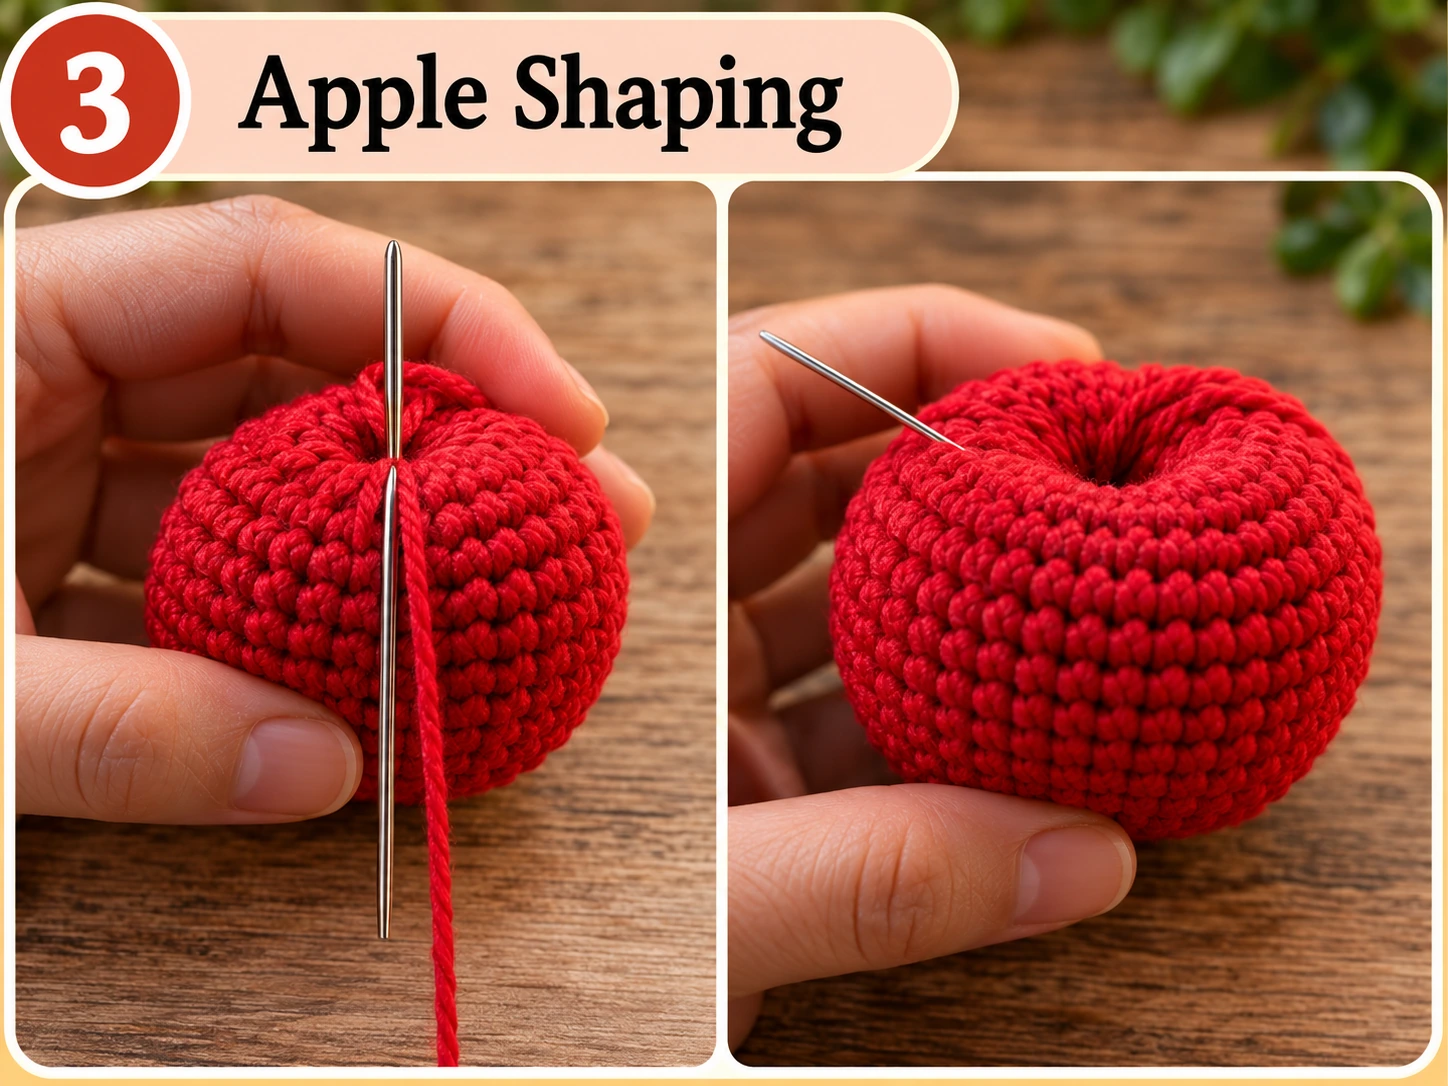
Fasten off, leaving a long yarn tail of approximately 30 cm / 12 in. Do not trim this tail short because it will be used to shape the apple.
How to Shape Your Crochet Poison Apple Pattern
At this stage, your project may look more like a red ball than an apple. That is normal.
Thread the long red yarn tail onto your yarn needle. Insert the needle through the bottom center of the apple and bring it out through the center of the top.
Pull gently. The top and bottom should move slightly toward each other.
Pass the yarn through the center again and pull until a subtle indentation forms at both ends.
Do not pull too tightly. The goal is a soft apple shape, not a flattened or collapsed body.
Secure the yarn discreetly and hide the end inside the apple. Use your fingers to redistribute the stuffing if necessary.
The apple should remain round and plump, with a visible indentation where the stem will eventually sit.
How to Crochet the Poison Drip for the Crochet Poison Apple Pattern
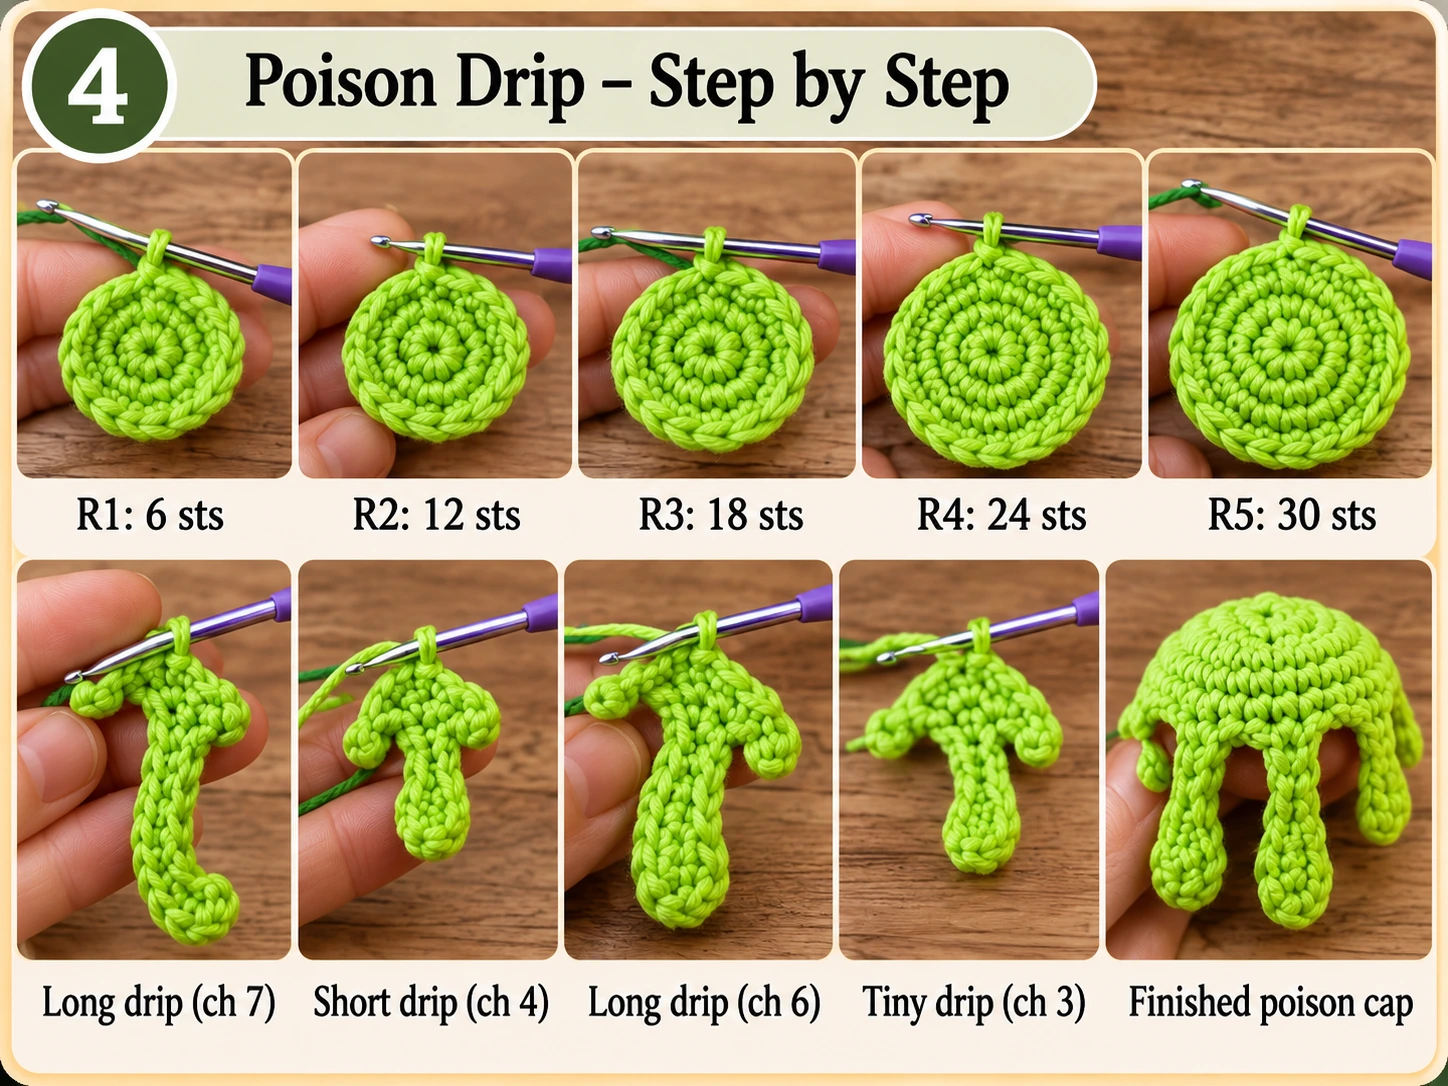
The signature detail in this crochet poison apple pattern is the dripping cap. Use bright toxic green yarn; the poison is made separately as a shallow circular cap.
Round 1
6 sc in MR. (6)
Round 2
inc × 6. (12)
Round 3
(1 sc, inc) × 6. (18)
Round 4
(2 sc, inc) × 6. (24)
Round 5
(3 sc, inc) × 6. (30)
Place the circle over the top of the apple before continuing. It should cover the top indentation and extend toward the upper sides without hiding the entire face.
Poison Drip Edge
Continue with green yarn.
sl st in next 4 sts.
Long Drip 1
ch 7.
Starting in the second chain from the hook: sl st, sc, sc, hdc, hdc, dc
Return to the cap and sl st in the next base stitch, then sl st in next 5 sts.
Short Drip
ch 4.
Starting in the second chain: sl st, sc, hdc
sl st in the next base stitch, then sl st in next 6 sts.
Long Drip 2
ch 6.
Starting in the second chain: sl st, sc, sc, hdc, dc
sl st in the next base stitch, then sl st in next 5 sts.
Tiny Drip
ch 3.
Starting in the second chain: sl st, sc
sl st in the next base stitch.
Finish with sl st in the remaining 6 sts.
Fasten off and leave a long tail for sewing. You should now have a green poison cap with four uneven drips.
The different drip lengths are intentional and help create a more natural liquid effect.
Position the Poison on the Apple
Do not sew the cap down immediately. Place it over the top indentation and rotate it until you like the placement.
One longer drip should sit slightly to one side of the face rather than directly between the eyes.
Make sure:
- Both eyes remain visible.
- The drips are not perfectly symmetrical.
- The center remains open for the stem.
- The green section looks like it is flowing downward.
Once you are happy with the placement, pin it temporarily. Use the long green yarn tail to sew around the main circular edge.
You do not need to stitch every drip completely flat. If a long drip lifts too far from the apple, add one or two hidden stitches near its lower end.
How to Crochet the Stem
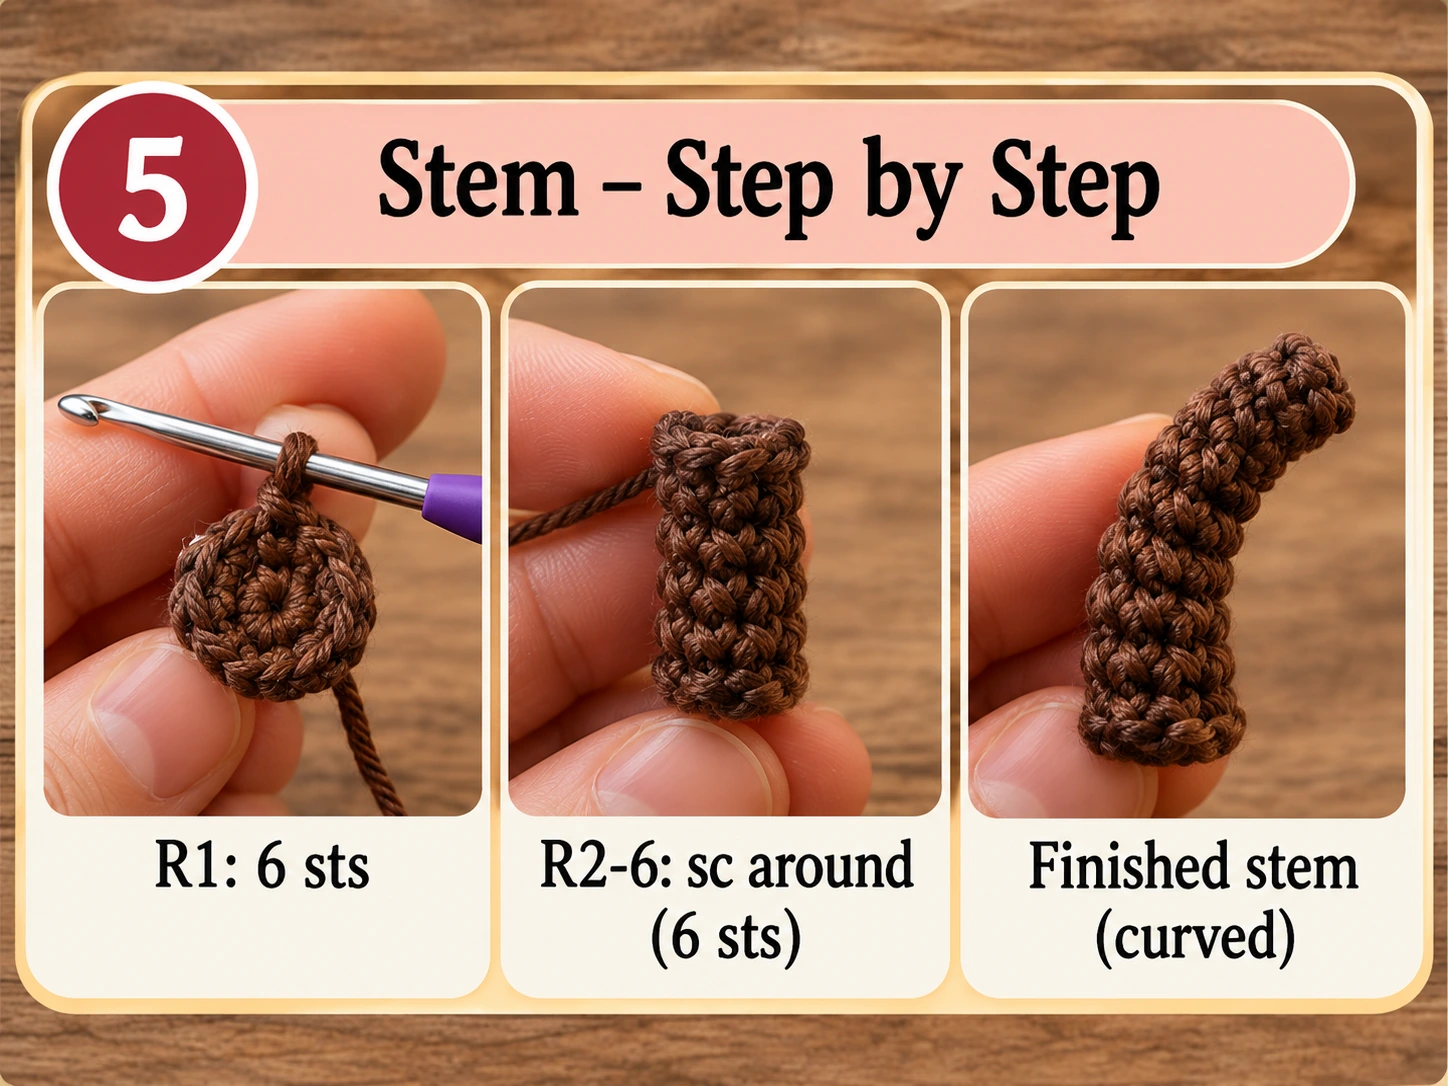
Use dark brown yarn.
Round 1
6 sc in MR. (6)
Rounds 2–6
sc around. (6)
Fasten off, leaving a long tail for sewing. Do not stuff the stem.
Flatten it slightly between your fingers. For a more natural look, bend the upper section gently before attaching it.
How to Crochet the Leaf
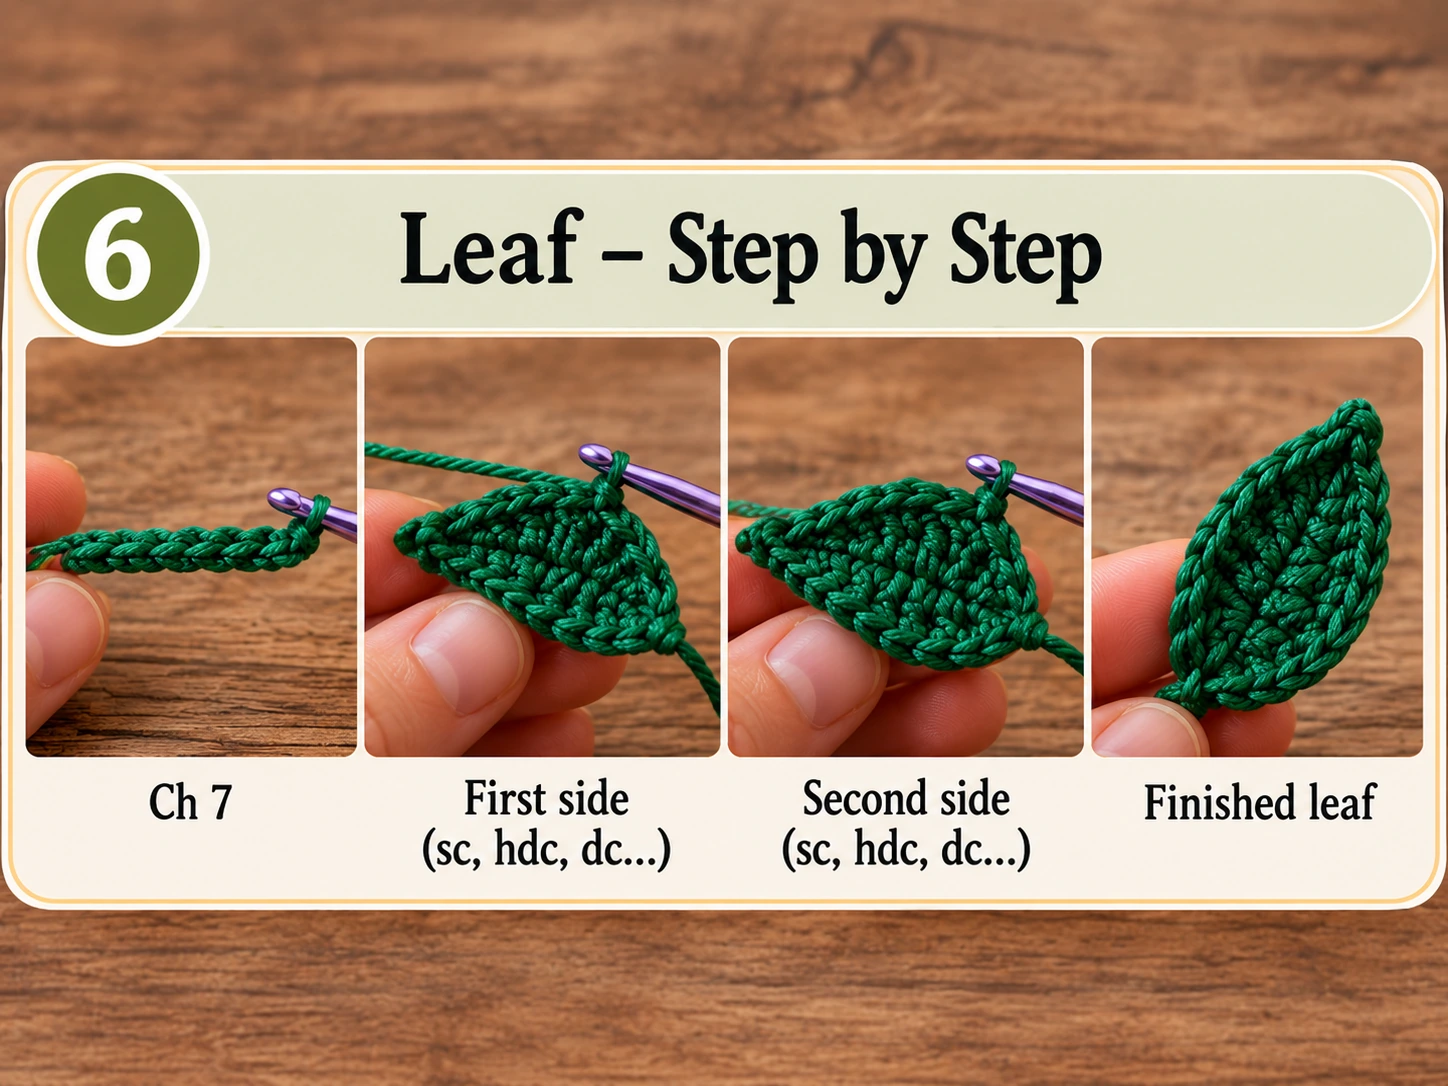
Use darker green yarn.
ch 7.
Starting in the second chain from the hook:
sc, hdc, dc, dc, hdc, sc
Rotate the work and crochet along the opposite side of the foundation chain:
sc, hdc, dc, dc, hdc, sc
sl st near the starting point.
Fasten off, leaving a yarn tail for sewing.
Pinch the base of the leaf slightly. You can also curve the finished leaf gently with your fingers so it does not sit completely flat.
How to Make the Cute Spooky Face
The dripping poison already gives the apple a strong Halloween look, so the face can remain simple.
Use two black safety eyes and a small embroidered smile.
Mouth
Thread your yarn needle with black yarn or embroidery thread.
Create a small curved smile approximately one round below the eyes. Two or three stitches are enough.
Keep the mouth small so the overall expression remains cute-spooky rather than scary.
Optional Eyebrows
For a mischievous expression, add a short diagonal black stitch above each eye. Angle the stitches slightly toward the center.
Leave them off if you prefer a sweeter kawaii expression.
Embroidered Eye Option
You can replace the safety eyes with black embroidered eyes. Simple vertical stitches, small circles, or closed curved eyes can all work.
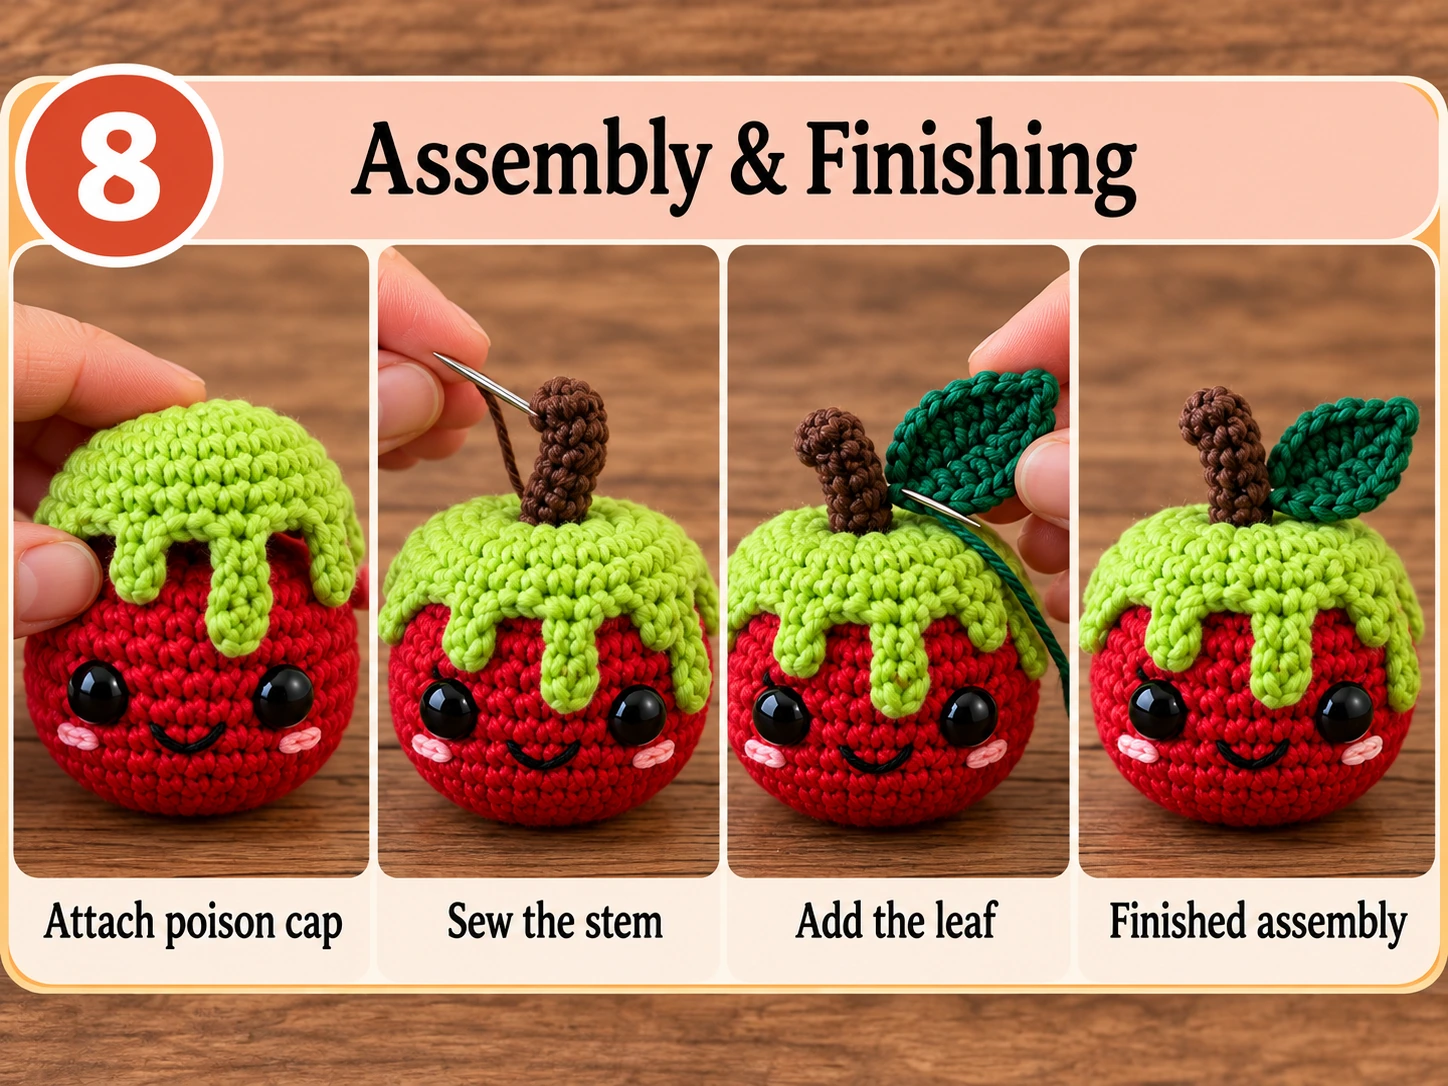
Assembly and Finishing
At this stage you should have:
- One shaped red apple
- One attached green poison cap
- One brown stem
- One green leaf
- Completed facial details
Step 1: Attach the Stem
Place the stem in the center of the top indentation. Sew around its base with the brown yarn tail.
Check that it stands securely. A slight lean can look more natural than a perfectly vertical stem.
Step 2: Attach the Leaf
Place the leaf beside the stem. Angle it slightly outward.
Sew only the base of the leaf to the apple so the outer section remains free and dimensional.
Step 3: Check the Poison Drips
Look at each drip. If one twists backward, gently flatten it.
If a longer drip lifts too far away from the apple, secure it with one hidden green stitch. Avoid sewing every drip completely flat.
Step 4: Check the Face
Look at the apple straight on. Both eyes should remain clearly visible.
If a drip covers too much of one eye, reposition it before adding any final securing stitches.
Step 5: Hide All Yarn Ends
Pull remaining yarn ends through the body with a yarn needle. Trim only after each end is secure.
Your poison apple is now finished.
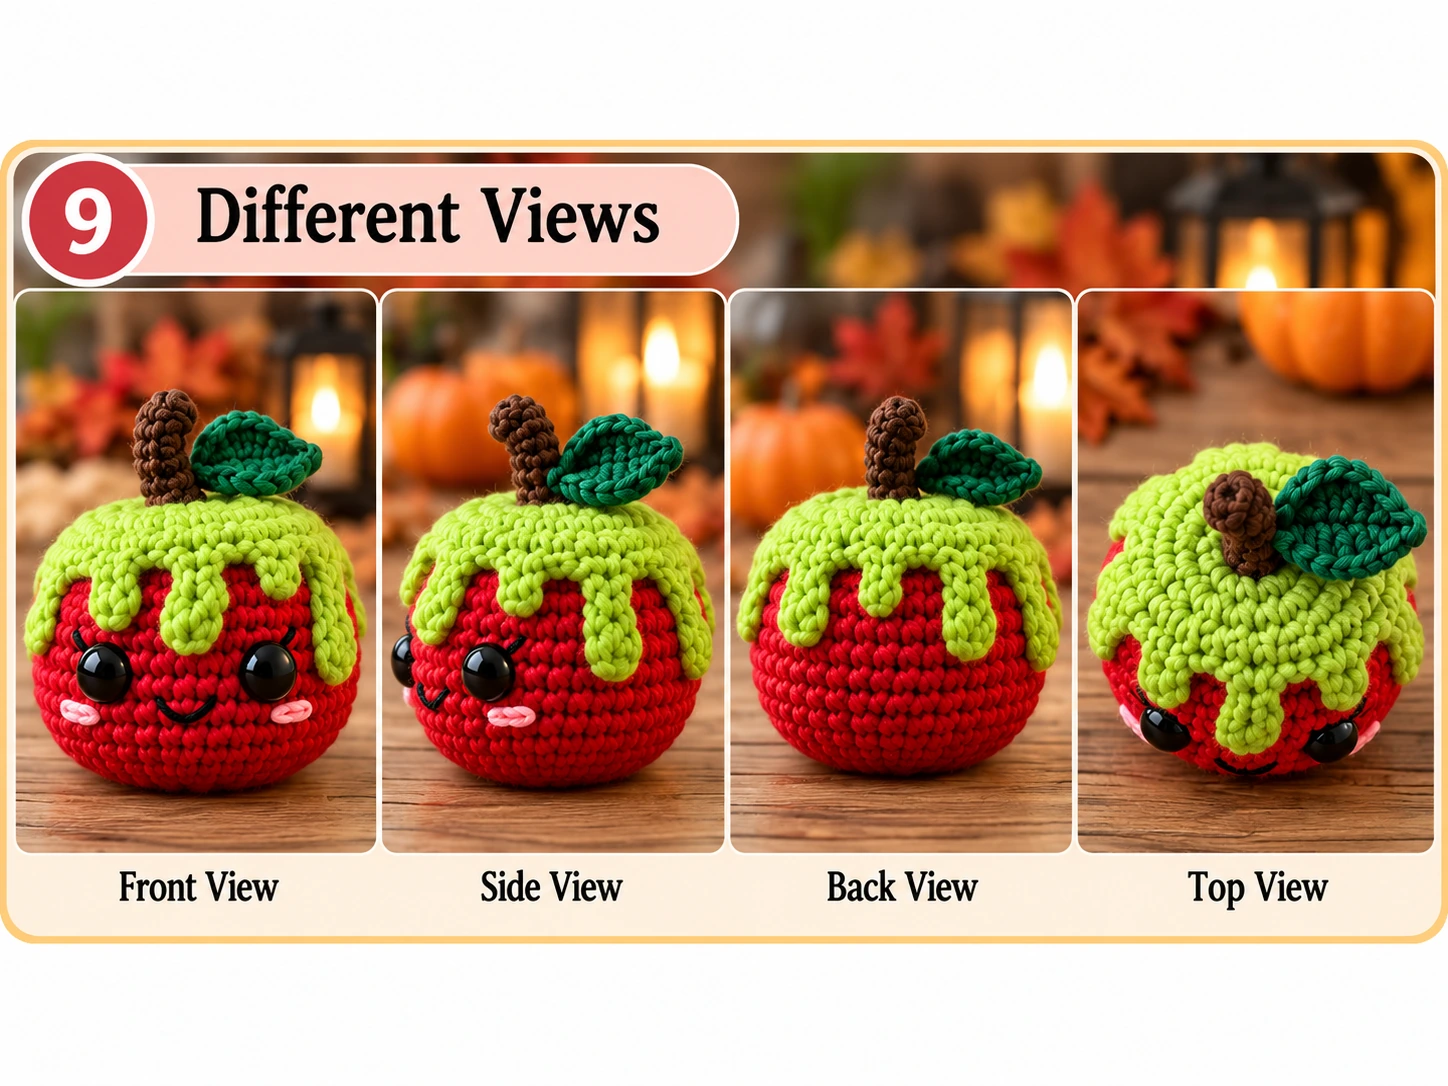
Check the Front, Side, Back and Top
Front View
The face should be easy to read and the poison drips should frame it rather than hide it.
Side View
The apple should look rounded and plump. One or two drips can extend farther down the side.
Back View
The poison cap should sit smoothly against the apple. The shaping indentation should remain subtle.
Top View
The stem should emerge from the center indentation with the leaf positioned naturally beside it.
Crochet Poison Apple Color Variations
| Style | Apple | Poison | Stem / Leaf |
|---|---|---|---|
| Toxic Classic | Red | Neon Green | Brown / Dark Green |
| Midnight Poison | Black | Lime Green | Black / Green |
| Witch Potion | Purple | Bright Green | Black / Dark Purple |
| Candy Halloween | Pink | Purple | Brown / Lavender |
| Radioactive | Dark Green | Yellow-Green | Black / Green |
| Haunted Orchard | Burgundy | Pale Green | Dark Brown / Olive |
For photos, strong contrast makes the dripping poison easier to recognize at smaller sizes. The classic red apple + vivid green poison combination is especially effective.
Common Problems and Fixes
Why does my crochet apple look like a ball?
That is normal before shaping. Use the long red yarn tail to pull the top and bottom centers slightly inward.
Why is my apple too flat?
The shaping yarn may be too tight. Relax the tension if possible and redistribute the stuffing toward the sides. The goal is a gentle indentation, not a doughnut shape.
Why can I see the stuffing?
Your hook may be too large for the yarn or your tension may be too loose. Try a smaller hook next time.
Do not compensate by adding extra stuffing because that can stretch the stitches even more.
Why is the poison cap too large?
Differences in yarn and tension can change its diameter. Test the cap after Round 4 and again after Round 5.
If the apple is smaller than the sample, 24 stitches may provide enough coverage.
Why do the poison drips curl?
A small amount of curling can look natural. If a drip curls completely away from the apple, flatten it gently and secure it with one hidden stitch.
Why does the poison cover the eyes?
Rotate the cap before sewing it down. Visual placement matters more than perfect stitch-by-stitch symmetry.
Why is my stem falling over?
Do not stuff the stem. Sew securely around its entire base and bend only the upper portion if you want a crooked shape.
Crochet Poison Apple Pattern FAQs
Is this crochet poison apple pattern beginner-friendly?
It is best for a confident beginner who already understands the magic ring, single crochet, increases, decreases, chains, and basic amigurumi construction.
How large is the finished crochet poison apple?
With DK/light worsted yarn and a 3.0 mm hook, expect approximately 9–11 cm (3.5–4.3 inches) in height.
Can I make a larger poison apple?
Yes. Use thicker yarn with an appropriately larger hook while keeping the same stitch counts.
Can I use plush yarn?
Yes, although the drips and leaf may lose some definition with very thick plush yarn. A smoother yarn can still be used for the leaf or facial embroidery.
Do I have to use safety eyes?
No. Embroidered eyes are a good alternative.
Can I make the poison purple instead of green?
Yes. Purple, black, lime, or bright pink can all work for Halloween variations.
Can I make the apple without a face?
Yes. Leave off the eyes and mouth for a more decorative Halloween apple.
Can I use the finished apple as Halloween décor?
Yes. Its compact size works well for shelf displays, Halloween baskets, desks, and seasonal arrangements.
Is the poison crocheted directly onto the apple?
No. The green poison is made separately as a 30-stitch circular cap with four uneven drips, positioned on the apple, and then sewn in place.
Final Result
This crochet poison apple pattern transforms a basic amigurumi shape into a distinctive Halloween project using three important details: the shaped apple body, contrasting poison drips, and a cute spooky face. The finished crochet poison apple pattern is compact, colorful, and designed to read clearly in seasonal photos.
Start with the red apple, stuff it evenly, and use the long yarn tail to form the top and bottom indentations. Then crochet the poison cap separately and take your time choosing where the four drips should fall before sewing it in place.
Finish with the brown stem, green leaf, and facial details.
The completed apple should fit comfortably in one hand while still having enough contrast and texture to stand out in Halloween photography.
Once you have made the classic red-and-green version, try changing the colors for a completely different look.
For more spooky projects, see our no-sew witch ghost crochet pattern, easy crochet bat pattern, crochet black cat amigurumi pattern, no-sew crochet pumpkin pattern, and easy crochet Halloween decorations.