Easy No-Sew Witch Ghost Crochet Pattern – Mini Halloween Amigurumi
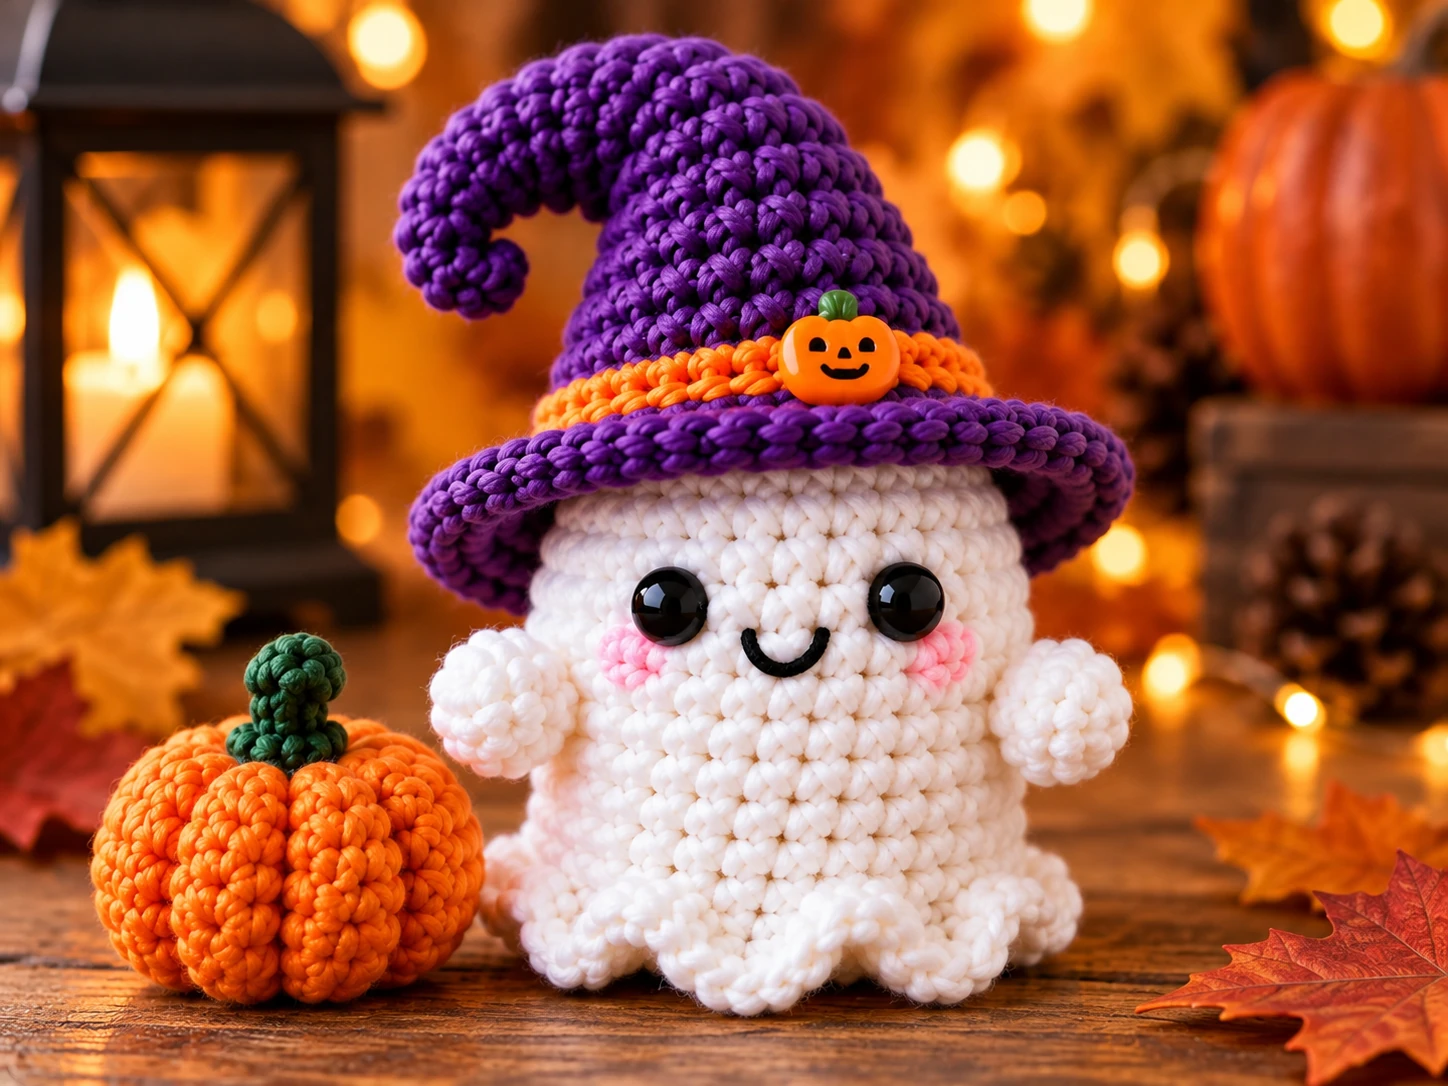
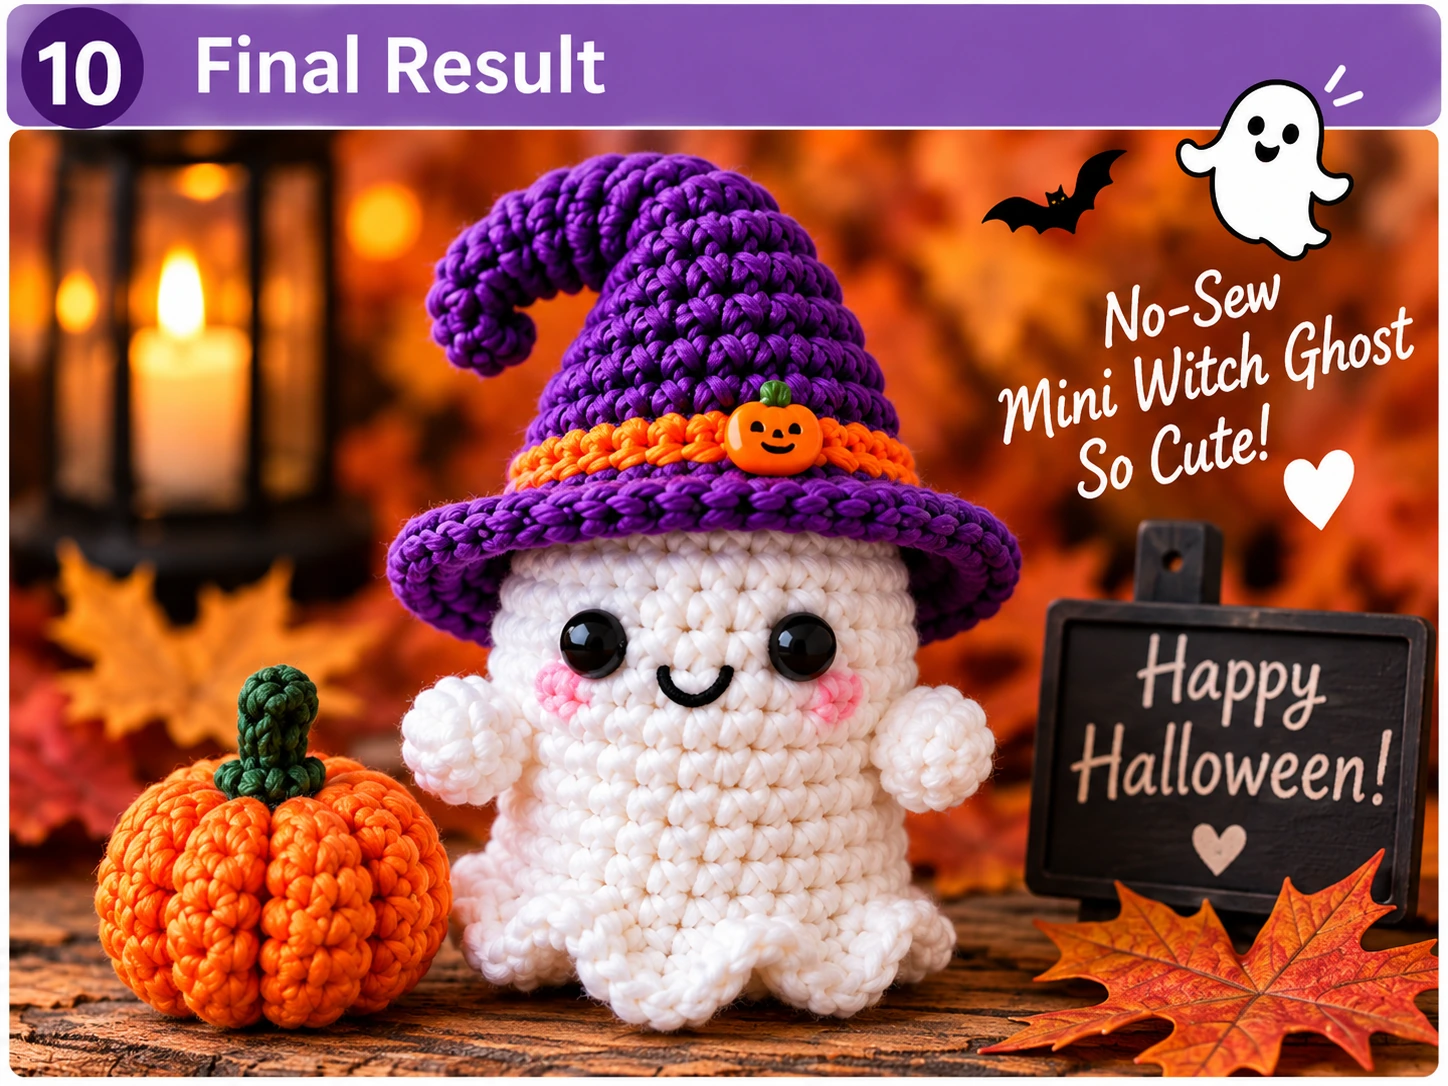
Looking for a small Halloween project that is cute, quick, and doesn’t require sewing lots of separate amigurumi pieces together? This easy no-sew witch ghost crochet pattern turns basic crochet stitches into a tiny Halloween character with a round head, little arms, a wavy ghost base, and a removable crooked witch hat.
The main ghost is crocheted as one continuous piece. Instead of making two separate arms and sewing them onto the body later, you’ll create the arms directly while crocheting the ghost.
The decorative bottom is also worked directly into loops left around the body.
That means the only separate major component is the witch hat, which is intentionally removable. You can make one ghost and several hats in different colors if you want to change its Halloween look.
This pattern uses simple amigurumi techniques including a magic ring, single crochet, increases, invisible decreases, chains, and basic shaping.
The result is a small ghost that works well as Halloween shelf décor, a desk companion, a handmade gift, or the starting point for your own collection of mini crochet ghosts.
Pattern at a Glance
| Detail | Information |
|---|---|
| Skill Level | Confident Beginner |
| Crochet Terms | US terminology |
| Project Type | Amigurumi |
| Construction | Ghost worked in one piece |
| Main Ghost Sewing | None |
| Hat | Separate and removable |
| Recommended Yarn | DK / light worsted |
| Crochet Hook | 2.5 mm |
| Finished Height | Approximately 7–9 cm without hat |
| Main Color | White |
| Hat Color | Purple |
| Accent Color | Orange |
| Gauge | Not critical |
| Working Method | Continuous rounds |
The exact finished size can change depending on your yarn, hook, stuffing, and personal tension.
For amigurumi, the important goal is to create a fabric dense enough to prevent the stuffing from showing through the stitches.
Materials and Tools
For this mini witch ghost, you don’t need a large amount of yarn.
Yarn
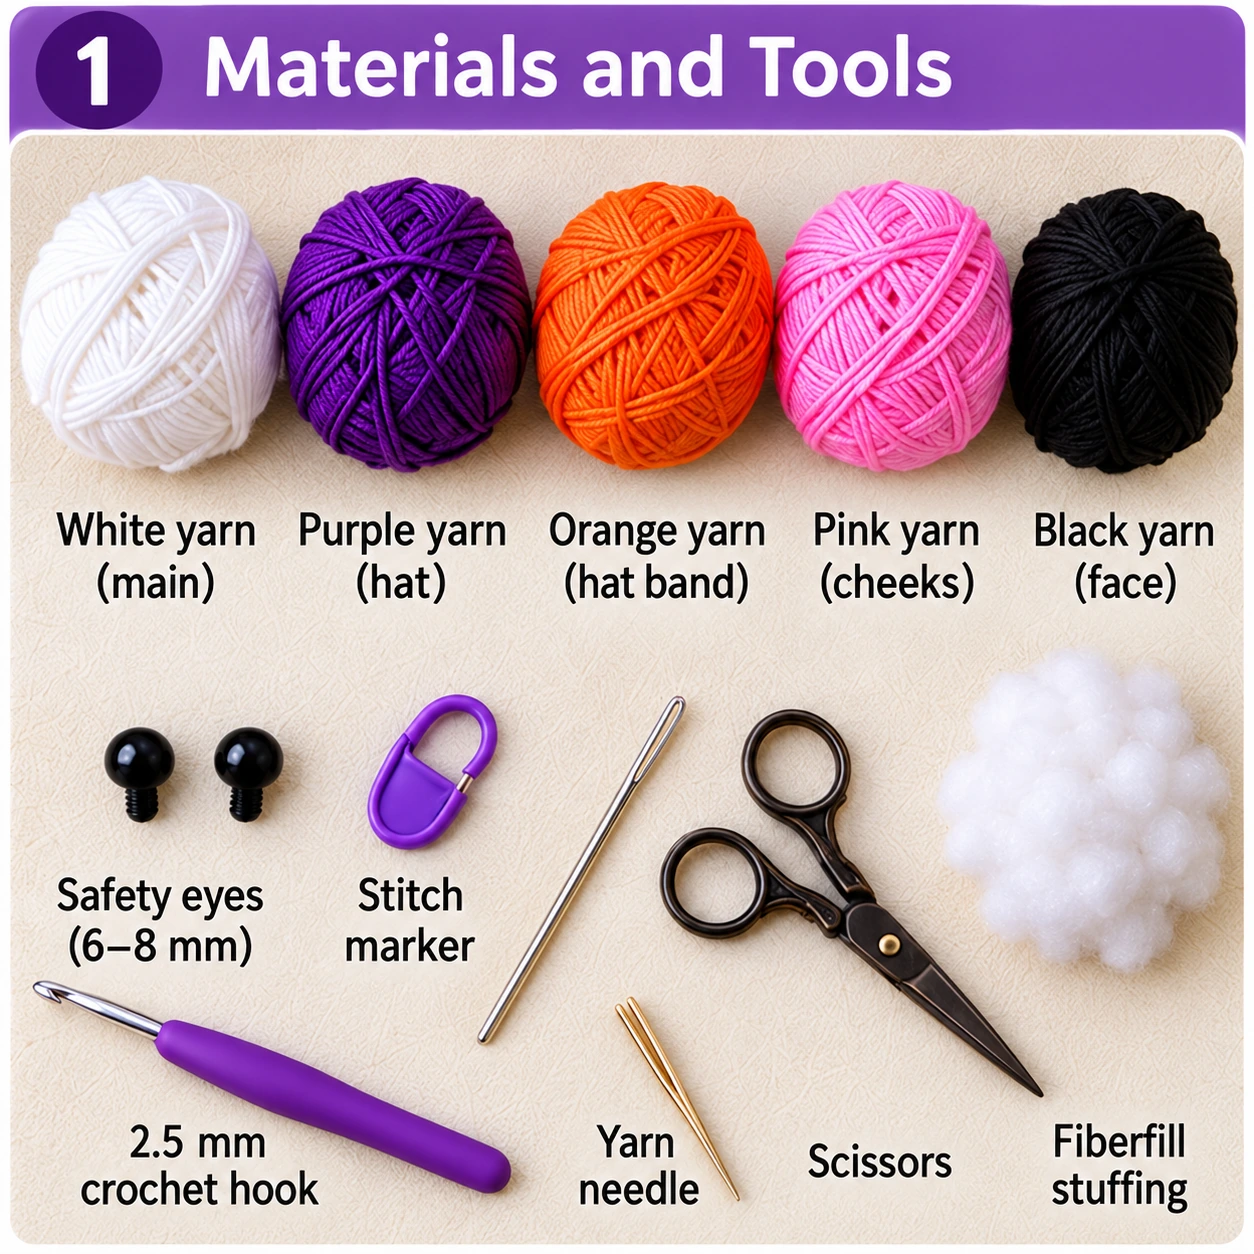
You’ll need:
- White DK or light worsted yarn for the ghost
- Purple yarn for the witch hat
- A small amount of orange yarn for the hat band
- A small amount of pink yarn for cheeks
- Black embroidery yarn or thread for facial details
Tools
You’ll also need:
- 2.5 mm crochet hook
- Fiberfill stuffing
- Stitch marker
- Yarn needle
- Scissors
- Two 6–8 mm safety eyes, optional
If you plan to make the ghost for a baby or very young child, consider embroidering the eyes rather than using removable plastic components.
Yarn Colors
The sample ghost uses a simple Halloween palette.
White keeps the character recognizable as a classic ghost.
Purple gives the witch hat a playful Halloween look without making the finished amigurumi too dark.
Orange adds contrast around the hat and connects the design to traditional pumpkin-inspired Halloween colors.
Pink is used sparingly for the cheeks.
You don’t need to use these exact colors. Later in the pattern, you’ll find several alternative color combinations.
Crochet Abbreviations
This pattern uses US crochet terminology.
| Abbreviation | Meaning |
|---|---|
| MR | Magic Ring |
| ch | Chain |
| sc | Single Crochet |
| inc | Increase — 2 sc in one stitch |
| dec | Decrease |
| hdc | Half Double Crochet |
| dc | Double Crochet |
| sl st | Slip Stitch |
| BLO | Back Loop Only |
| FLO | Front Loop Only |
| st | Stitch |
| sts | Stitches |
| Rnd | Round |
| FO | Fasten Off |
Unless otherwise stated, rounds are worked continuously rather than joined.
Use a stitch marker to identify the beginning of each round.
Important Pattern Notes
Read these notes before starting.
Work in continuous rounds
Do not join each round unless specifically instructed.
Move your stitch marker after completing each round.
Keep your tension firm
Amigurumi generally looks cleaner when the crochet fabric is dense.
If large gaps appear between stitches, try using a slightly smaller hook rather than pulling every stitch excessively tight.
Stuff gradually
Don’t wait until the final round to add all the stuffing.
Add small amounts at a time and distribute the fiberfill with your fingers.
This makes it easier to maintain the ghost’s rounded shape.
Don’t overstuff the bottom
The upper part of the ghost should be nicely rounded, but the lower section can remain slightly softer.
Overstuffing the base can make the ghost unstable.
Pin or position details visually
Amigurumi spirals naturally shift slightly as you crochet.
For this reason, visual alignment is often more useful than relying only on exact stitch numbers when positioning the face.
How to Crochet the Ghost Body
Use white yarn.
The ghost begins at the top of the head and is crocheted downward.
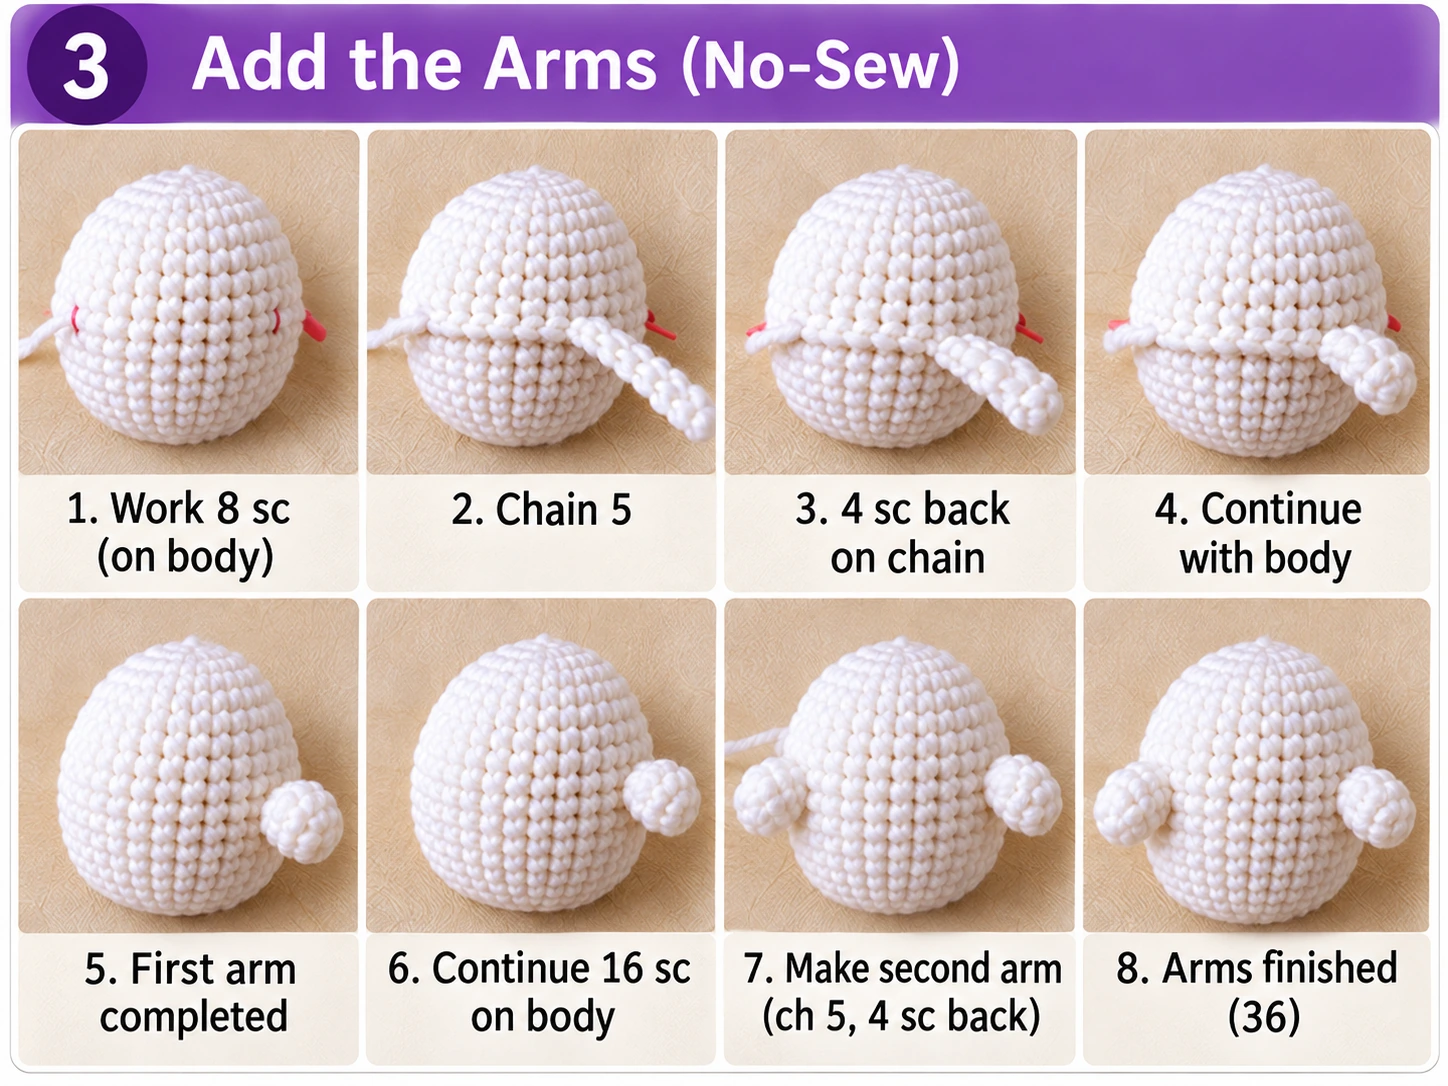
Round 1
6 sc into MR.
(6 sts)
Round 2
inc in each stitch around.
(12 sts)
Round 3
(1 sc, inc) × 6.
(18 sts)
Round 4
(2 sc, inc) × 6.
(24 sts)
Round 5
(3 sc, inc) × 6.
(30 sts)
Round 6
(4 sc, inc) × 6.
(36 sts)
You should now have a flat circular top that will begin forming the ghost’s head.
Rounds 7–11
sc in each stitch around.
(36 sts)
The sides of the head should now begin growing downward.
Add the Eyes
If you’re using safety eyes, a good starting position is between Rounds 9 and 10, approximately 7–8 stitches apart.
Don’t secure them immediately.
Insert both eyes first and look at the face from the front.
Move them one stitch inward or outward if the expression looks too narrow or too wide.
Once you’re happy with the position, secure the backs.
Round 12
(4 sc, dec) × 6.
(30 sts)
Round 13
(3 sc, dec) × 6.
(24 sts)
Begin adding stuffing to the head.
Shape it gradually rather than pushing one large piece of fiberfill inside.
Round 14
sc around.
(24 sts)
Round 15
(3 sc, inc) × 6.
(30 sts)
This increase begins creating the wider ghost body.
Round 16
sc around.
(30 sts)
Round 17
(4 sc, inc) × 6.
(36 sts)
Rounds 18–19
sc around.
(36 sts)
Continue adding a small amount of stuffing.
At this stage, your project should clearly resemble a rounded ghost body.
How to Add the No-Sew Arms
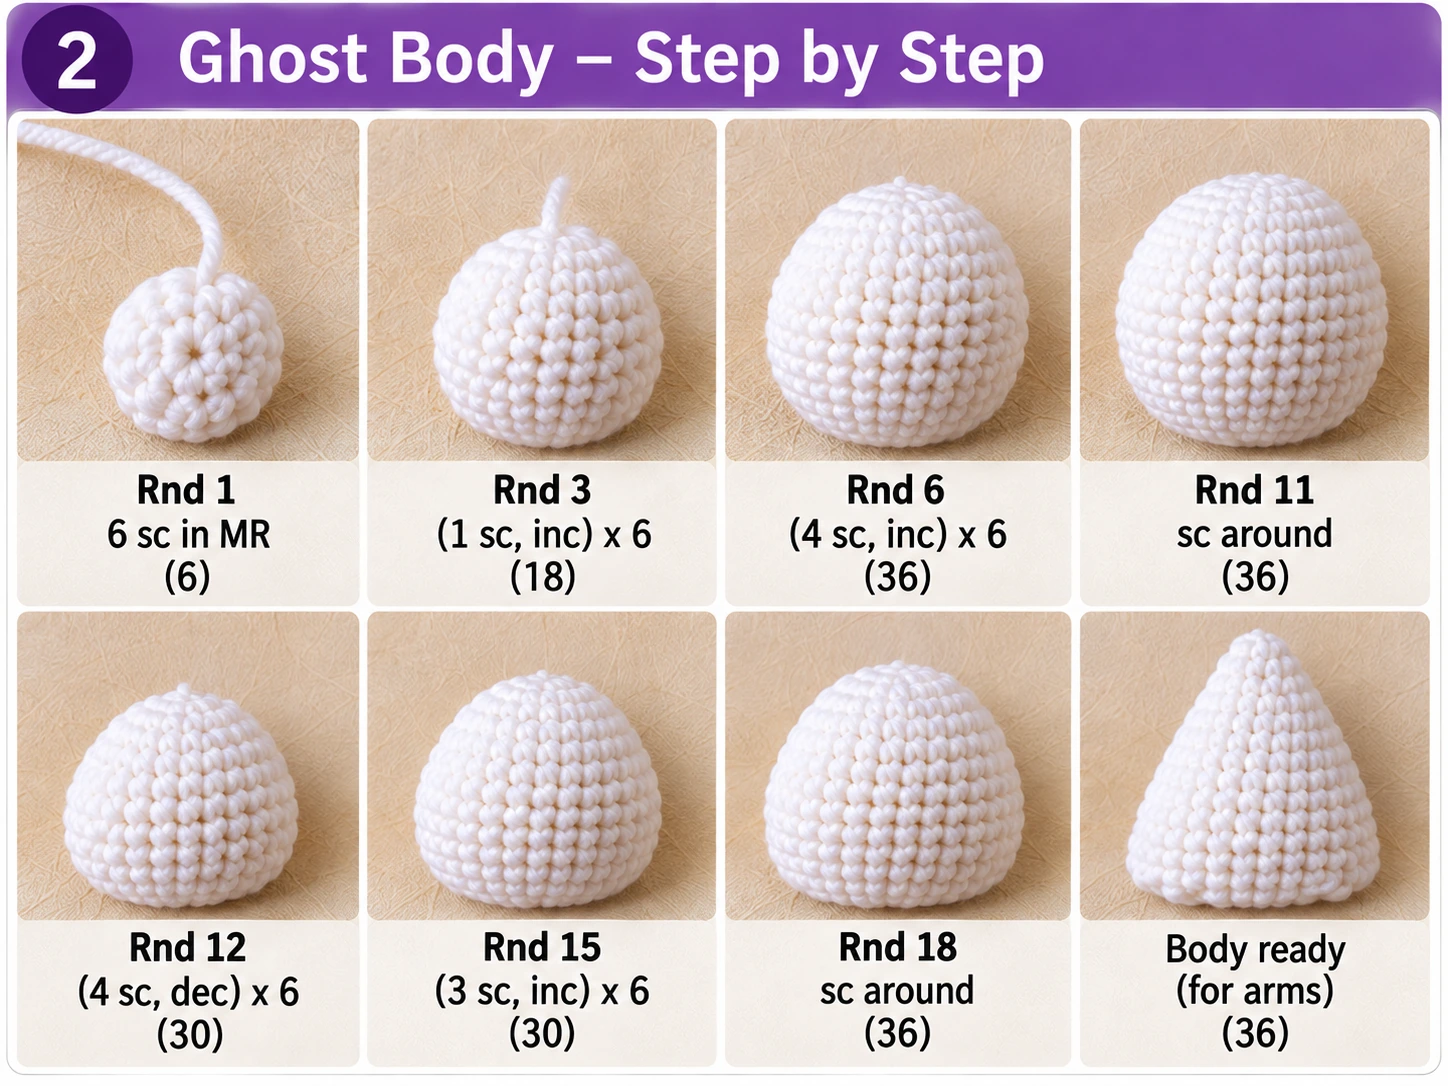
One of the most useful features of this no-sew ghost crochet pattern is that the arms don’t need to be made separately.
They are created with chains while working the body round.
This reduces finishing work and helps keep the arms positioned naturally.
Round 20
Work:
8 sc
Now create the first arm:
ch 5
Starting in the second chain from the hook:
4 sc back down the chain
You have now returned to the body.
Continue crocheting:
16 sc around the body
Create the second arm:
ch 5
Starting in the second chain from the hook:
4 sc back down the chain
Continue with:
10 sc
The body itself should still contain 36 body stitches.
The arm chains are extensions and are not counted as additional body stitches.
Because crochet rounds naturally shift, check the ghost from the front before moving on.
If one arm looks noticeably too far forward or backward, adjusting the starting point by one stitch is acceptable.
Round 21
sc around the 36 body stitches, working behind the arm chains where necessary.
Do not crochet around the arm chains as though they are part of the body circumference.
You should now have two small arms extending from opposite sides.
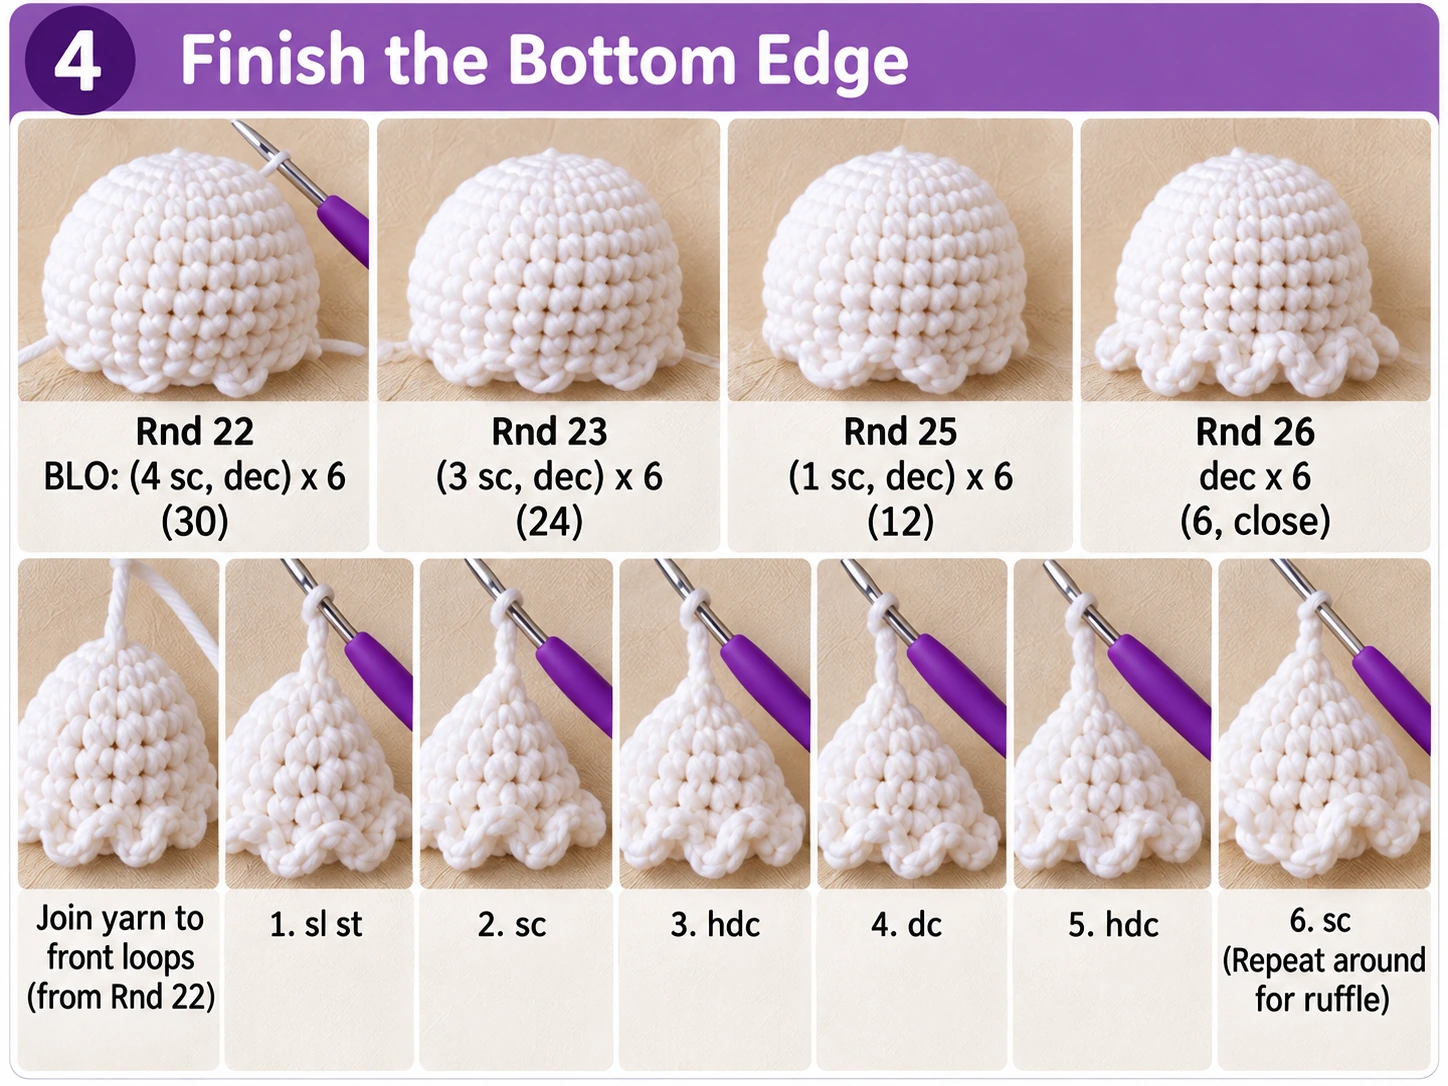
How to Finish the Bottom Edge
Now we’ll close the underside of the ghost while preserving loops that will later become the decorative wavy edge.
Round 22
Work in BLO:
(4 sc, dec) × 6.
(30 sts)
Working in the back loops leaves the front loops visible around the outside.
Do not accidentally crochet through both loops in this round.
Round 23
(3 sc, dec) × 6.
(24 sts)
Add more stuffing if necessary.
Round 24
(2 sc, dec) × 6.
(18 sts)
Check the overall shape before closing.
The ghost should be firm enough to maintain its form but not so heavily stuffed that the stitches stretch open.
Round 25
(1 sc, dec) × 6.
(12 sts)
Round 26
dec × 6.
(6 sts)
Fasten off.
Use your yarn needle to pass the tail through the remaining front loops and gently pull the opening closed.
Secure and hide the yarn end.
Create the Wavy Ghost Edge
Turn the ghost so you can see the unused front loops from Round 22.
Join white yarn to one of these loops.
Repeat the following sequence around:
sl st, sc, hdc, dc, hdc, sc
Continue around the unused front loops.
This changing stitch height creates the soft wave effect around the bottom of the ghost.
Depending on where the round begins and your individual tension, the final repeat may need a small adjustment.
The goal is a balanced decorative edge rather than forcing a repeat into an awkward final space.
Fasten off and hide the yarn ends.
The ghost body is now complete.
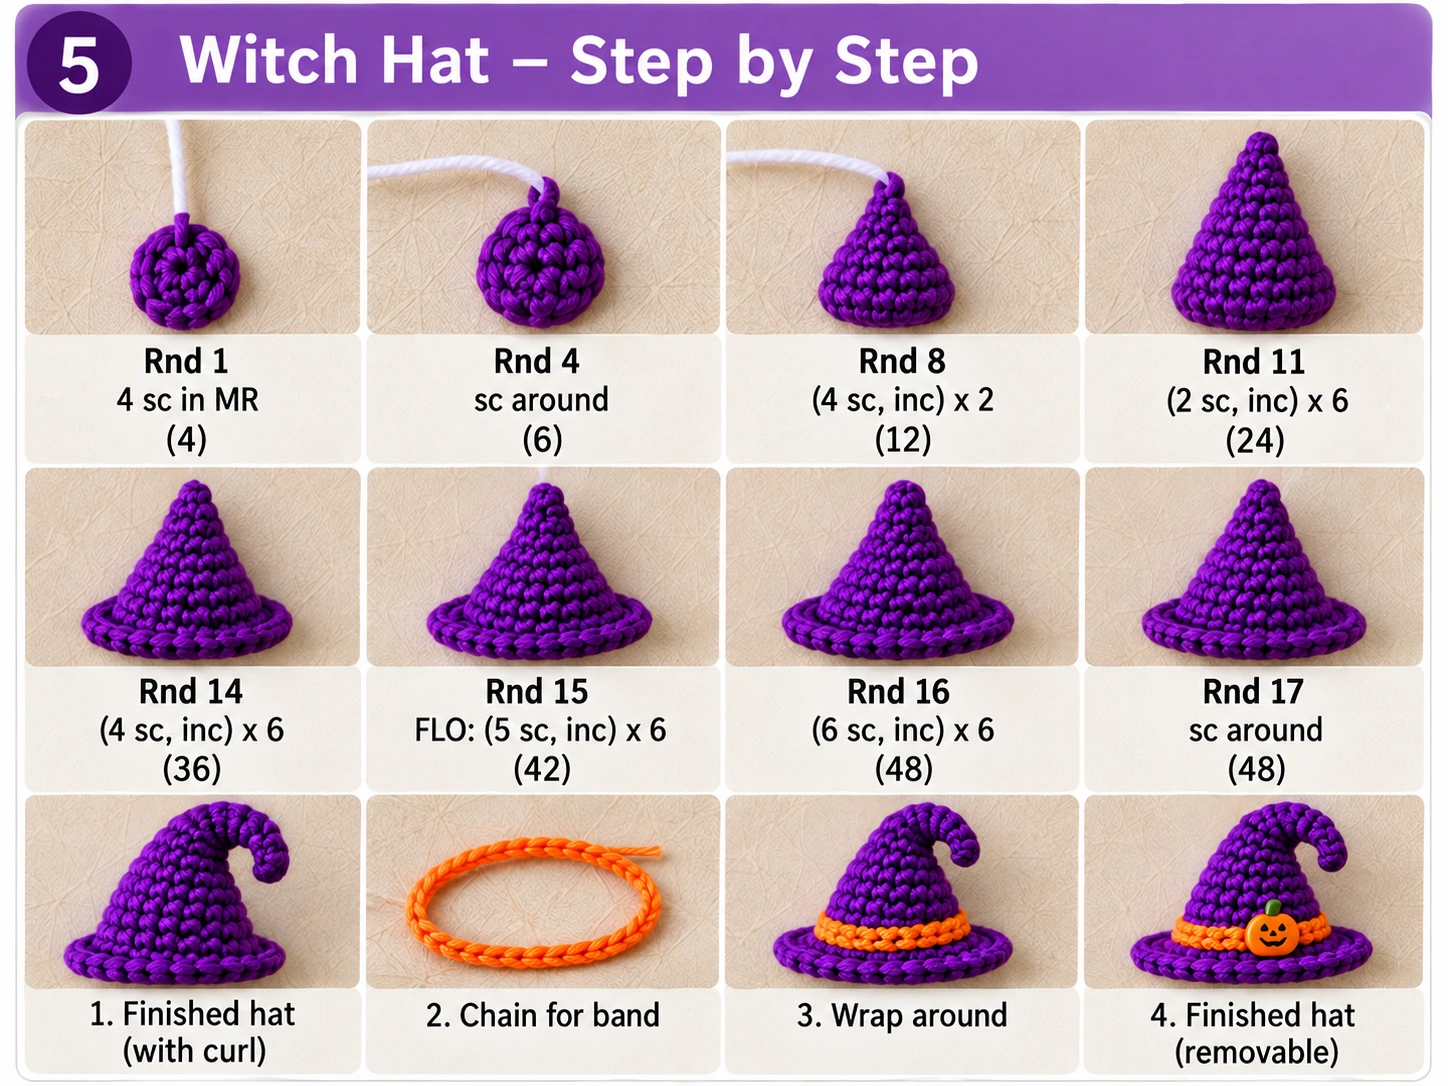
How to Crochet the Witch Hat
The witch hat is made separately so it can remain removable.
Use purple yarn.
The hat begins at the point and gradually widens toward the brim.
Round 1
4 sc into MR.
(4 sts)
Round 2
sc around.
(4 sts)
Round 3
(1 sc, inc) × 2.
(6 sts)
Round 4
sc around.
(6 sts)
Round 5
(2 sc, inc) × 2.
(8 sts)
Round 6
sc around.
(8 sts)
Round 7
(3 sc, inc) × 2.
(10 sts)
Round 8
(4 sc, inc) × 2.
(12 sts)
Round 9
(1 sc, inc) × 6.
(18 sts)
Round 10
sc around.
(18 sts)
Round 11
(2 sc, inc) × 6.
(24 sts)
Round 12
sc around.
(24 sts)
Round 13
(3 sc, inc) × 6.
(30 sts)
Round 14
(4 sc, inc) × 6.
(36 sts)
Before making the brim, place the cone gently over the ghost’s head.
The hat should sit comfortably without stretching the ghost or immediately falling off.
Remember that yarn thickness and tension can change the fit.
Crochet the Hat Brim
Round 15
Work in FLO:
(5 sc, inc) × 6.
(42 sts)
Round 16
(6 sc, inc) × 6.
(48 sts)
Round 17
sc around.
(48 sts)
Fasten off and hide the yarn end.
Shape the Crooked Witch Hat
Gently bend the narrow tip of the hat to one side.
You can simply shape it by hand.
If you want the bend to remain more permanent, use a few discreet purple yarn stitches to hold the folded tip in place.
Those optional stitches are part of the hat only. The main ghost remains a no-sew construction.
Add the Orange Hat Band
Using orange yarn, make a chain long enough to wrap around the base of the hat cone just above the brim.
Check the length directly against your finished hat.
Wrap it around the crown and secure the ends discreetly.
Another option is to work orange surface slip stitches around the hat.
The band should add contrast without making the hat too bulky.
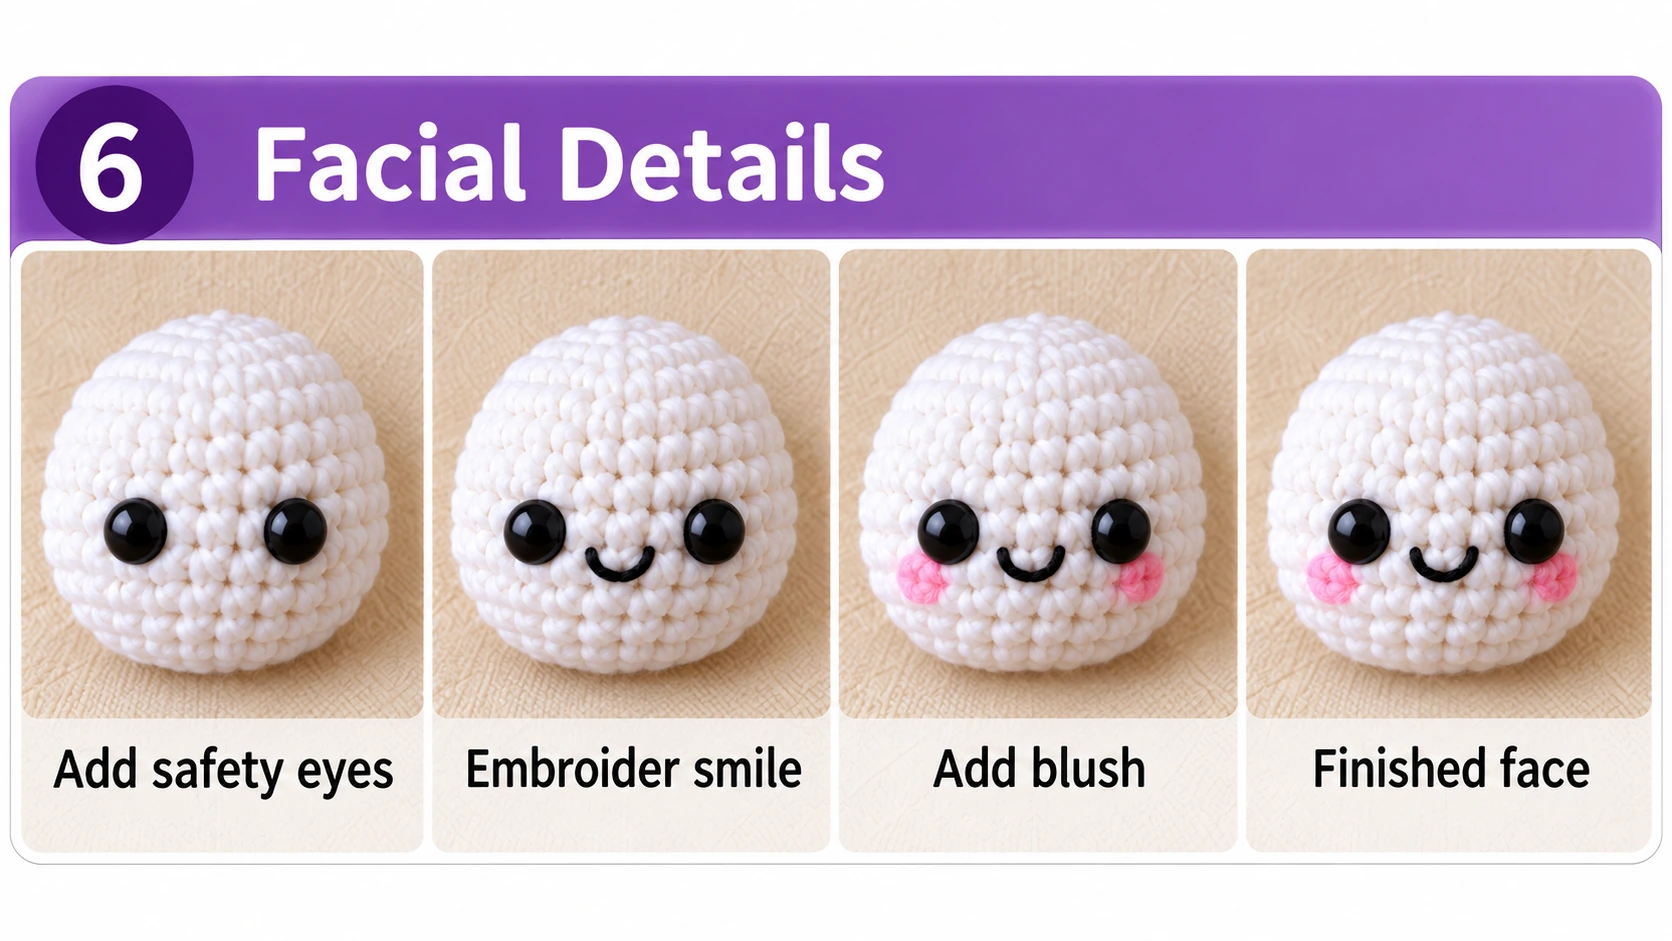
How to Add the Ghost Face
The face is what gives this little ghost most of its personality.
If you’ve already installed safety eyes, you only need to add the mouth and optional cheeks.
Embroider the Mouth
Use black yarn or embroidery thread.
Create a small curved smile between and slightly below the eyes.
Two or three small stitches are usually enough.
Avoid making the mouth too large.
A tiny expression works especially well on small amigurumi.
Add the Cheeks
Use pink yarn.
Add one or two small horizontal stitches below the outer side of each eye.
Keep both cheeks approximately level.
You can leave them off entirely if you prefer a simpler ghost.
Embroidered Eye Option
If you’re avoiding safety eyes, use black yarn to embroider the eyes instead.
You can make simple vertical stitches, small circles, or closed curved eyes.
This also gives you more control over the character’s expression.
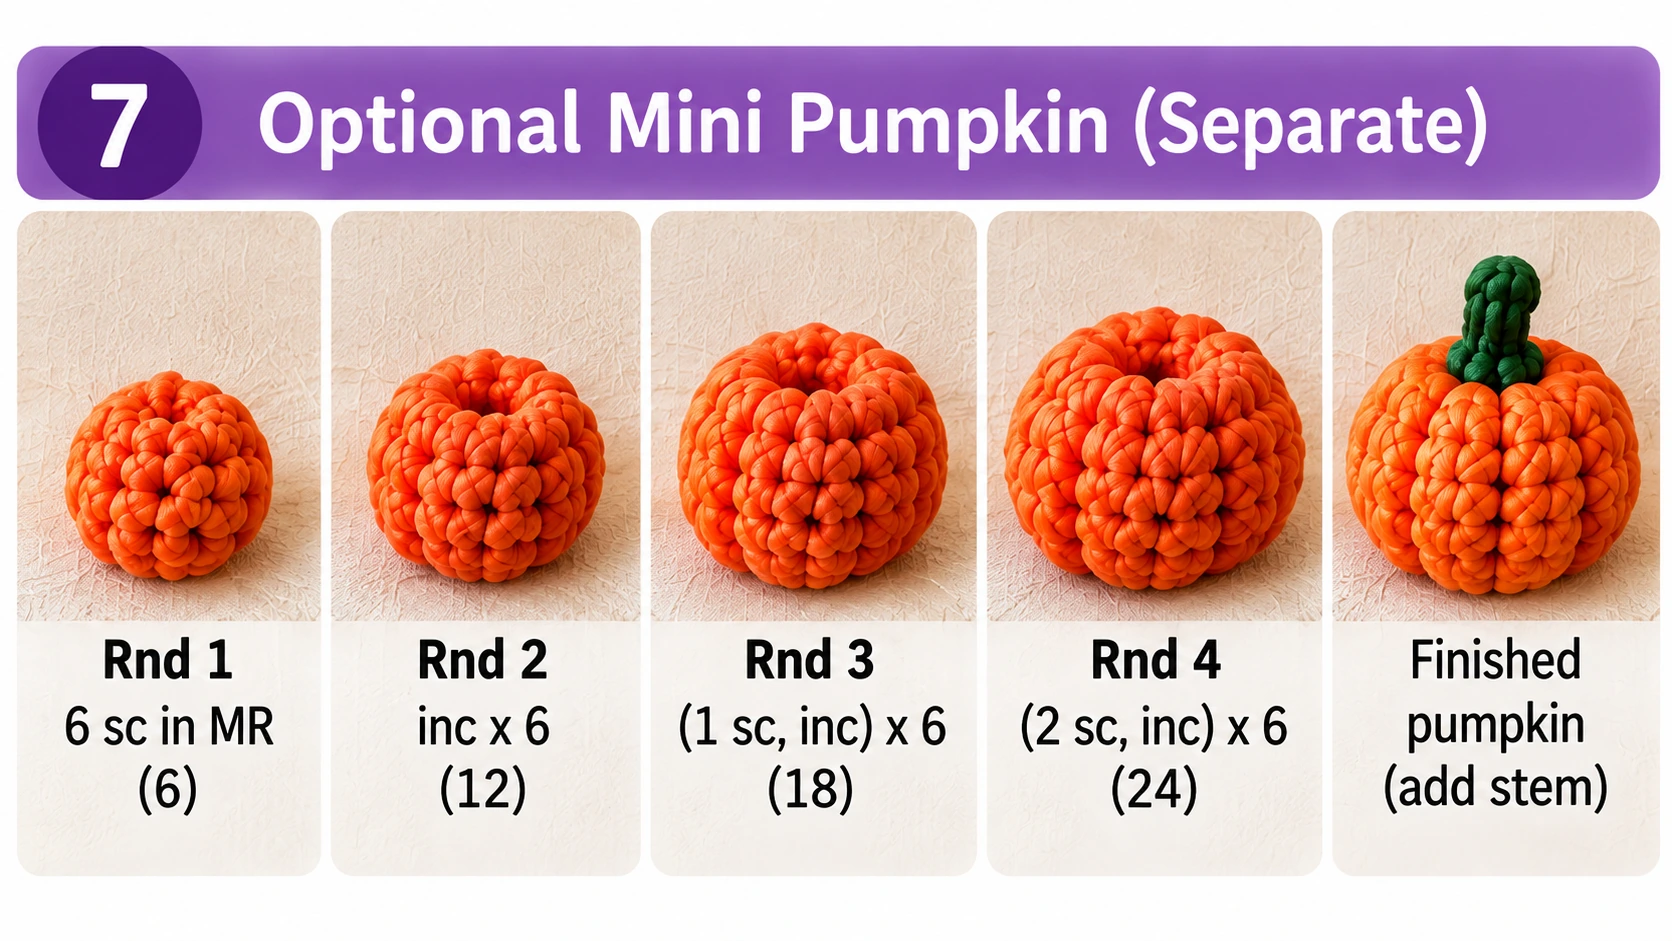
Optional Mini Pumpkin Prop
A tiny orange pumpkin looks especially cute next to the finished witch ghost in Halloween photography.
However, it is important to distinguish the prop from the actual project:
The pumpkin is not required for this no-sew witch ghost pattern.
You can use any small crochet pumpkin you already have as a photo prop, place a miniature decorative pumpkin beside the ghost, or simply photograph the ghost alone.
If you’re publishing only the instructions above, don’t present a pumpkin construction sequence as part of this pattern unless you also provide a tested pumpkin pattern.
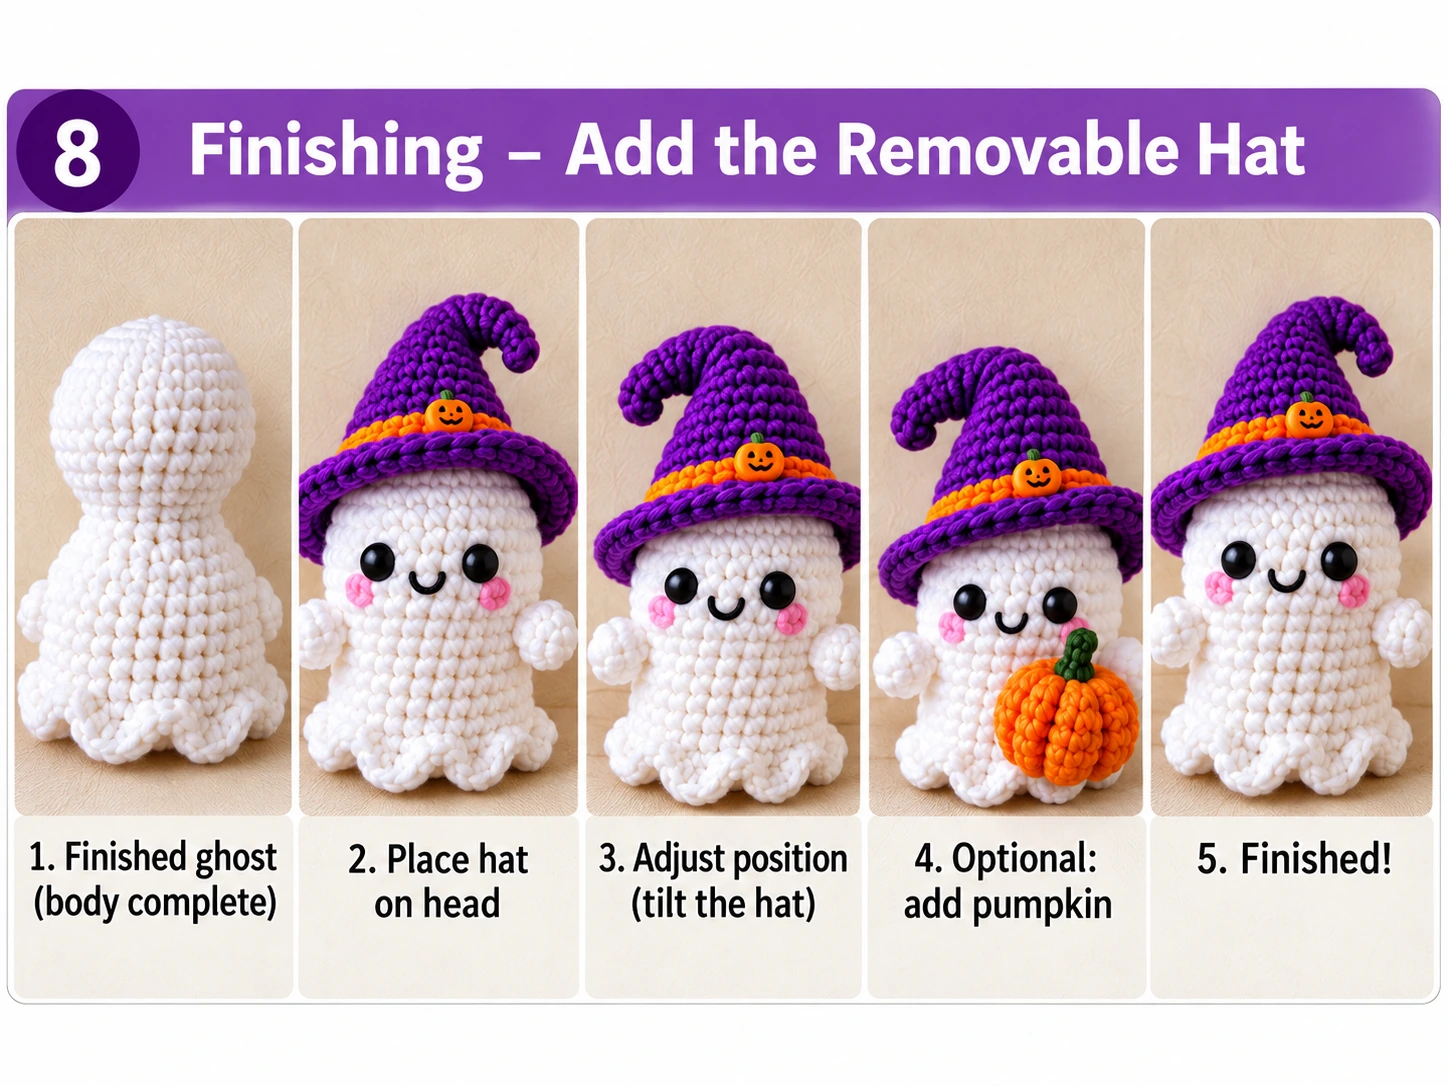
Finishing the Witch Ghost
There is very little assembly because the main ghost was designed as one piece.
Place the purple witch hat on the head.
Angle the tip slightly to one side.
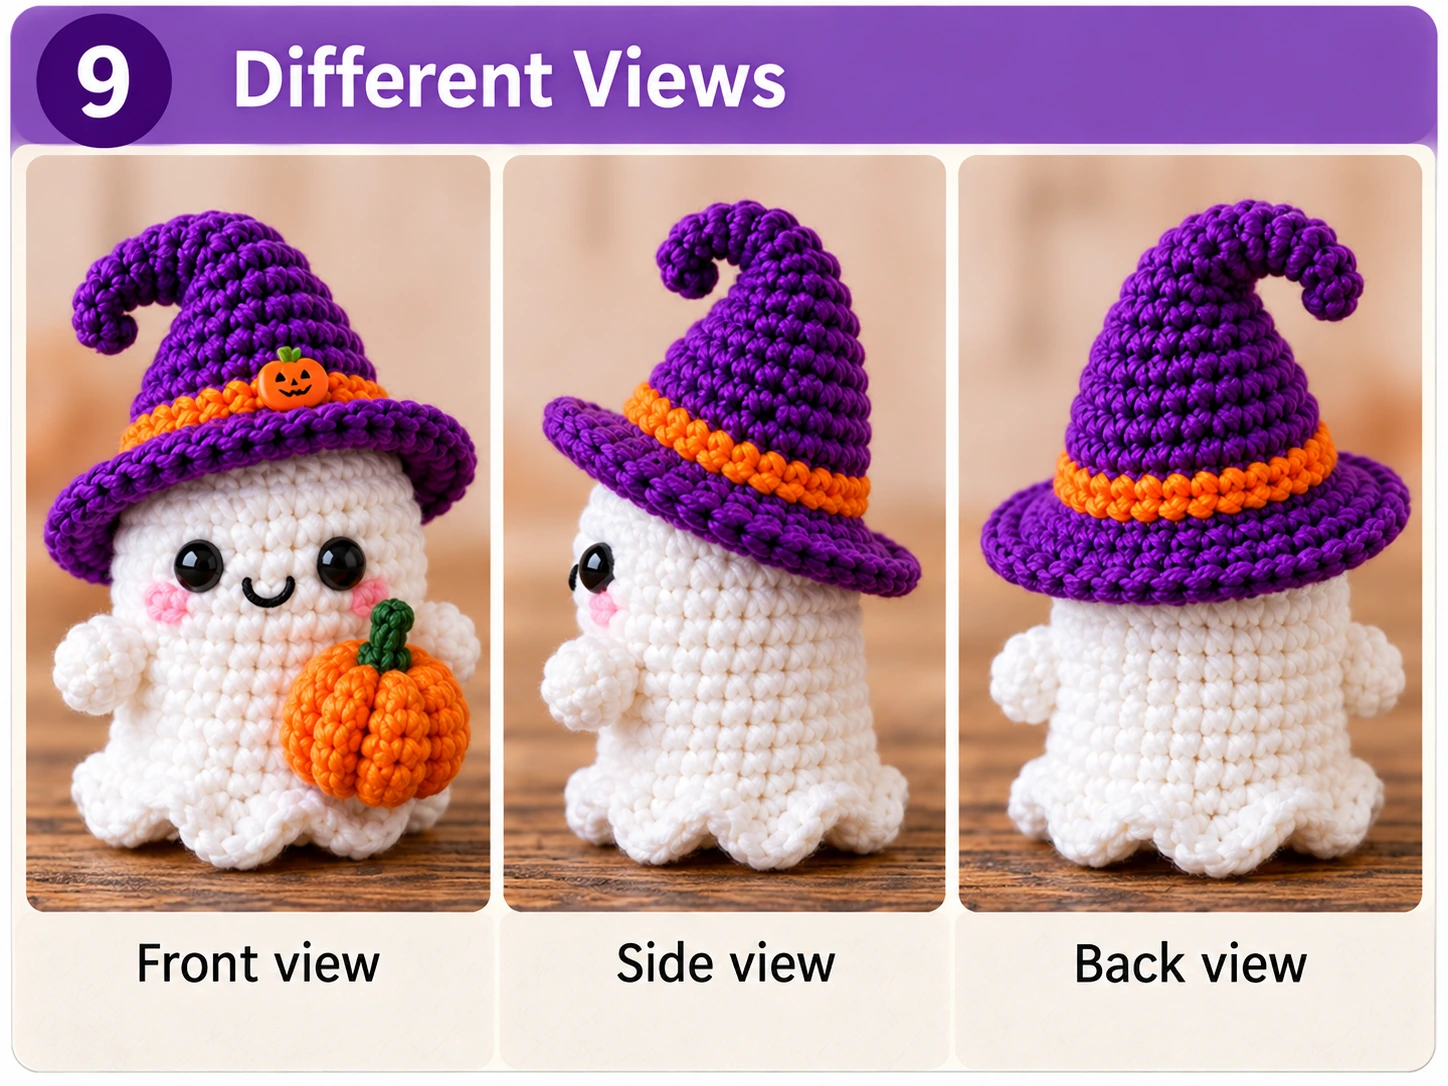
Check the ghost from the front, side, and back.
Adjust the hat until the brim sits naturally above the eyes without hiding too much of the face.
And that’s it.
Your mini witch ghost is finished.
The removable hat also gives you an easy customization option. You can crochet several hats and change the character’s look without making another ghost body.
Different Views of the Finished Ghost
Before photographing your finished project, check it from several directions.
Front
The eyes and smile should feel centered relative to the arms.
The witch hat can lean slightly to one side.
Side
From the side, the head should remain rounded without an obvious point at the top.
The body should have enough stuffing to hold its shape.
Back
Check that all yarn ends are hidden.
The back of the removable hat should also sit naturally rather than lifting excessively from the head.
Color Ideas for Your Crochet Witch Ghost
Once you’ve made the original version, changing the colors can produce a completely different character without changing the pattern.
| Style | Ghost | Hat | Accent |
|---|---|---|---|
| Classic Witch | White | Purple | Orange |
| Gothic | Light Gray | Black | Burgundy |
| Pastel Halloween | Cream | Lavender | Pink |
| Pumpkin Night | White | Black | Orange |
| Candy Witch | Pale Pink | Purple | Lime Green |
| Midnight | Light Gray | Navy | Gold |
A collection of three or four ghosts in coordinated colors could also make a fun Halloween display.
You can keep the bodies identical while changing only the hats.
Common Problems and How to Fix Them
Why is my ghost leaning?
Uneven stuffing can push one side outward more than the other.
Gently redistribute the fiberfill before closing the bottom.
Tension changes can also cause one section of the fabric to become tighter.
Why can I see the stuffing?
Your stitches may be too loose for the yarn.
Try using a smaller hook.
Avoid solving the problem by dramatically increasing your tension, because extremely tight stitches can become uncomfortable to work.
Why is the top of the head pointed?
Too much stuffing pushed directly against the top can distort the shape.
Remove a small amount and redistribute the remaining stuffing around the sides of the head.
The goal is a smooth rounded dome.
Why aren’t my arms perfectly symmetrical?
Amigurumi is worked in a spiral, so the beginning of each round gradually shifts.
This can make mathematically placed features look slightly different visually.
Use the face and overall silhouette as your reference.
Moving the second arm by one stitch can sometimes create better visual symmetry.
Why is my witch hat too loose?
Yarn weight, hook size, and tension all affect the finished circumference. When substituting yarn, compare its label with the Craft Yarn Council yarn weight chart before choosing a hook.
If the hat becomes too wide, you can stop increasing sooner or try a slightly smaller hook.
Test the hat on the ghost before finishing the brim.
Why is the brim curling?
A small amount of movement is normal and can actually add character to a witch hat.
If the brim twists dramatically, recount your stitches and check whether any increases were accidentally skipped or added.
Frequently Asked Questions
Is this no-sew witch ghost crochet pattern suitable for beginners?
It is best for a confident beginner who already knows how to make a magic ring, single crochet, increase, decrease, and chain.
The project introduces useful amigurumi skills without requiring complicated assembly.
Is the witch hat sewn onto the ghost?
No.
The hat is designed to remain removable.
You can place it on the finished ghost and reposition it whenever you want.
Can I make the ghost with plush yarn?
Yes, but the finished ghost will be larger.
You will normally need a hook size appropriate for your plush yarn, and you may need larger eyes.
The exact finished measurements will therefore differ from the sample.
Can I make the ghost without safety eyes?
Yes.
Embroidered eyes work very well for this design.
They also allow you to create different expressions.
How can I make a larger witch ghost?
The simplest method is to use thicker yarn and a larger hook while following the same stitch counts.
Remember that changing yarn weight also changes the amount of stuffing required and the final hat size.
Can I turn the mini ghost into a keychain?
The small size makes the design suitable for adaptation as a bag charm or keychain.
If you add hanging hardware, make sure it is attached securely through strong crochet fabric rather than relying on a loose yarn strand.
Can I make several witch hats for one ghost?
Yes.
Because the hat is removable, you can create several color variations.
Try purple and orange for Halloween, black and burgundy for a darker style, or lavender and pink for a pastel version.
What can I use the finished crochet ghost for?
It can work as seasonal shelf décor, desk décor, a small handmade gift, part of a Halloween display, or—with suitable secure hardware—as a bag charm or keychain.
More Halloween Crochet Projects
- Easy Crochet Ghost Pattern
- No-Sew Crochet Pumpkin Pattern
- Easy Crochet Bat Pattern
- Crochet Black Cat Amigurumi Pattern
- 12 Easy Crochet Halloween Decorations
- Invisible Decrease Crochet Technique
- Beginner Crochet
- Crochet Animals
Conclusion
This easy no-sew witch ghost crochet pattern combines simple amigurumi shaping with details that give the finished project plenty of Halloween personality.
The body is worked from the head downward, the tiny arms are incorporated directly into the crochet, and the decorative lower edge is made from loops already built into the body. That keeps separate assembly to a minimum.
The removable purple witch hat is where you can really customize the project. Change the hat color, add a contrasting band, embroider a different expression, or make several ghosts with matching Halloween palettes.
Most importantly, check the shape as you work rather than relying only on stitch counts. Small adjustments to stuffing, facial placement, and hat position can make a big difference in the final character.
Once you’ve finished your first ghost, the same basic project can become the starting point for a whole miniature Halloween collection.