Easy Crochet Bat Pattern – Cute Halloween Amigurumi
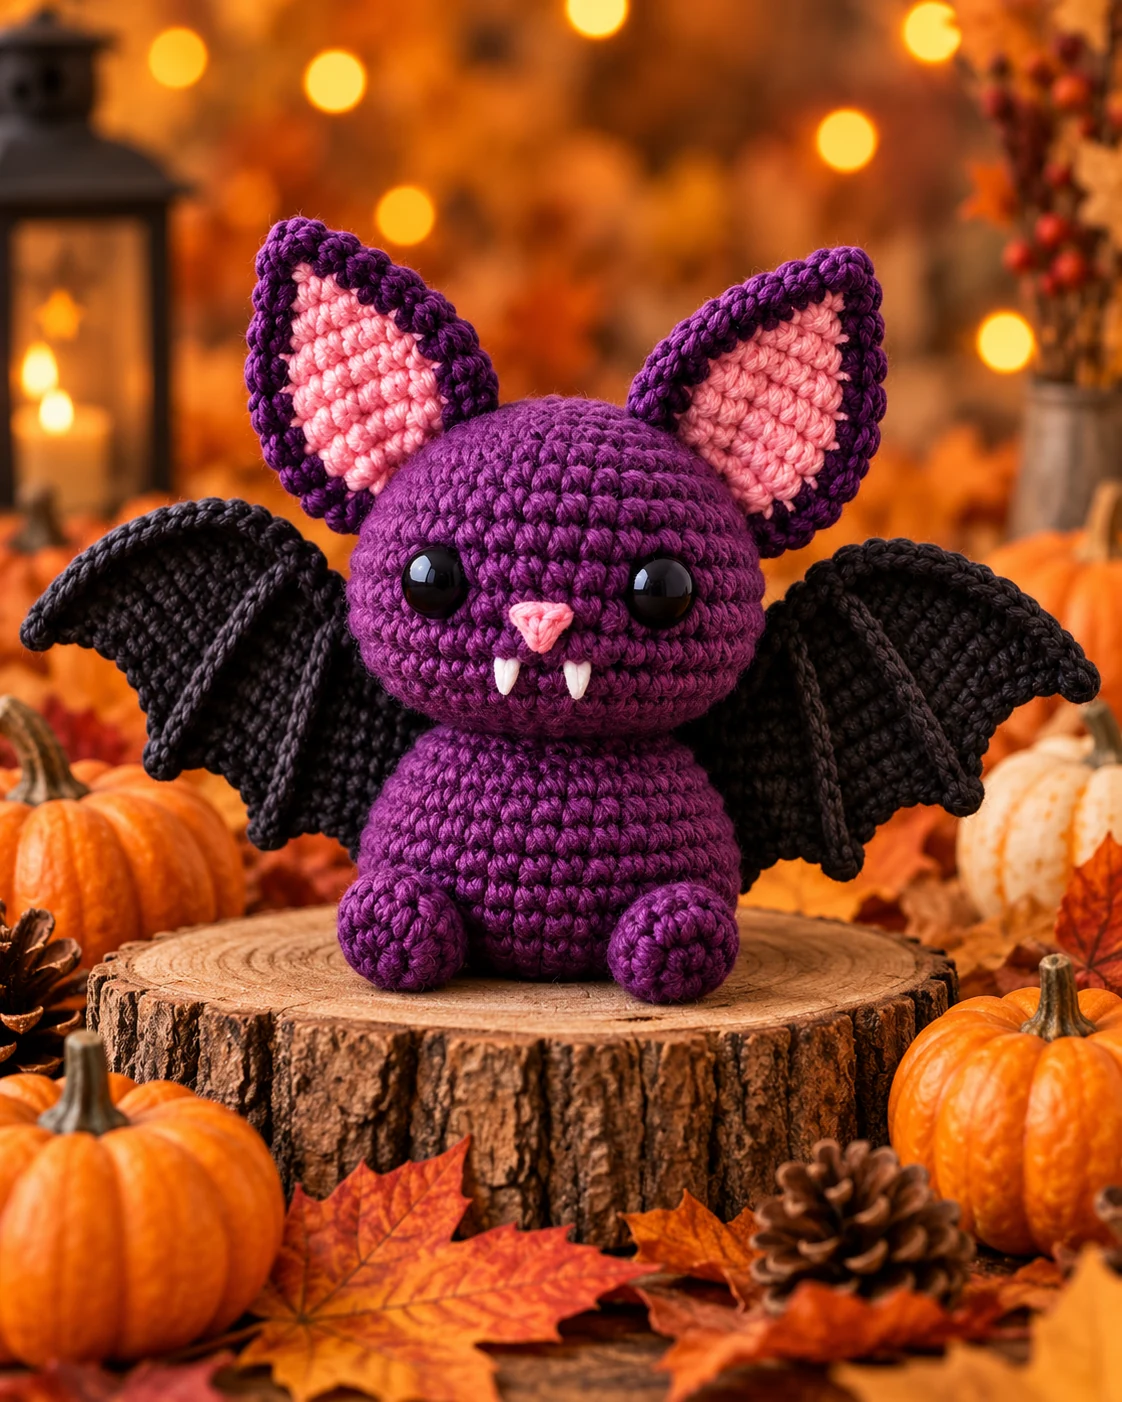
Looking for an easy crochet bat pattern that is cute rather than scary? This little amigurumi bat combines a round purple body, oversized pink-lined ears, tiny white fangs, and dramatic black wings into a fun Halloween crochet project.
The pattern uses familiar amigurumi techniques including a magic ring, single crochet, increases, decreases, stuffing, flat crochet pieces, and simple sewing. The body and head are worked separately in continuous rounds, while the ears, wings, and feet are made individually and attached afterward.
Our Halloween version uses deep purple, charcoal black, dusty pink, and a tiny amount of white yarn. Once you understand the construction, you can also make a classic black bat, pastel bat, gothic bat, or pumpkin-colored version.
Safety note: Plastic safety eyes can be unsuitable for babies and very young children. Use securely embroidered facial features when appropriate for the intended recipient.
Pattern at a Glance
| Detail | Information |
|---|---|
| Skill level | Confident beginner |
| Crochet terms | US |
| Technique | Amigurumi |
| Construction | Separate pieces |
| Yarn | DK/light worsted |
| Hook | 3.0 mm |
| Approx. height | 12–14 cm / 4.7–5.5 in |
| Main colors | Purple, black, pink |
| Gauge | Not critical |
Your finished size may differ depending on yarn thickness, hook size, stuffing, and crochet tension.
Materials and Tools
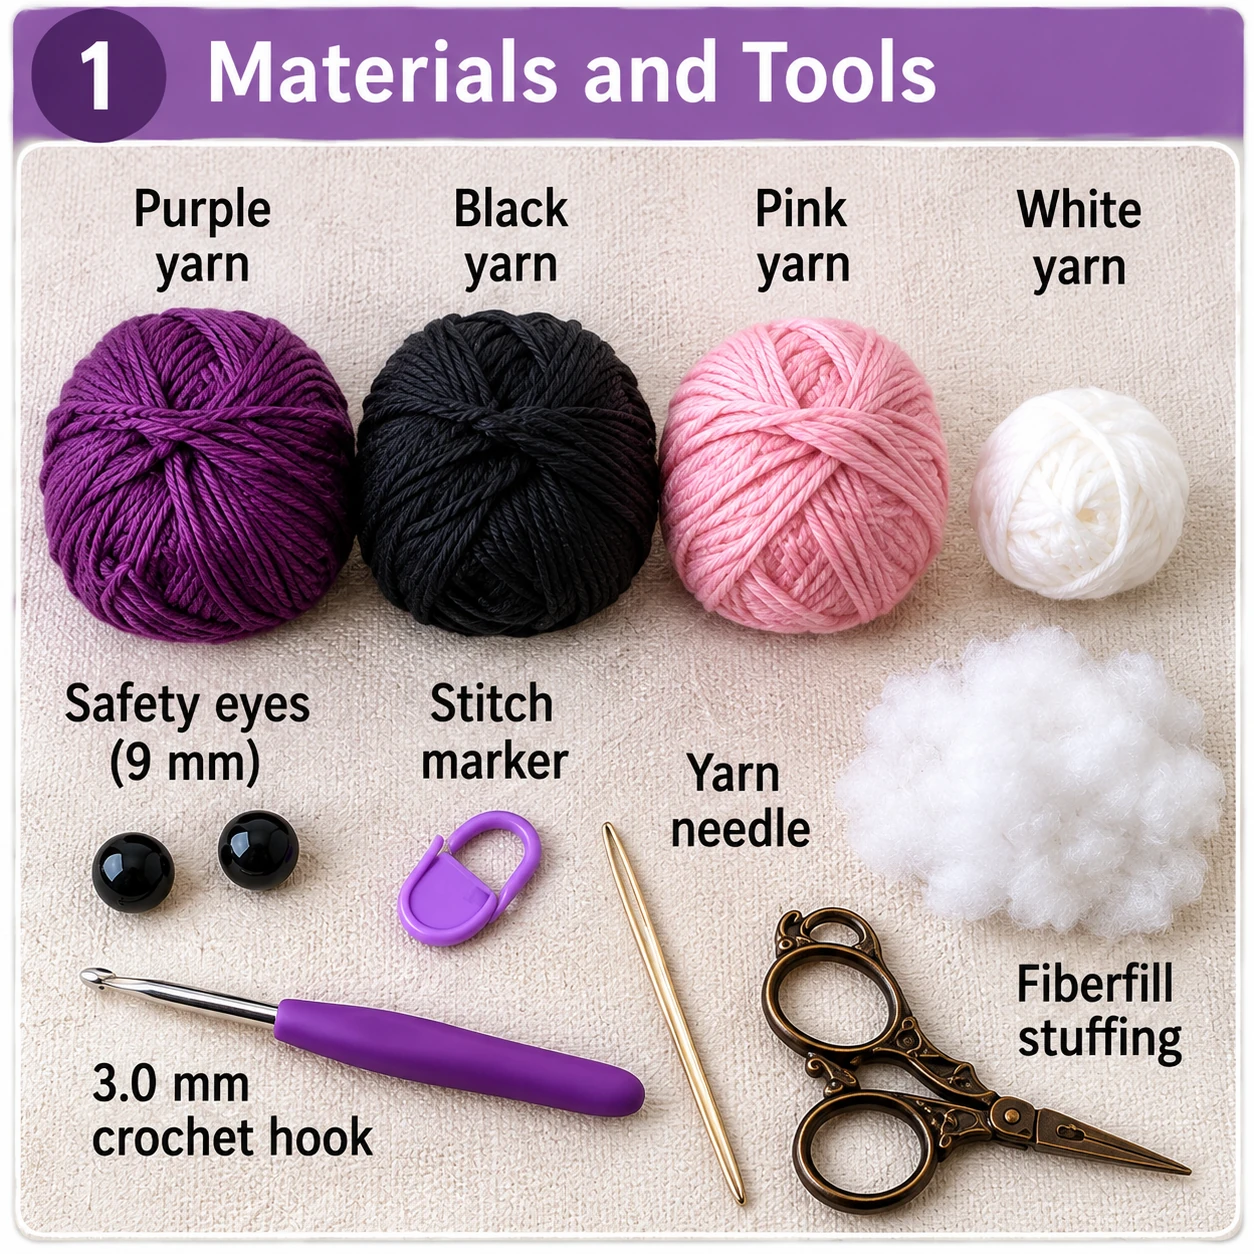
- 35–45 g deep purple DK/light worsted yarn
- 20–25 g charcoal or black yarn
- Small amount of dusty pink yarn
- Small amount of white yarn
- 3.0 mm crochet hook
- Two 9 mm safety eyes
- Polyester fiberfill
- Stitch marker
- Yarn needle
- Pins
- Scissors
Choose a hook that creates a dense crochet fabric without making your hands uncomfortable. Amigurumi normally benefits from tighter stitches because large gaps may reveal the stuffing.
Crochet Abbreviations
| Abbreviation | Meaning |
|---|---|
| MR | Magic ring |
| ch | Chain |
| sc | Single crochet |
| inc | Increase: 2 sc in one stitch |
| dec | Invisible decrease |
| hdc | Half double crochet |
| sl st | Slip stitch |
| st/sts | Stitch/stitches |
| Rnd | Round |
| Row | Row |
| FO | Fasten off |
The number shown in parentheses at the end of a round is the expected stitch count. If decreases are new to you, review our invisible decrease crochet technique before starting.
Pattern Notes
The body and head are crocheted in continuous spirals. Do not join the rounds unless specifically instructed. Place your stitch marker into the first stitch of each round and move it upward every time you begin a new round.
Count your stitches carefully after increase and decrease rounds. One missed increase can change the shape several rounds later. Stuff gradually rather than pushing all the fiberfill inside at the end. The wings and ears are worked separately, and any piece that will be attached later should keep a long yarn tail for sewing.
If you are still building confidence, browse our beginner crochet tutorials before starting this amigurumi.
Crochet the Body
Use purple yarn.
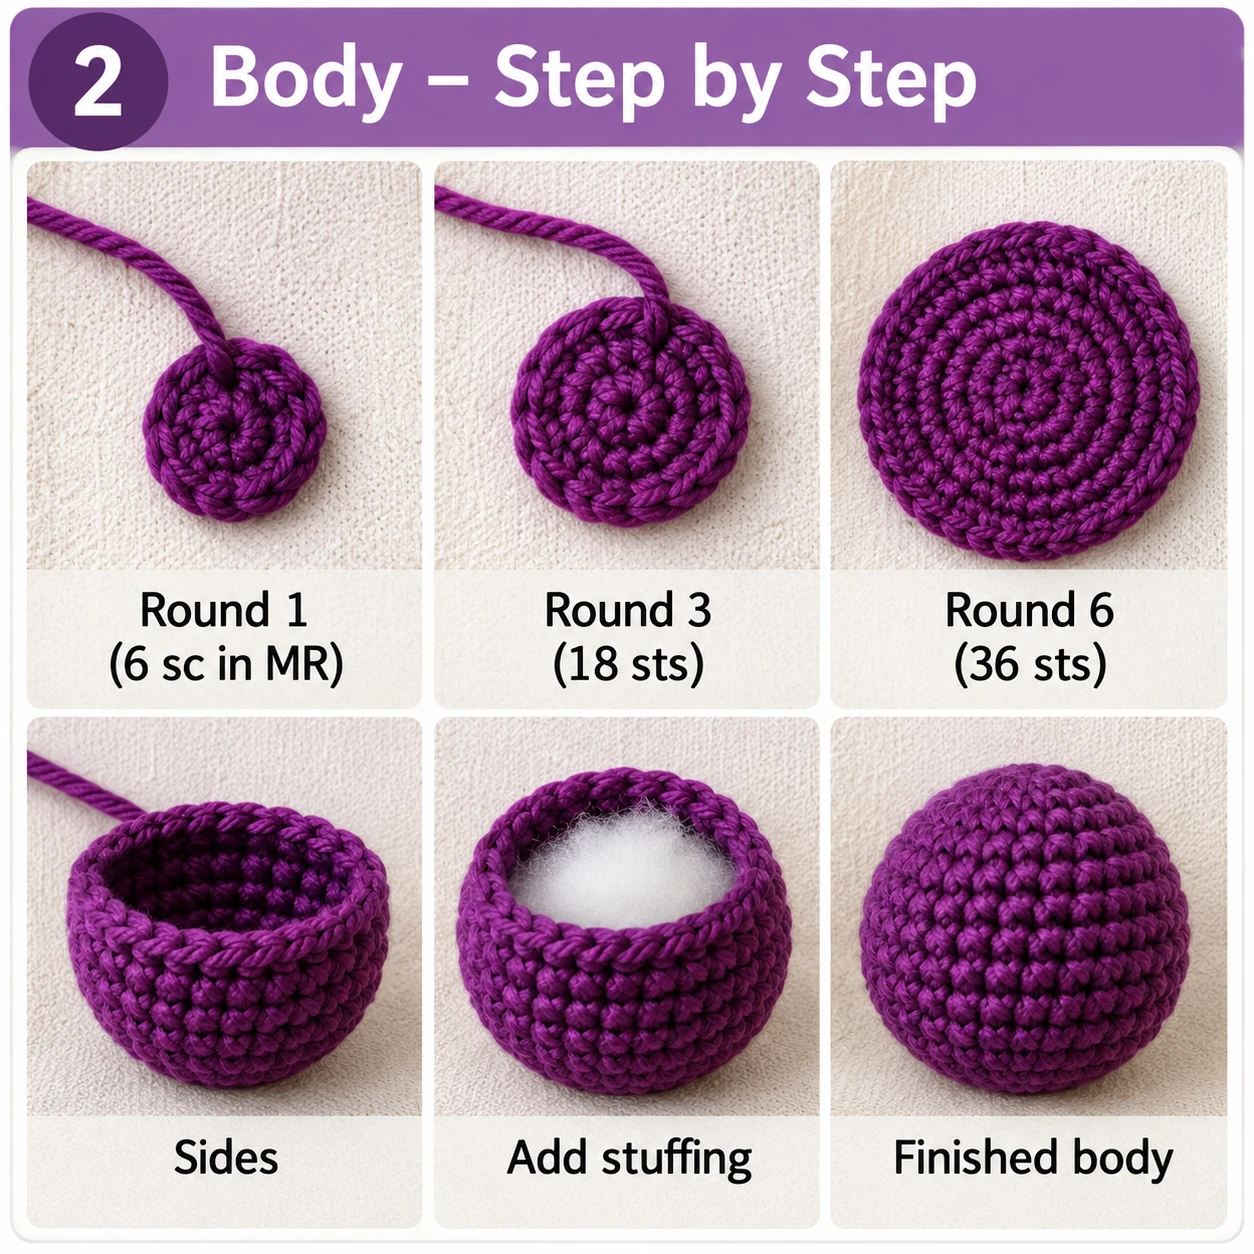
- Rnd 1: 6 sc in MR. (6)
- Rnd 2: inc × 6. (12)
- Rnd 3: (1 sc, inc) × 6. (18)
- Rnd 4: (2 sc, inc) × 6. (24)
- Rnd 5: (3 sc, inc) × 6. (30)
- Rnd 6: (4 sc, inc) × 6. (36)
- Rnd 7–13: sc around. (36)
- Rnd 14: (4 sc, dec) × 6. (30)
- Rnd 15: sc around. (30)
- Rnd 16: (3 sc, dec) × 6. (24)
- Rnd 17: sc around. (24)
- Rnd 18: (2 sc, dec) × 6. (18)
- Rnd 19: (1 sc, dec) × 6. (12)
- Rnd 20: dec × 6. (6)
After Round 6 you should have a relatively flat circular base. The sides rise naturally during Rounds 7–13. Begin stuffing around Round 15, adding small amounts evenly. The body should look plump and rounded rather than hard or overfilled. Finish stuffing before the final decreases, fasten off, and close the remaining opening securely.
Crochet the Head
Continue with purple yarn.
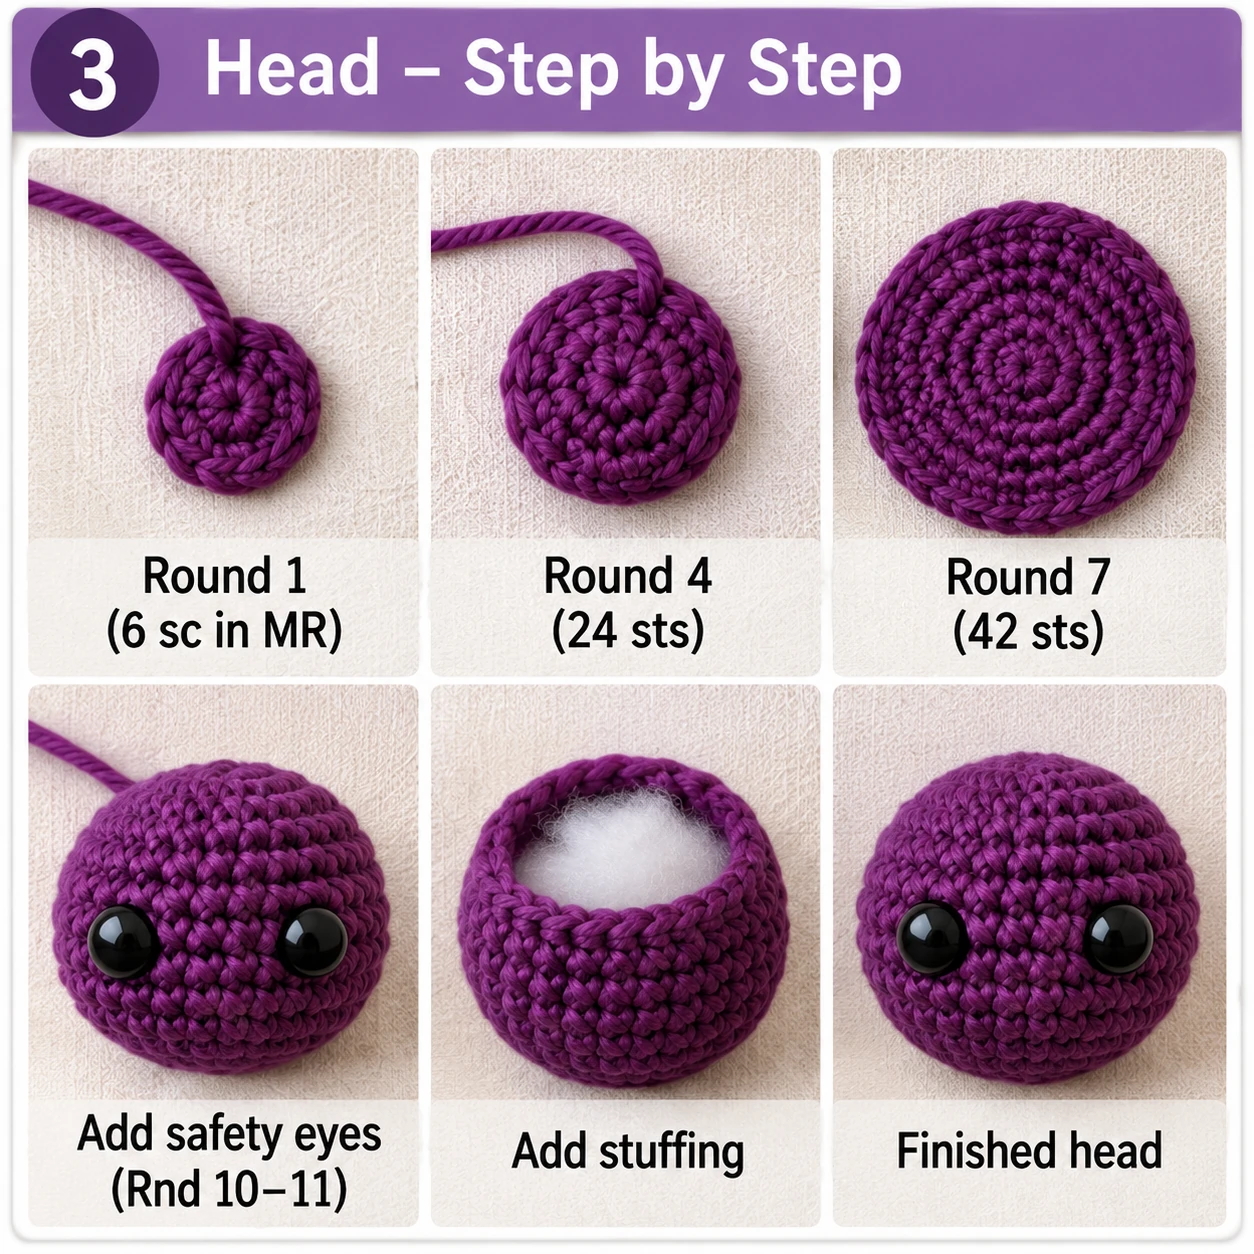
- Rnd 1: 6 sc in MR. (6)
- Rnd 2: inc × 6. (12)
- Rnd 3: (1 sc, inc) × 6. (18)
- Rnd 4: (2 sc, inc) × 6. (24)
- Rnd 5: (3 sc, inc) × 6. (30)
- Rnd 6: (4 sc, inc) × 6. (36)
- Rnd 7: (5 sc, inc) × 6. (42)
- Rnd 8–14: sc around. (42)
- Rnd 15: (5 sc, dec) × 6. (36)
- Rnd 16: (4 sc, dec) × 6. (30)
- Rnd 17: (3 sc, dec) × 6. (24)
- Rnd 18: (2 sc, dec) × 6. (18)
- Rnd 19: (1 sc, dec) × 6. (12)
- Rnd 20: dec × 6. (6)
Position the Eyes
Place the safety eyes between Rounds 10 and 11, starting with approximately 8 stitches between them. Do not attach the washers immediately. Look at the head from the front, adjust until both eyes appear balanced, and then secure them.
Start stuffing after Round 16. Add fiberfill gradually around the sides and finish stuffing before the final two decrease rounds. Fasten off and close the opening.
Crochet the Bat Ears
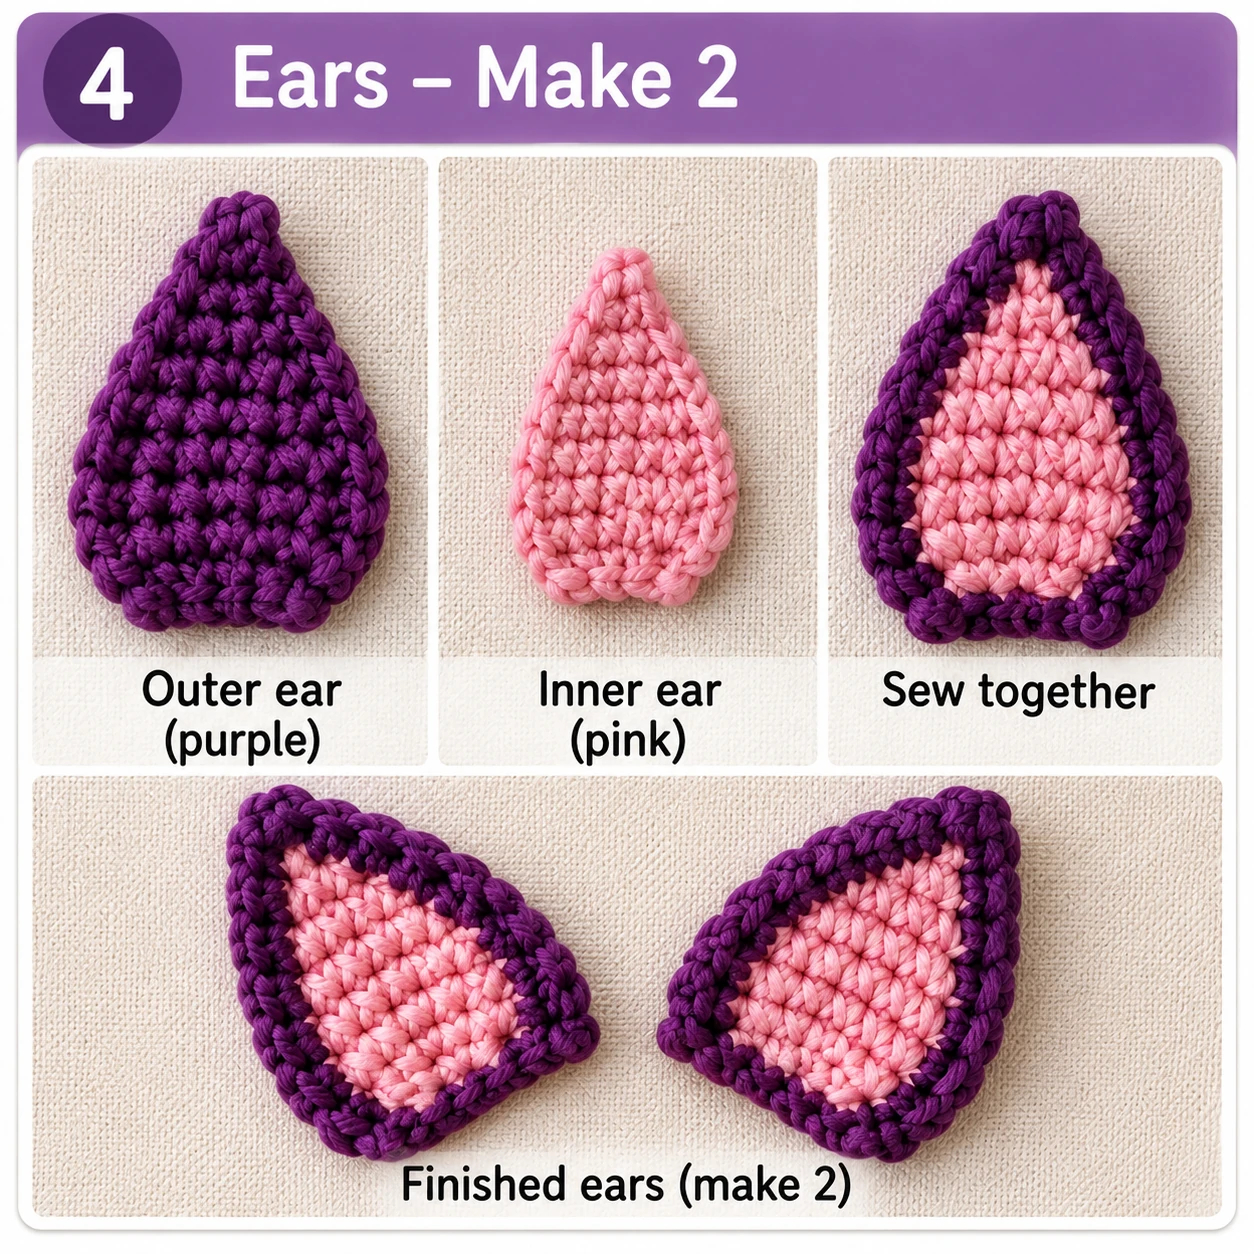
The large ears give this bat much of its personality. Make two outer ears and two smaller inner panels.
Outer Ear — Make 2
Use purple yarn.
- Row 1: ch 2. Work 2 sc into second ch from hook. (2)
- Row 2: ch 1, turn. inc in each st. (4)
- Row 3: ch 1, turn. sc across. (4)
- Row 4: ch 1, turn. inc, 2 sc, inc. (6)
- Row 5: ch 1, turn. sc across. (6)
- Row 6: ch 1, turn. inc, 4 sc, inc. (8)
- Row 7: ch 1, turn. sc across. (8)
- Row 8: ch 1, turn. inc, 6 sc, inc. (10)
- Row 9: ch 1, turn. sc across. (10)
Fasten off, leaving a long tail.
Inner Ear — Make 2
Use pink yarn and repeat Rows 1–7 of the outer ear. Fasten off. Place a pink inner ear in the center of each purple outer ear, leaving a visible purple border. Sew the inner panels in place with small stitches.
Before attaching the completed ears to the head, pin both in position, angle the tips slightly outward, and check the bat from the front. Sew permanently only after both sides look balanced.
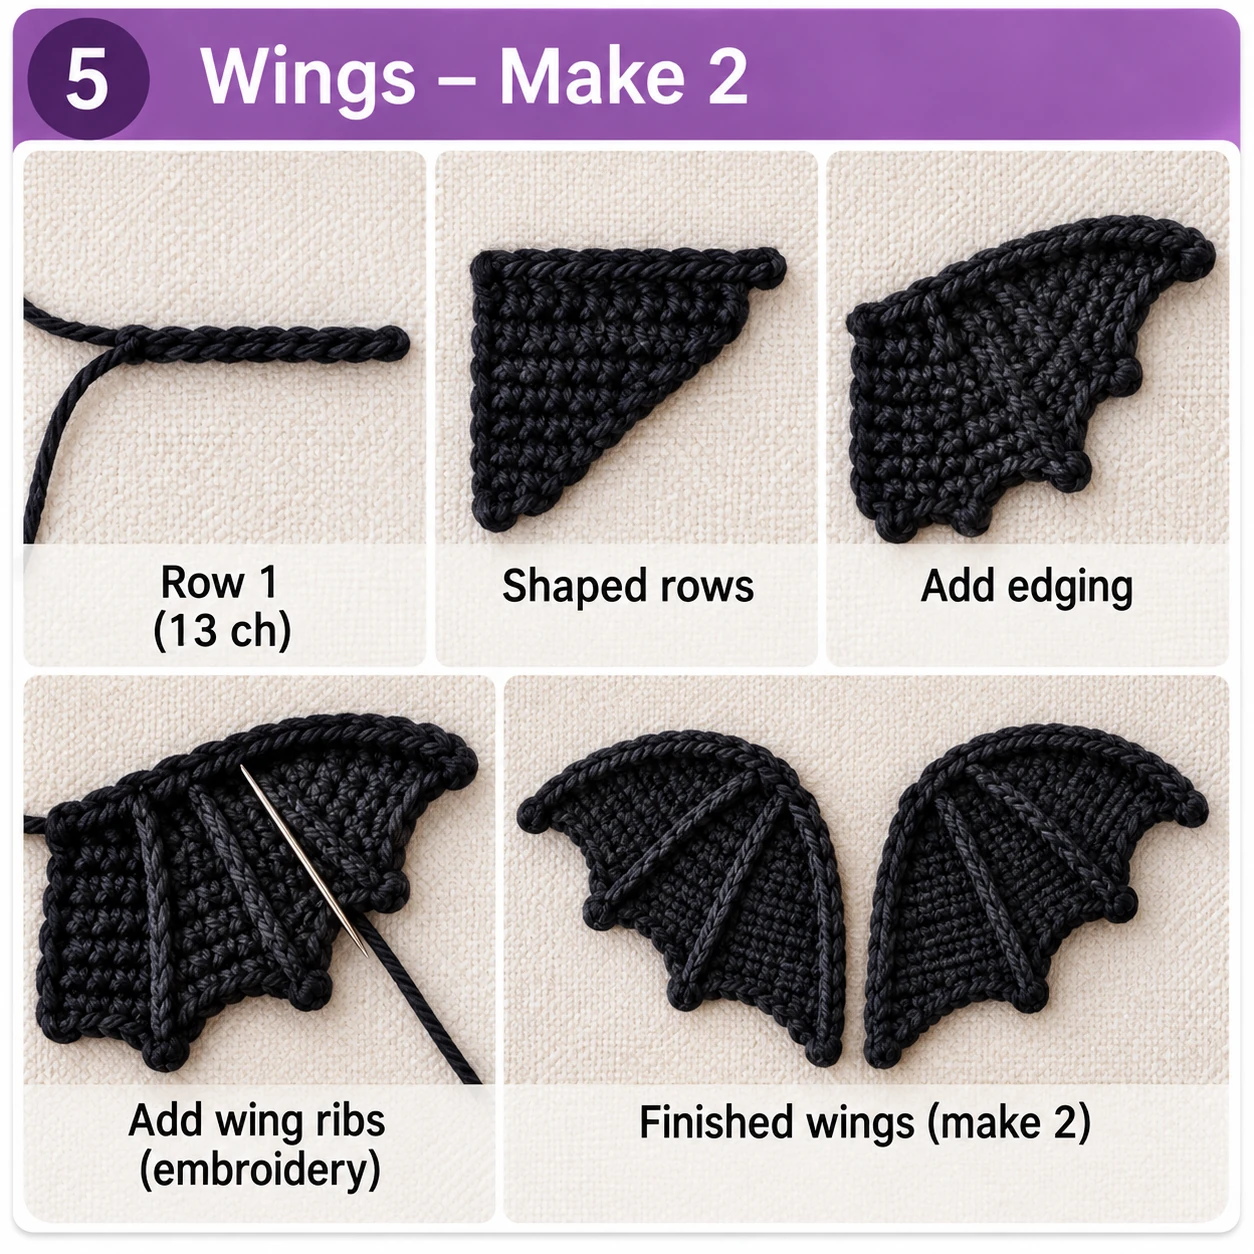
Crochet the Bat Wings
The wings are the most important visual feature of this project. Use black or charcoal yarn.
First Wing
- Row 1: ch 13. Starting in the second ch from hook, work 12 sc. (12)
- Row 2: ch 1, turn. 12 sc. (12)
- Row 3: ch 1, turn. 10 sc. Leave 2 sts unworked. (10)
- Row 4: ch 1, turn. 10 sc. (10)
- Row 5: ch 1, turn. 8 sc. Leave 2 sts unworked. (8)
- Row 6: ch 1, turn. 8 sc. (8)
- Row 7: ch 1, turn. 6 sc. Leave 2 sts unworked. (6)
- Row 8: ch 1, turn. 6 sc. (6)
- Row 9: ch 1, turn. 4 sc. Leave 2 sts unworked. (4)
Do not fasten off yet. Work around the stepped outer edge with sc and sl sts. Add extra stitches around the lower corners where needed to soften the staircase shape into a more organic bat-wing edge. Fasten off, leaving a long sewing tail.
Second Wing
Repeat the same rows, then turn the second wing so that it mirrors the first. Lay both pieces flat. Their straight edges should face inward and the shaped edges should point away from the bat.
Add Wing Ribs
Thread a yarn needle with black yarn and embroider two or three long lines from the inner upper portion of each wing toward the lower outer points. Keep the embroidery tension relaxed so the wings do not curl.
For more animal projects, browse our crochet animal patterns.
Crochet the Feet
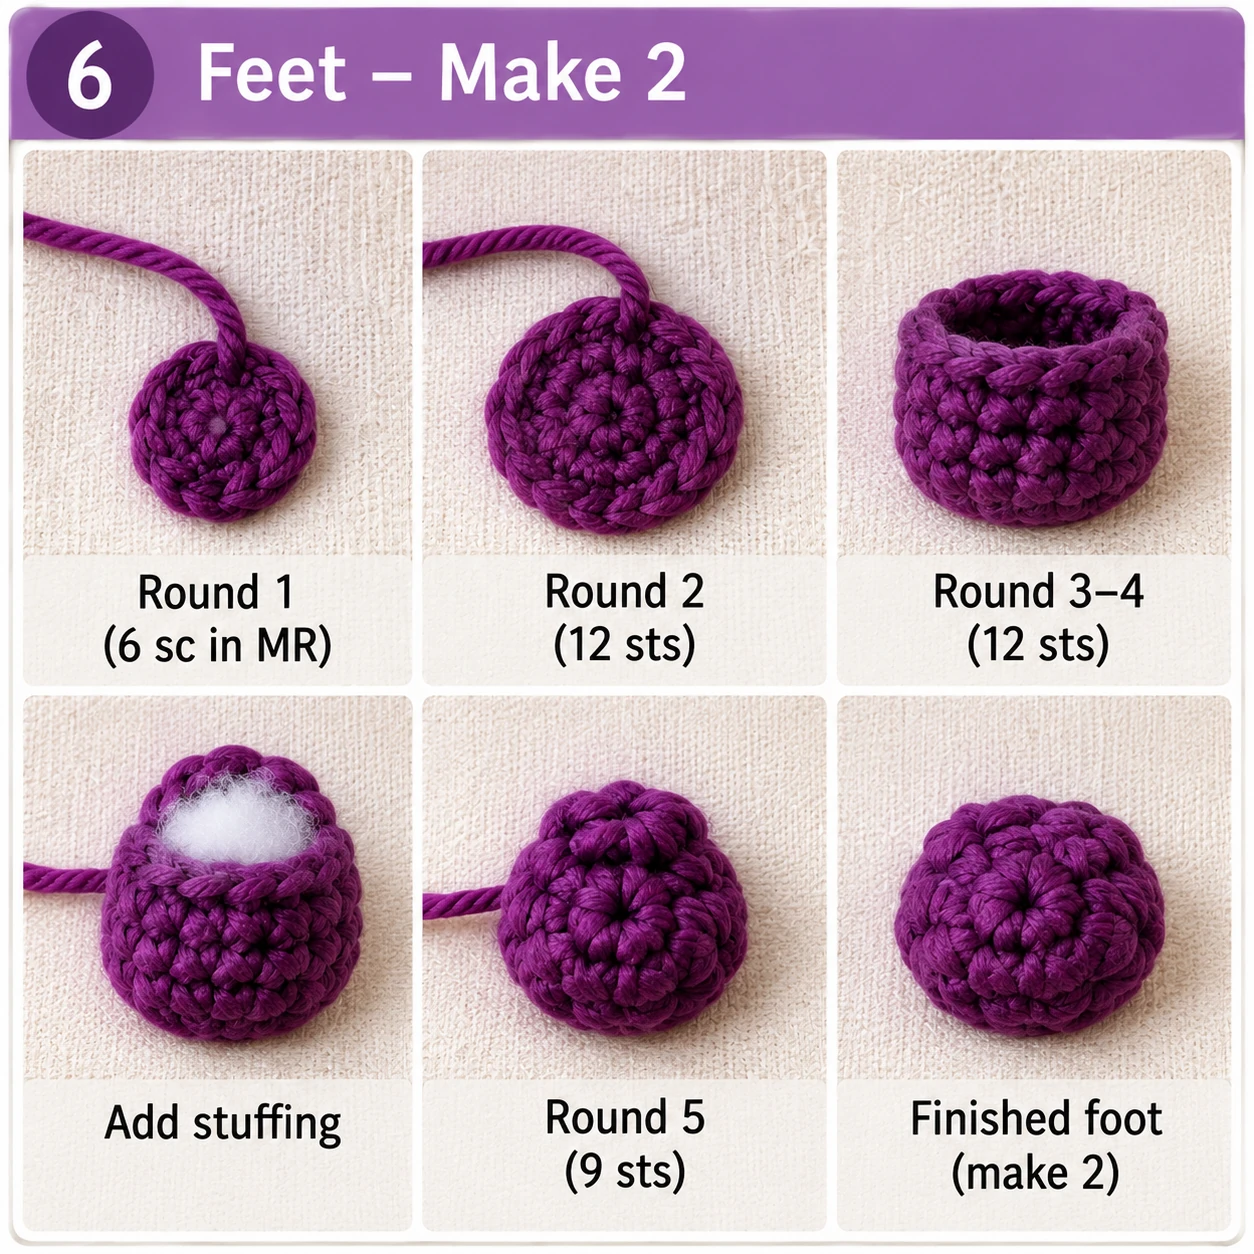
Make 2 using purple yarn.
- Rnd 1: 6 sc in MR. (6)
- Rnd 2: inc × 6. (12)
- Rnd 3–4: sc around. (12)
- Rnd 5: (2 sc, dec) × 3. (9)
Add a small amount of fiberfill after Round 4 and do not overstuff. Fasten off, leaving a long tail. The feet should remain small compared with the body; their main jobs are to add character and help the finished bat sit upright.
Add the Bat’s Face
Your eyes should already be installed. Use pink yarn to embroider a tiny triangular nose between the eyes and slightly below them, then add a short vertical stitch underneath.
Use white yarn for the fangs. Create one small fang on either side below the mouth. Keep them small because oversized fangs can dominate the compact face. For a softer look, add one tiny pink cheek stitch below each eye.
Before hiding your yarn tails, place the head on a table and look at it from farther away. This makes uneven eye, nose, and fang placement easier to notice. Reposition anything necessary before securing it.
Assemble Your Crochet Bat
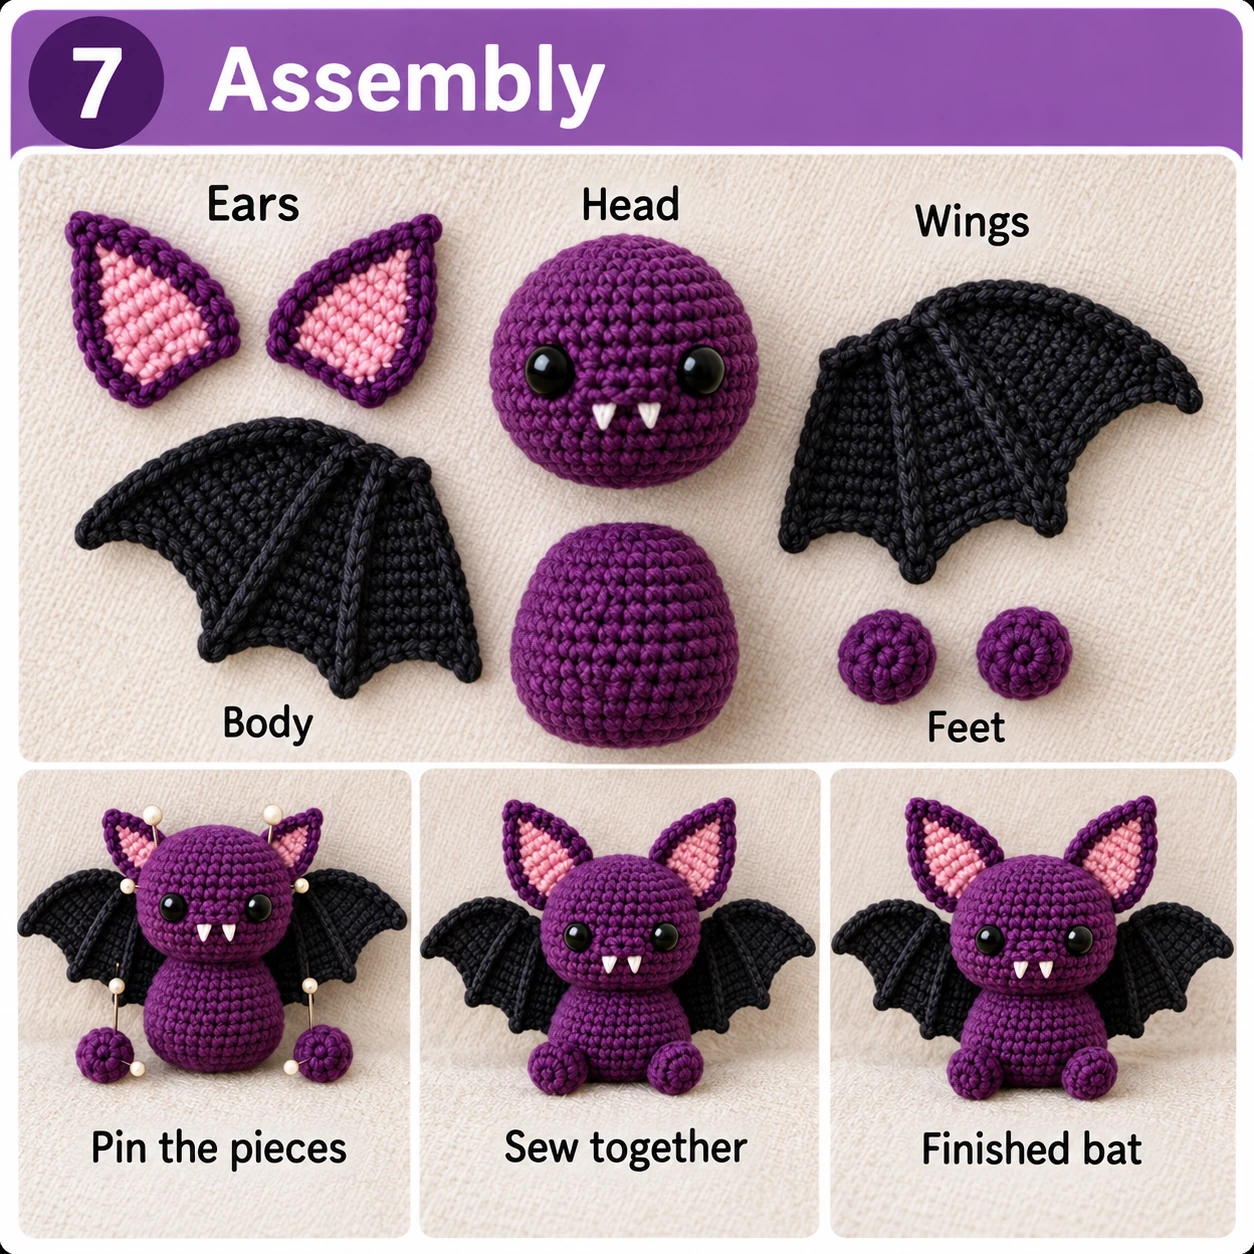
You should now have 1 body, 1 head, 2 finished ears, 2 wings, and 2 feet. Do not immediately sew everything together. Pin first.
Step 1: Attach the Head
Center the head on the body and pin it temporarily. Look at the bat from the front, side, and back. When satisfied, sew around the neck connection several times. The join should be secure without being pulled so tightly that the neck becomes narrow.
Step 2: Attach the Ears
Pin both ears to the upper sides of the head with the pink panels facing forward. Angle the tips slightly outward and compare both sides before sewing.
Step 3: Position the Wings
Place the wings on the upper half of the body. Their inner straight edges should sit close to the body while the scalloped edges spread outward. Pin both wings, put the bat upright, compare their height, and then sew securely.
Step 4: Attach the Feet
Pin the feet near the lower front of the body and test the bat on a flat surface. Moving the feet slightly forward can help balance a head-heavy amigurumi. Sew them once the bat sits as intended.
Step 5: Final Check
Hide loose yarn ends, adjust the stuffing with your fingers, straighten the wings, and check the face.
For another Halloween amigurumi with detailed assembly, see our crochet black cat amigurumi pattern.
Crochet Bat Color Ideas
Classic Halloween Bat
- Black body
- Black wings
- Gray inner ears
- Pink or gray nose
Pastel Bat
- Lavender body
- Pale gray wings
- Blush ears
- Cream fangs
Pumpkin Bat
- Burnt orange body
- Black wings
- Orange or peach ears
- Black or brown nose
Gothic Bat
- Black body
- Charcoal wings
- Burgundy inner ears
- Dark red or dusty pink nose
The construction stays the same; only the palette changes. For more seasonal inspiration, explore our easy crochet Halloween decorations and the full Occasions collection.
Troubleshooting
Why can I see stuffing between my stitches?
Your crochet fabric may be too loose. Try going down slightly in hook size or tightening your tension. Do not simply add more stuffing, because overstuffing can stretch the fabric and make gaps even more visible.
Why is my bat head uneven?
Check the stitch count first. If the count is correct, massage and redistribute the stuffing. Uneven fiberfill can distort a correctly crocheted shape.
Why are my two wings different sizes?
Your tension may have changed. Make the second wing soon after the first and compare them during construction rather than waiting until both are finished.
Why are the wings curling?
The edging or embroidered ribs may be too tight. Relax your tension and gently reshape the wing.
Why does my crochet bat fall forward?
The head may contain too much stuffing or the feet may be too far back. Pin the feet temporarily and test several positions before sewing.
Why are the ears uneven?
Pin both ears, look at the face straight on, and adjust the angle until they appear balanced.
Frequently Asked Questions
Is this easy crochet bat pattern suitable for beginners?
It is most suitable for a confident beginner who understands a magic ring, single crochet, increases, decreases, and basic amigurumi construction. The flat wings add a little shaping without requiring highly advanced stitches.
What yarn should I use for this crochet bat?
DK or light worsted yarn works well. Cotton can provide crisp stitch definition, while many acrylic yarns produce a softer finish. Use a hook that gives you dense fabric suitable for stuffing.
How large will the finished bat be?
Using DK/light worsted yarn with a 3.0 mm hook, the target is approximately 12–14 cm (4.7–5.5 inches) tall. Exact dimensions depend on yarn, hook, tension, and stuffing.
Can I make the crochet bat without safety eyes?
Yes. Embroidered eyes can replace plastic safety eyes and may be more appropriate for a finished item intended for a young child.
Can I make a larger bat with the same pattern?
Yes. Thicker yarn and an appropriately larger hook can create a larger bat while retaining the same stitch counts. Final measurements will vary.
How can I make a mini crochet bat?
Use thinner yarn and an appropriately smaller hook while keeping the written stitch counts unchanged.
Can I use a different color for the wings?
Yes. Gray, purple, burgundy, brown, pastel shades, or orange can all work depending on the style you want.
Can I turn the bat into Halloween hanging décor?
Yes. For a decorative version, attach a secure hanging loop at the top of the finished bat and anchor it firmly if the decoration will be handled frequently.
Final Result
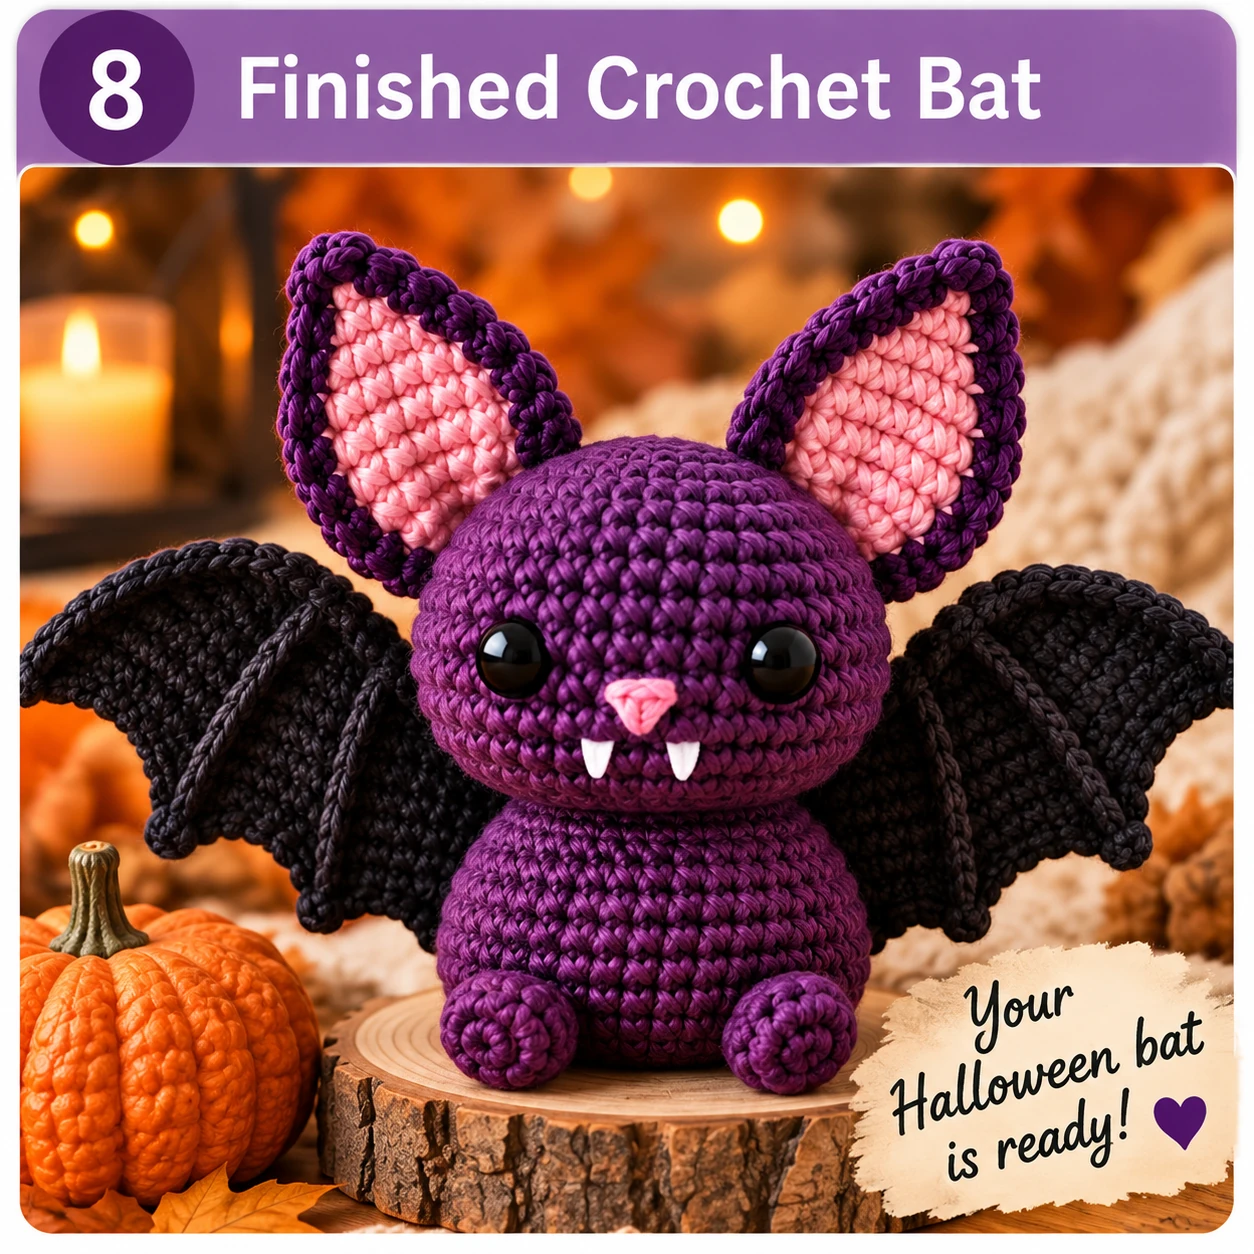
This easy crochet bat pattern uses basic amigurumi shapes to create a Halloween character with a distinctive personality. The round purple body keeps the main construction approachable, while the oversized ears, tiny fangs, and black scalloped wings transform those simple shapes into a recognizable bat.
Take your time with the final assembly. Pinning the ears, wings, and feet before sewing can make a bigger visual difference than changing the crochet itself. Once you have made the first bat, experiment with different yarn colors and sizes.
Once your project is complete, securely weave in every loose tail. Our guide to weaving in crochet ends can help with the final cleanup.