Mini Crochet Turtle Pattern – Easy Free Amigurumi
Make a cute mini crochet turtle with this free amigurumi pattern. Follow easy steps for the shell, head, flippers, tail, assembly, and finishing.
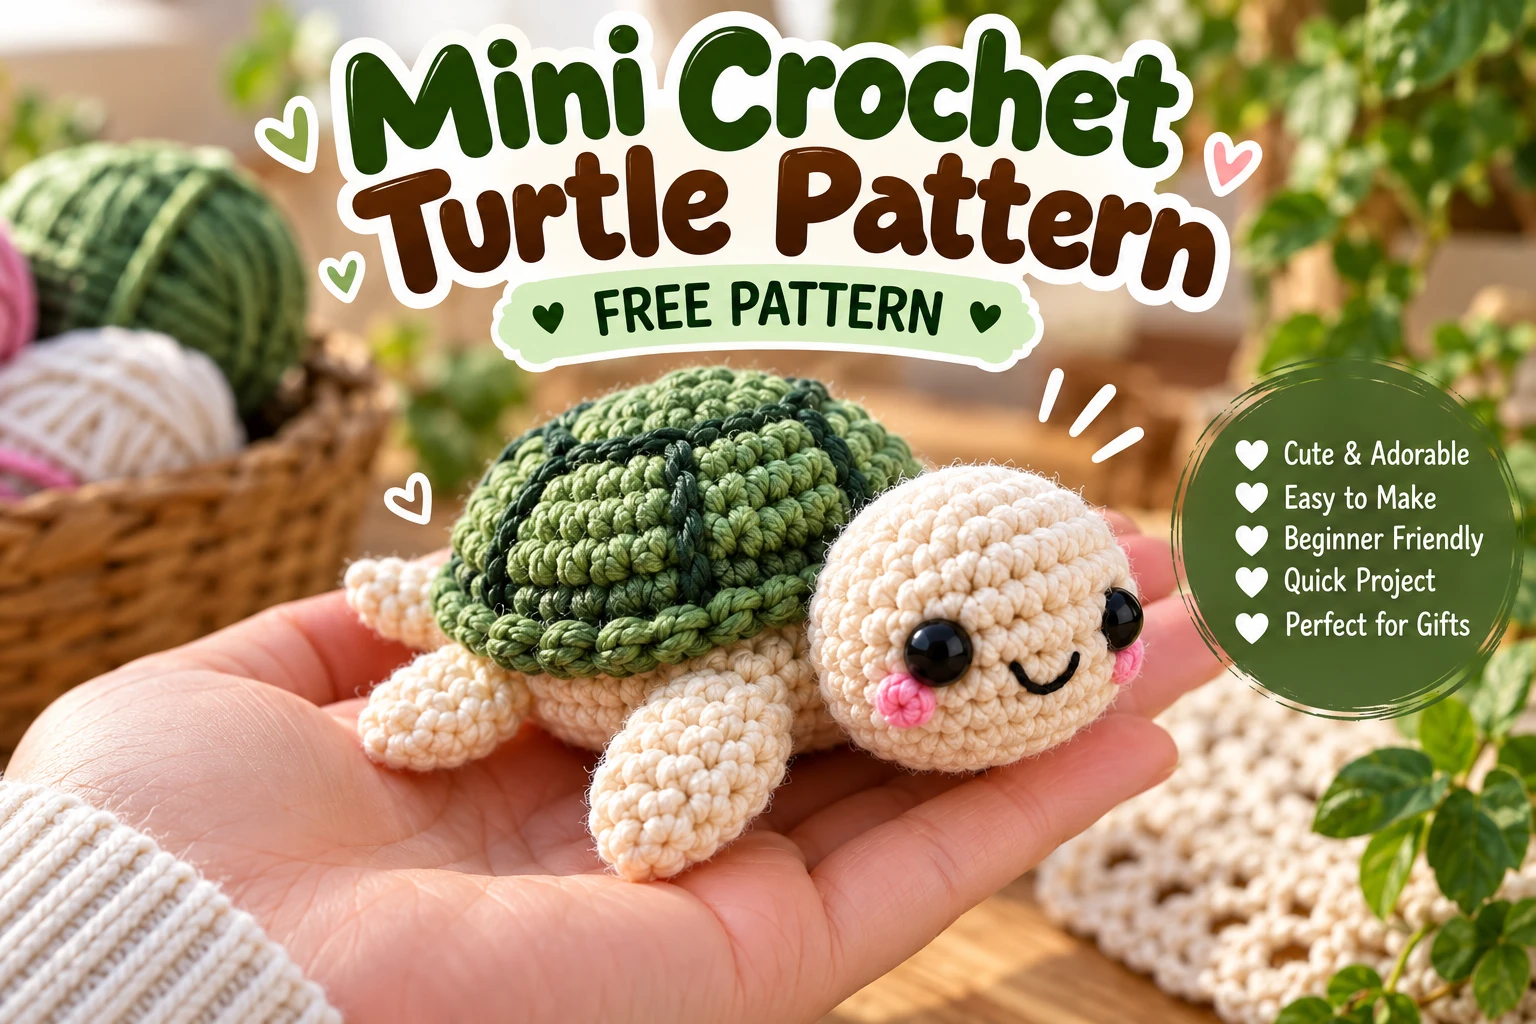
A tiny turtle, a ball of yarn, and an afternoon are all you need for this mini crochet turtle pattern.
This cute amigurumi turtle combines a soft cream body with a rounded green shell, four little flippers, and a tiny tail. Add two black eyes, a simple embroidered smile, and optional pink cheeks, and the result is a palm-sized turtle with plenty of personality.
The project uses mostly single crochet, increases, and decreases. Each main component is made separately before assembly, making it easier to position the head and flippers before permanently attaching them.
Pattern at a Glance
| Skill level | Confident beginner |
| Crochet terms | US terminology |
| Technique | Amigurumi |
| Construction | Separate pieces + assembly |
| Main stitch | Single crochet |
| Hook | 3 mm |
| Yarn | DK/light worsted |
| Main colors | Cream + sage/dark green |
| Eyes | 8 mm safety eyes |
| Finished size | Approx. 10–12 cm / 4–4.7 in |
| Working method | Continuous spiral unless noted |
| Gauge | Not critical |
The exact finished size depends on your yarn, hook, tension, and stuffing.
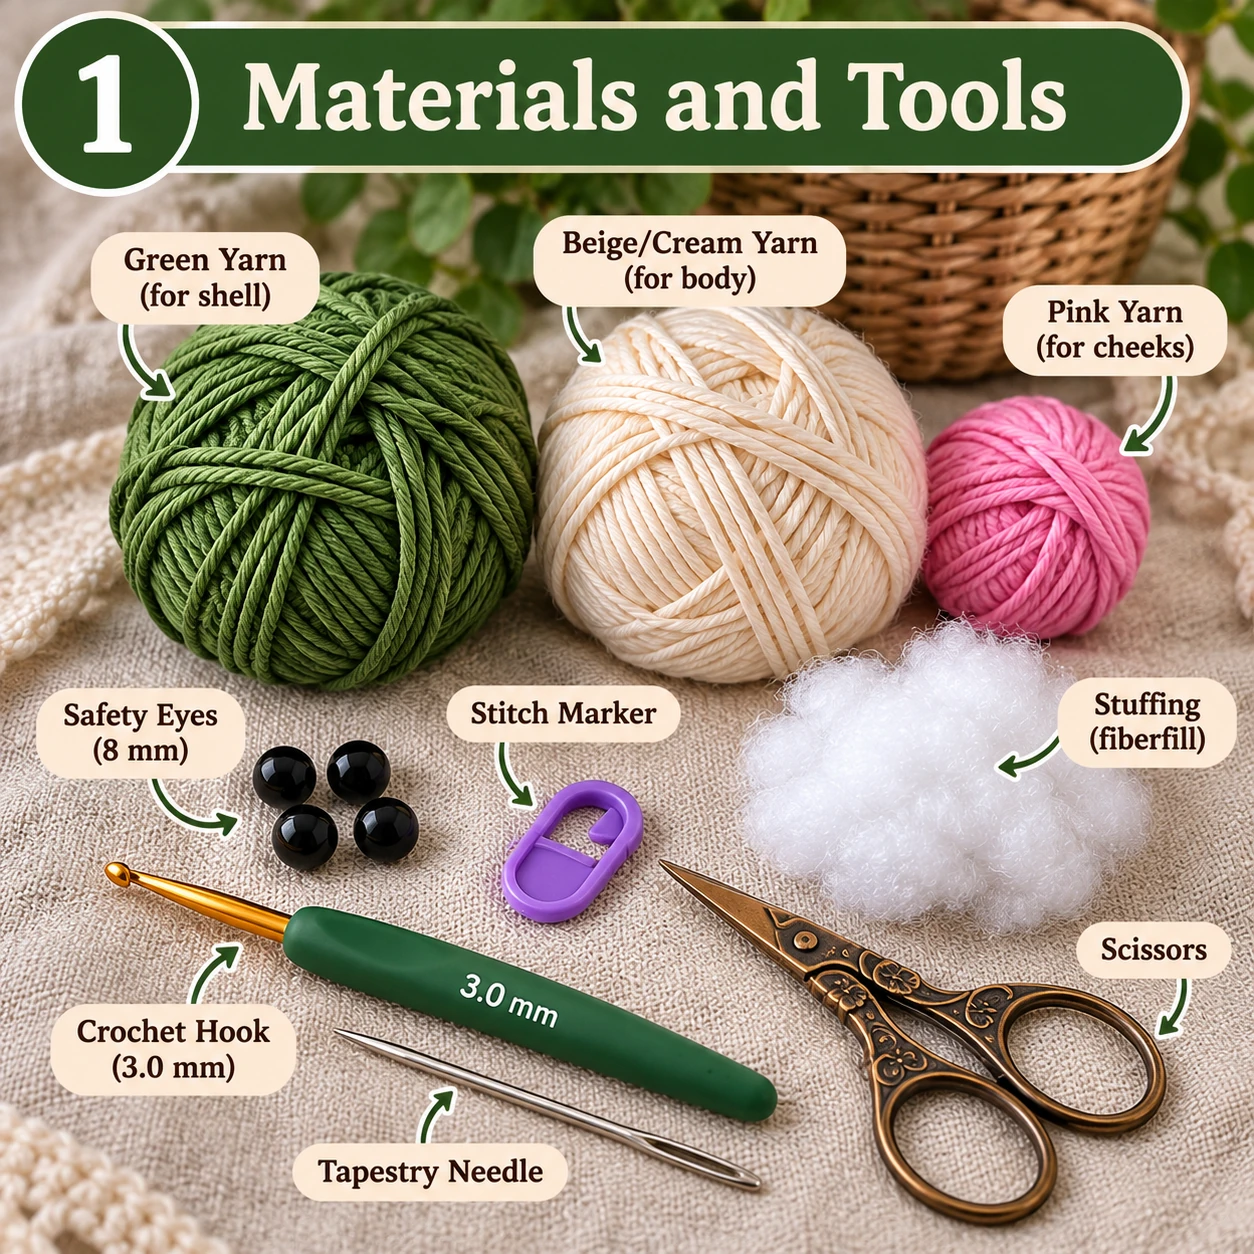
Materials
- DK or light worsted yarn in cream
- Sage or medium green yarn for the shell
- Optional darker green yarn for shell details
- Small amount of pink yarn or embroidery thread
- Black embroidery thread
- 3 mm crochet hook
- Two 8 mm safety eyes
- Polyester fiberfill
- Stitch marker
- Yarn needle
- Sewing pins
- Scissors
Abbreviations
| MR | Magic Ring |
| ch | Chain |
| sc | Single Crochet |
| inc | Increase – 2 sc in one stitch |
| dec | Decrease – crochet 2 stitches together |
| sl st | Slip Stitch |
| st | Stitch |
| sts | Stitches |
| Rnd | Round |
| FO | Fasten Off |
Pattern Notes
Work most pieces in continuous spiral rounds. Do not join at the end of each round unless specifically instructed. Place a stitch marker in the first stitch of every round and move it upward as you work. Keep the tension firm enough that stuffing does not show through the fabric.
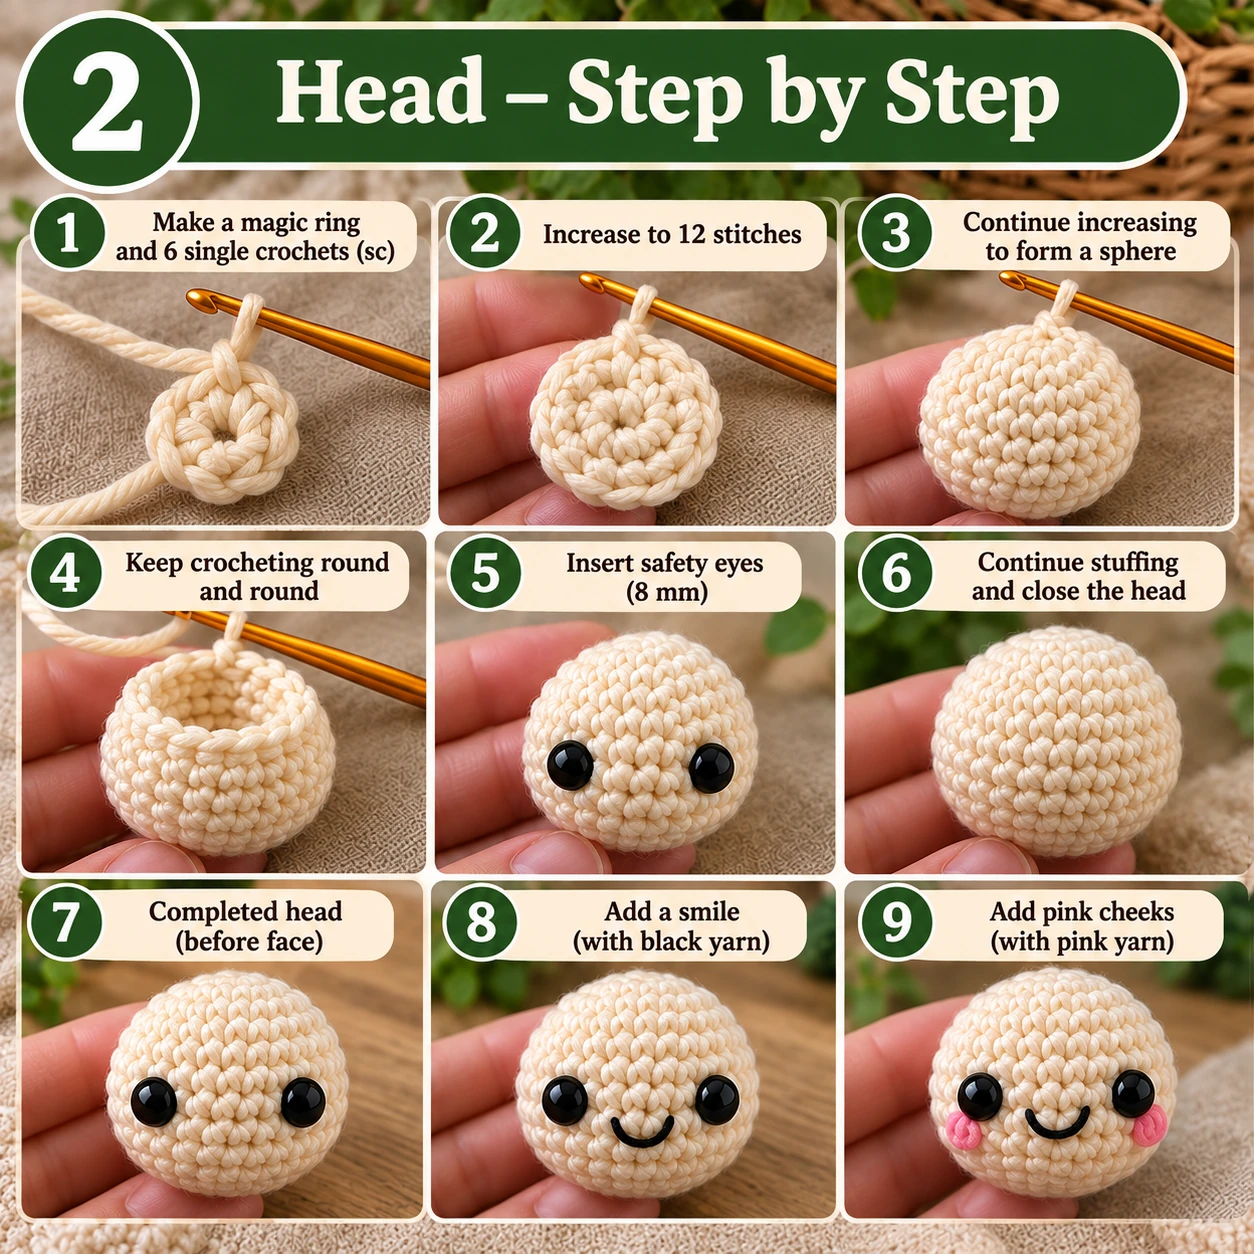
Crochet the Turtle Head
Use cream yarn. The head should be round but slightly longer toward the neck opening.
Rnd 1: 6 sc in MR. (6)
Rnd 2: inc in each st around. (12)
Rnd 3: (1 sc, inc) × 6. (18)
Rnd 4: (2 sc, inc) × 6. (24)
Rnd 5: (3 sc, inc) × 6. (30)
Rnd 6–9: sc in each st around. (30)
Place the safety eyes approximately between Rounds 7 and 8, with about 7–8 stitches between them.
Rnd 10: (3 sc, dec) × 6. (24)
Rnd 11: (2 sc, dec) × 6. (18)
Rnd 12: (1 sc, dec) × 6. (12)
Stuff gradually, fasten off, and leave a long yarn tail for sewing.
Crochet the Bottom Body
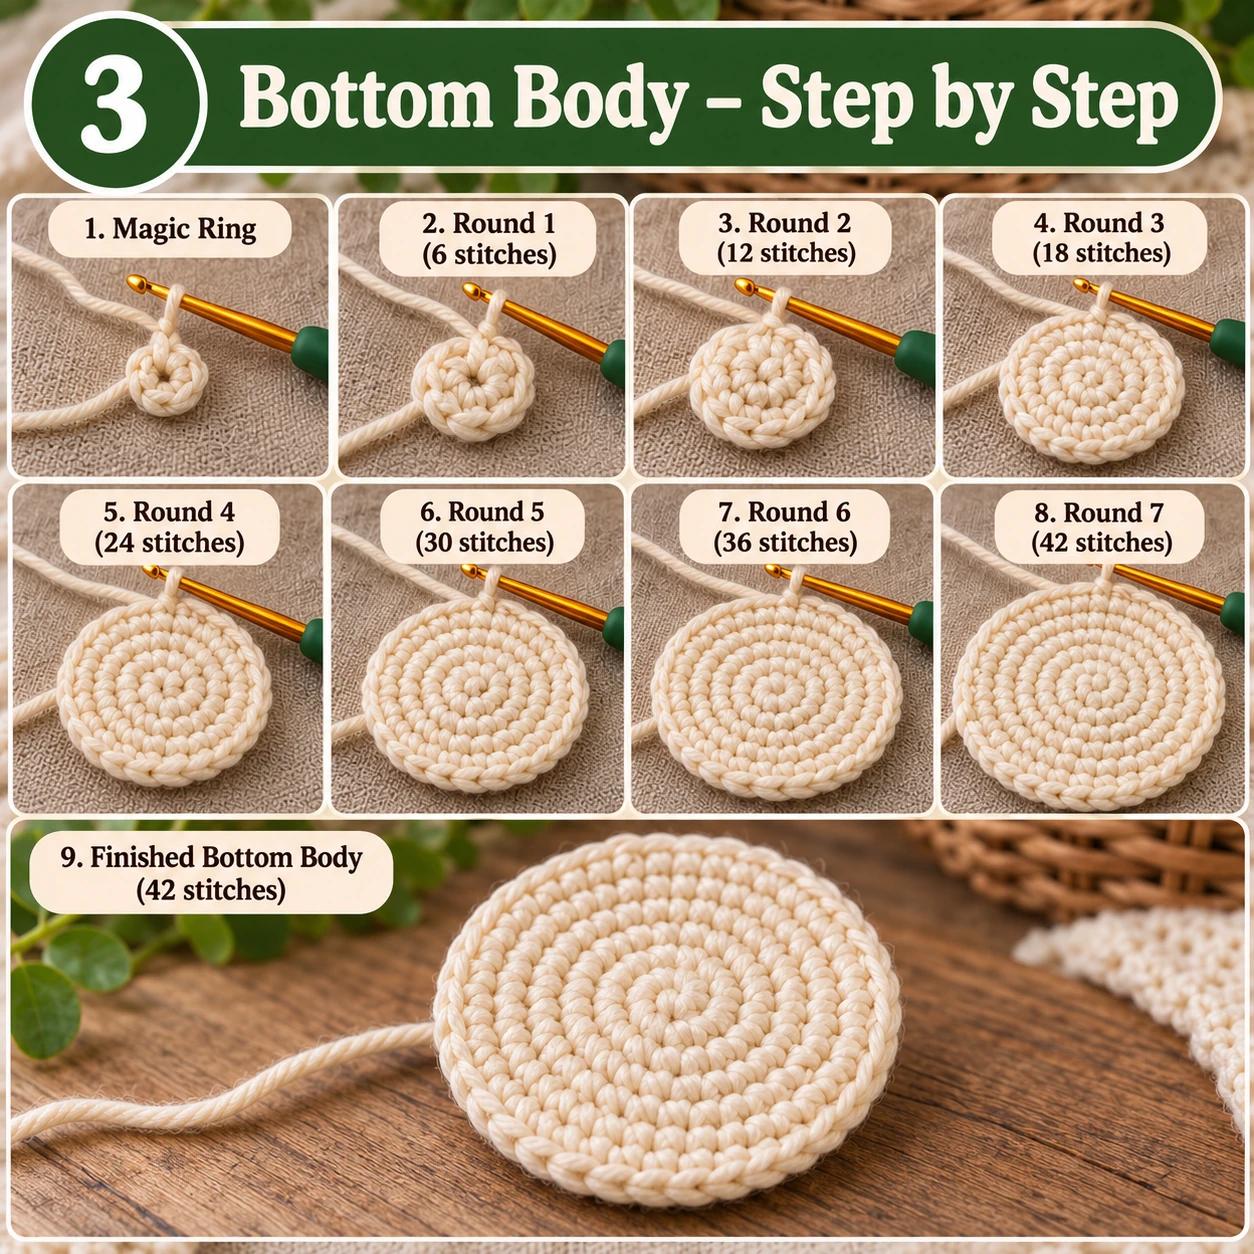
Use cream yarn. This flat piece forms the underside of the turtle.
Rnd 1: 6 sc in MR. (6)
Rnd 2: inc × 6. (12)
Rnd 3: (1 sc, inc) × 6. (18)
Rnd 4: (2 sc, inc) × 6. (24)
Rnd 5: (3 sc, inc) × 6. (30)
Rnd 6: (4 sc, inc) × 6. (36)
Fasten off and leave a long tail.
Crochet the Turtle Shell
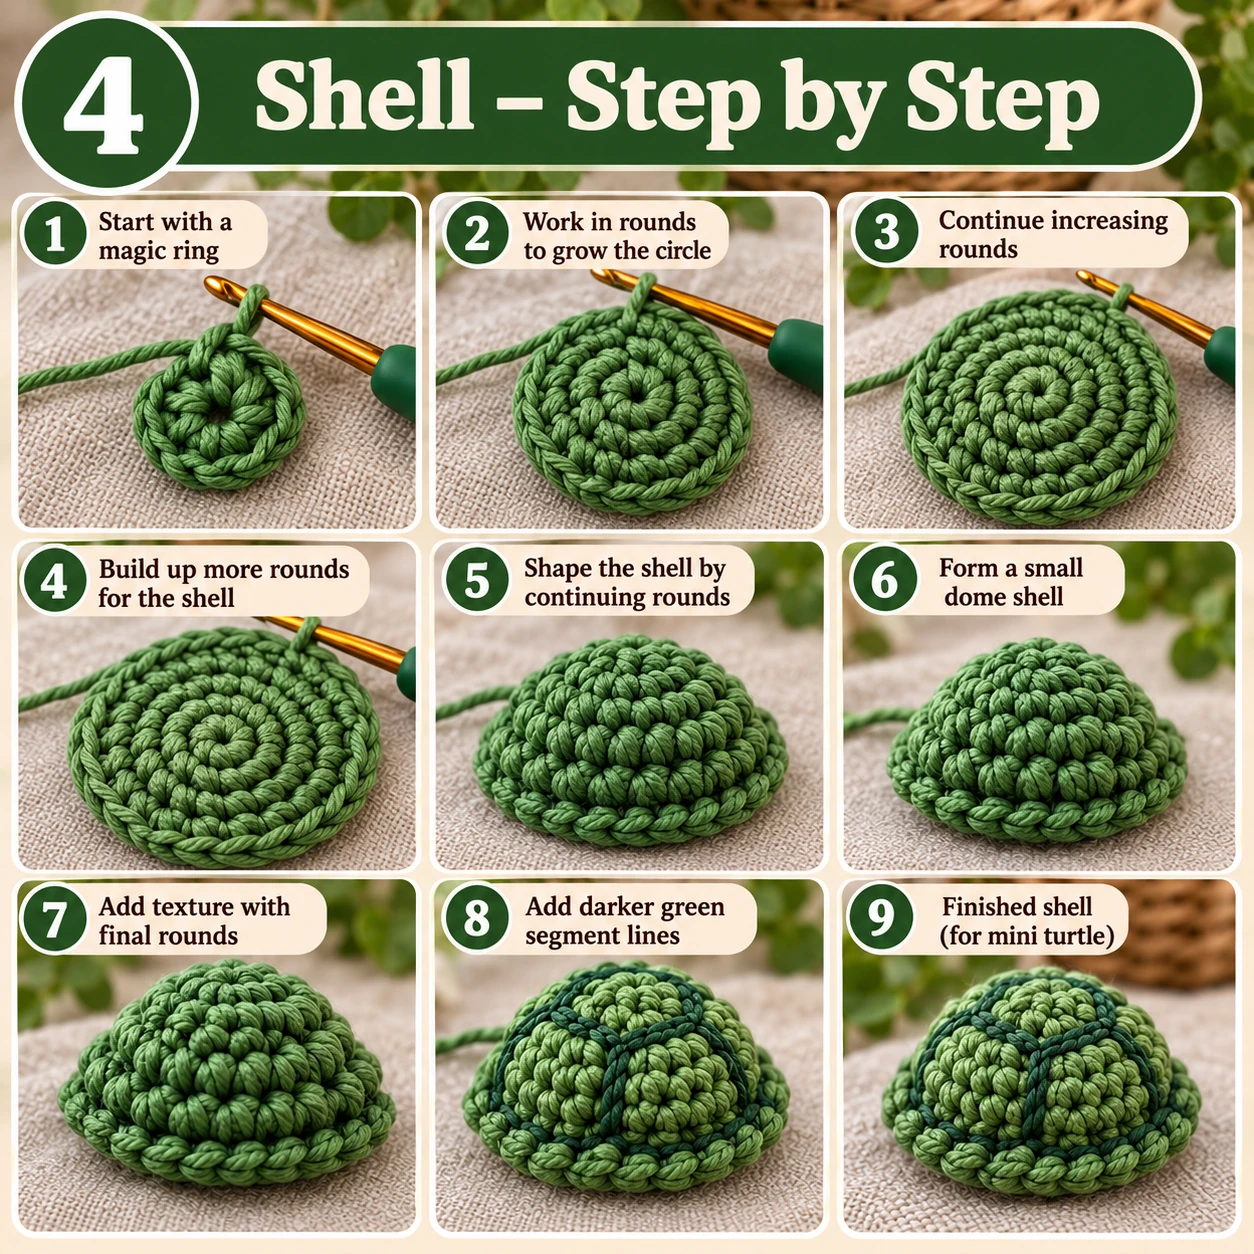
Switch to sage, moss, or another green yarn.
Rnd 1: 6 sc in MR. (6)
Rnd 2: inc × 6. (12)
Rnd 3: (1 sc, inc) × 6. (18)
Rnd 4: (2 sc, inc) × 6. (24)
Rnd 5: (3 sc, inc) × 6. (30)
Rnd 6: (4 sc, inc) × 6. (36)
Rnd 7–10: sc around. (36)
Fasten off with a long tail for joining. For more texture, embroider subtle darker green lines from the center toward the edge.
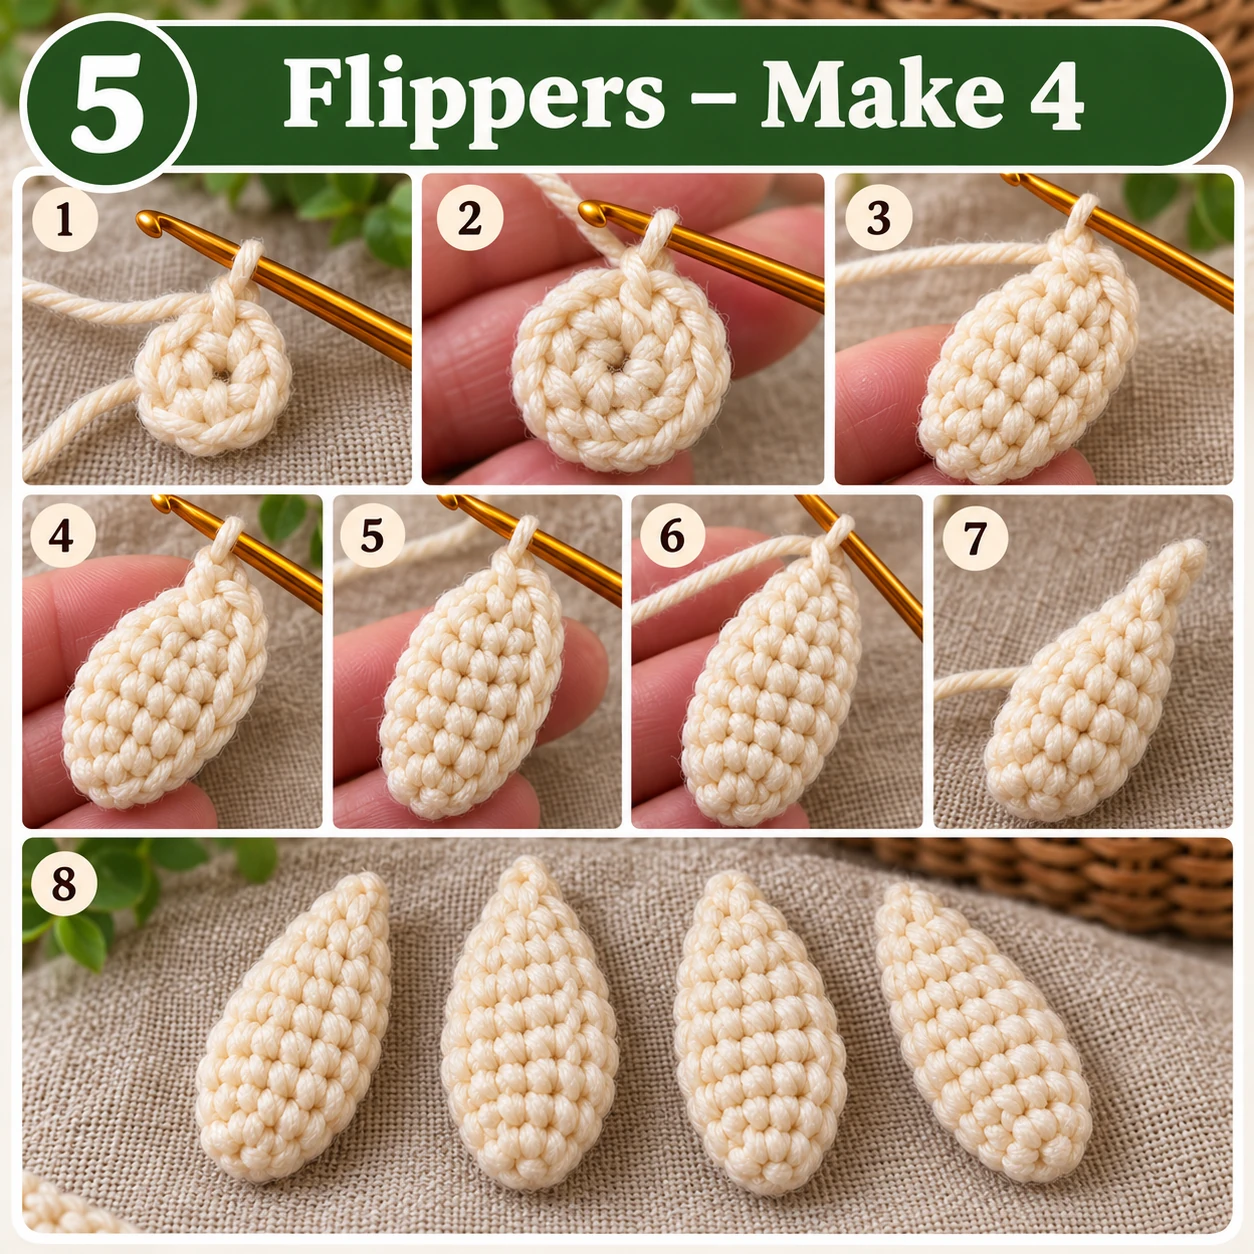
Make the Turtle Flippers
Make 4 in cream.
Rnd 1: 6 sc in MR. (6)
Rnd 2: inc × 6. (12)
Rnd 3: (1 sc, inc) × 6. (18)
Rnd 4: sc around. (18)
Rnd 5: (1 sc, dec) × 6. (12)
Do not stuff. Flatten the opening and work 6 sc through both layers to close. Fasten off and leave a long sewing tail.
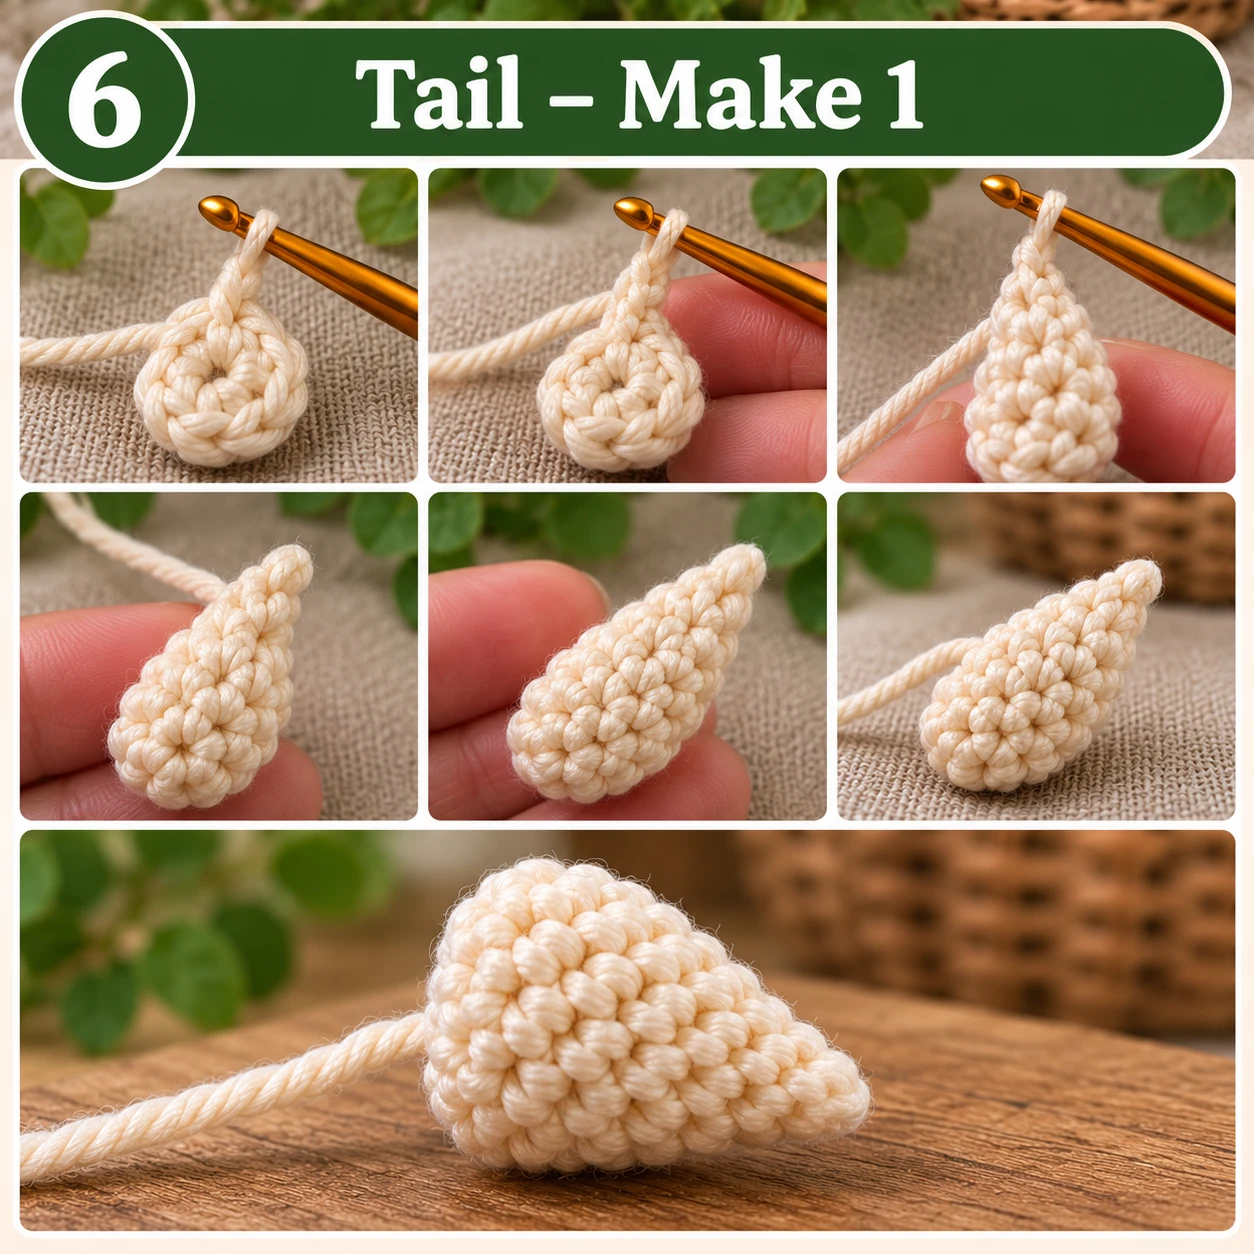
Make the Tail
Rnd 1: 4 sc in MR. (4)
Rnd 2: (1 sc, inc) × 2. (6)
Rnd 3: sc around. (6)
Rnd 4: (1 sc, dec) × 2. (4)
Do not stuff. Fasten off, leaving a long sewing tail.
Add the Turtle’s Face
Embroider a small curved smile between and slightly below the eyes. Add tiny pink stitches beside each eye for rosy cheeks if desired.
Safety note: Safety eyes are not suitable for very young children. Use securely embroidered facial features instead when making the toy for babies or toddlers.
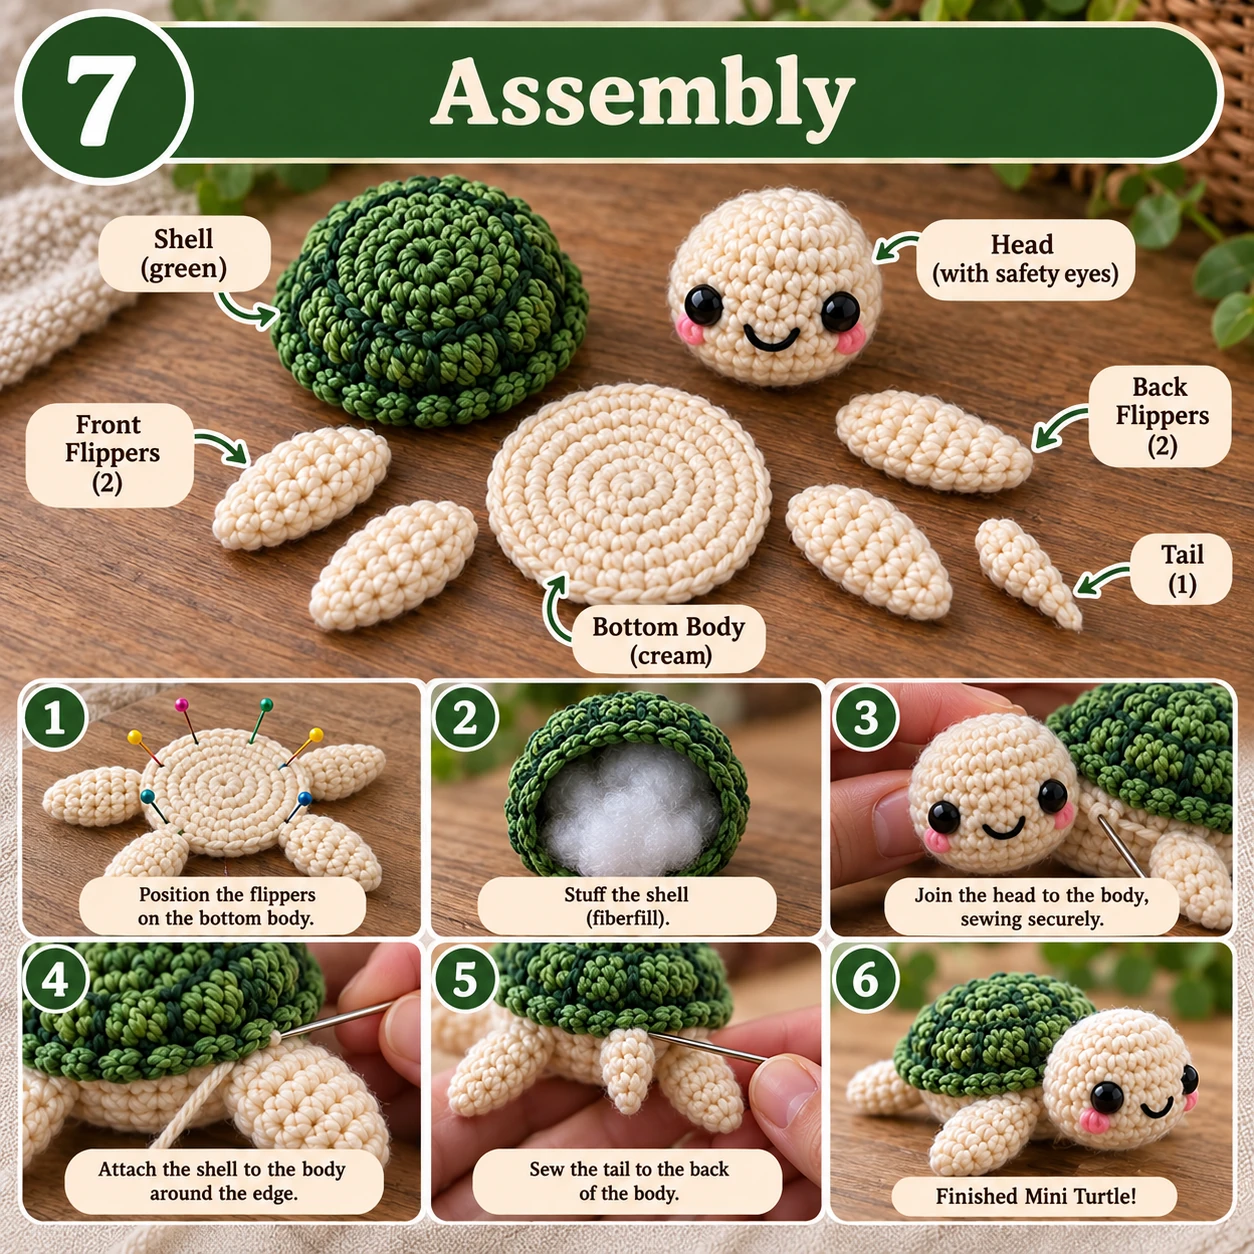
How to Assemble the Mini Crochet Turtle
- Position the four flippers around the bottom body and pin them.
- Place the tail at the center back and pin it.
- Sew the flippers and tail securely to the bottom body.
- Place the green shell over the cream bottom and sew around the perimeter, leaving an opening for stuffing.
- Add fiberfill until the shell is gently domed, then close the seam.
- Pin the head at the front center and sew securely around the neck opening.
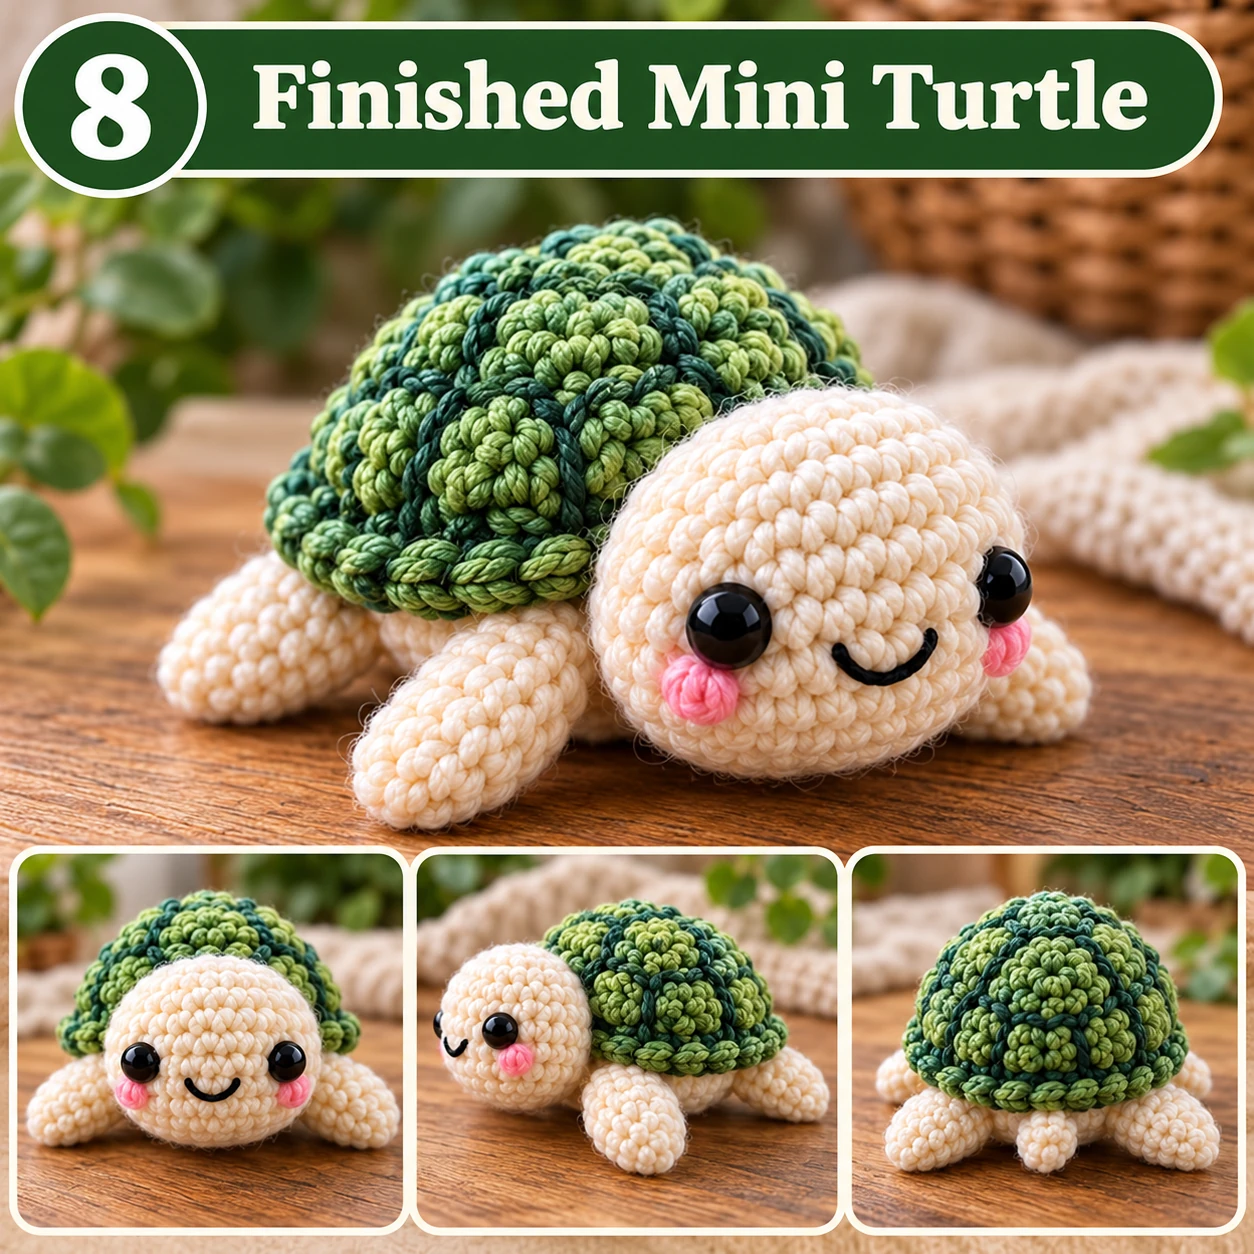
Check the Finished Turtle
Set the turtle on a flat surface and check it from the front, side, back, and top. The shell should form a smooth dome, the tail should sit between the rear flippers, and the head should be centered.
Mini Crochet Turtle Color Ideas
| Style | Body | Shell | Cheeks |
|---|---|---|---|
| Woodland | Cream | Sage green | Dusty pink |
| Sea Turtle | Pale green | Dark green | Soft coral |
| Pastel | Ivory | Mint | Baby pink |
| Ocean | Aqua | Teal | Peach |
| Neutral | Beige | Olive | Muted rose |
Common Problems and How to Fix Them
Why Is My Shell Flat?
Make sure you complete the even rounds after the increase rounds. Those rounds create the shell depth.
Why Can I See Stuffing Through the Stitches?
Your tension may be too loose. Try a slightly smaller hook or firmer tension.
Why Is the Head Wobbly?
Sew around the entire neck opening and make a second pass if needed.
Frequently Asked Questions
Is this mini crochet turtle pattern suitable for beginners?
It is best for a confident beginner who already knows single crochet, a magic ring, increases, and decreases.
What is the best yarn for a crochet turtle?
DK or light worsted cotton, cotton blend, or smooth acrylic works well.
Can I make the turtle without safety eyes?
Yes. Embroider the eyes with black yarn or embroidery thread instead.
How can I make the turtle smaller?
Use thinner yarn and an appropriately smaller crochet hook while keeping the same stitch counts.
This mini crochet turtle is a useful project for practicing magic rings, increases, decreases, shaping, stuffing, embroidery, and assembly while creating a cute small amigurumi animal.